Brother International SM3701 Operation Manual - Page 22
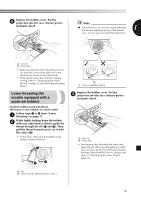
Using the needle threader, for models equipped with, a needle threader
 |
View all Brother International SM3701 manuals
Add to My Manuals
Save this manual to your list of manuals |
Page 22 highlights
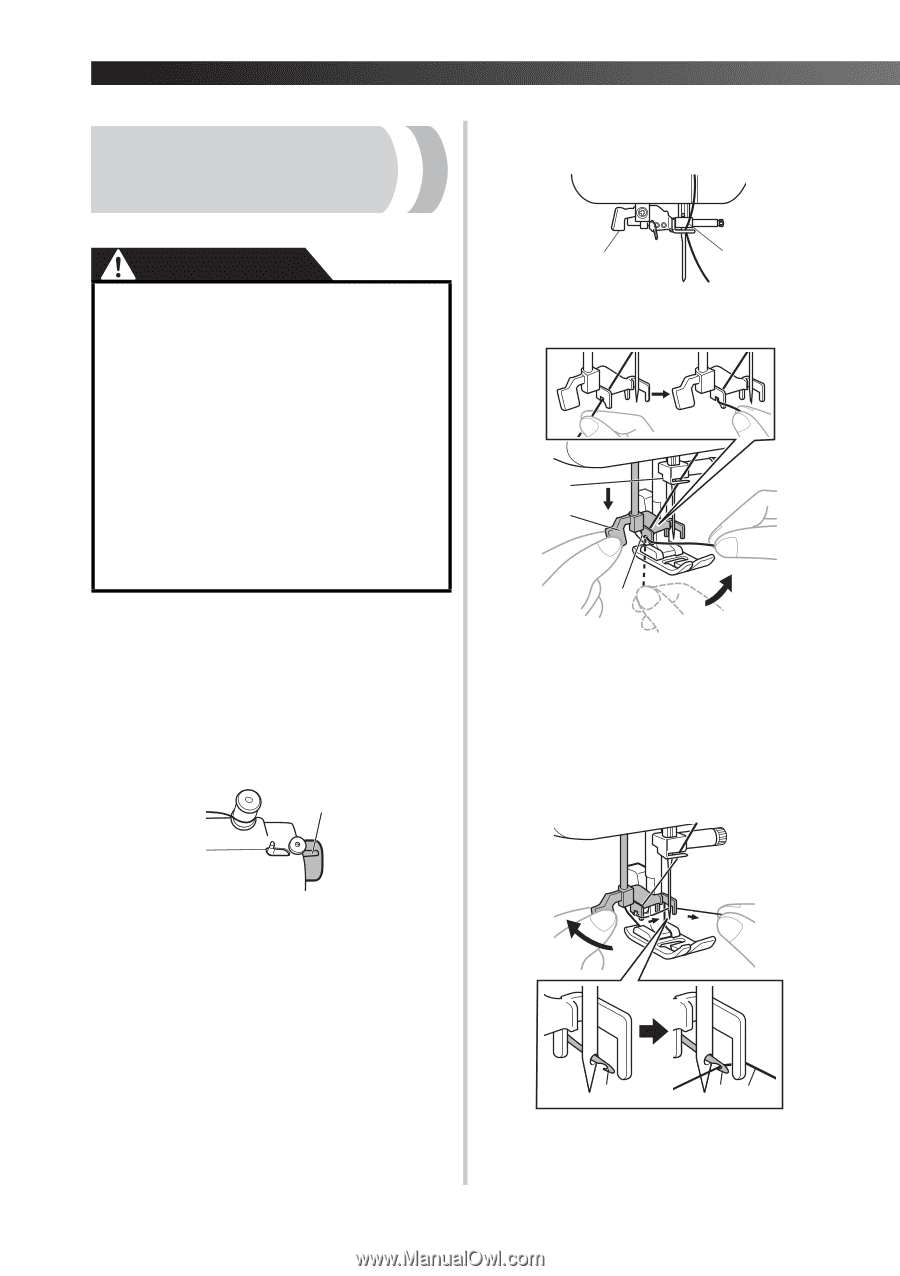
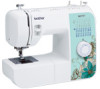
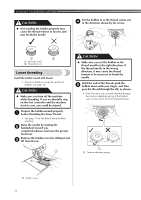
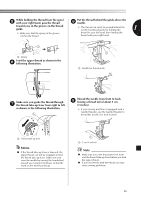
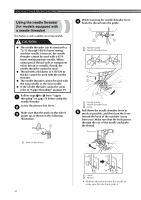
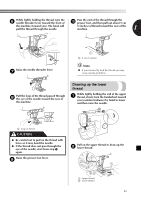
KNOWING YOUR SEWING MACHINE Using the needle threader (for models equipped with a needle threader) This feature is only available on certain models. CAUTION ● The needle threader can be used with a 75/11 through 100/16 home sewing machine needle. However, the needle threader cannot be used with a 65/9 home sewing machine needle. When using special thread such as transparent nylon thread or metallic thread, the needle threader cannot be used. ● Thread with a thickness of 130/120 or thicker cannot be used with the needle threader. ● The needle threader cannot be used with the wing needle or the twin needle. ● If the needle threader cannot be used, refer to "Upper threading" on page 19. Follow steps 1 to 8 from "Upper 1 threading" on page 19 before using the needle threader. Lower the presser foot lever. 2 Make sure that the mark on the wheel 3 points up as shown in the following illustration. 1 While lowering the needle threader lever, 4 hook the thread onto the guide. 2 1 1 Needle holder 2 Needle threader lever 1 2 3 1 Needle holder 2 Needle threader lever 3 Guide Pull down the needle threader lever as 5 much as possible, and then turn the lever toward the back of the machine (away from you). Make sure that the hook passes through the eye of the needle and grabs the thread. 1 Mark on the wheel 1 12 1 Hook 2 Thread • Hold the thread in front of the needle to make sure that the hook grabs it. 21
-
 1
1 -
2
-
3
-
4
-
5
-
6
-
7
-
8
-
9
-
10
-
11
-
12
-
13
-
14
-
15
-
16
-
 17
17 -
 18
18 -
 19
19 -
 20
20 -
 21
21 -
 22
22 -
 23
23 -
 24
24 -
 25
25 -
 26
26 -
 27
27 -
28
-
29
-
30
-
31
-
32
-
33
-
34
-
35
-
36
-
37
-
38
-
39
-
40
-
41
-
42
-
43
-
44
-
45
-
46
-
47
-
48
-
49
-
50
-
51
-
52
-
53
-
54
-
55
-
56
-
57
-
58
-
59
-
60
-
61
-
62
-
63
-
64
-
65
-
66
-
67
-
68
-
69
-
70
-
71
-
72
-
73
-
74
-
75
-
76
-
77
-
78
-
79
-
80
-
81
-
82
-
83
-
84
-
85
-
86
-
87
-
88
-
89
-
90
-
91
-
92
-
93
-
94
-
95
-
96
-
97
-
98
-
99
-
100
-
101
-
102
-
103
-
104
-
105
-
106
-
107
-
108
 |
 |