Brother International andtrade; QL-550 Quick Setup Guide - English - Page 2
Creating Labels
 |
View all Brother International andtrade; QL-550 manuals
Add to My Manuals
Save this manual to your list of manuals |
Page 2 highlights
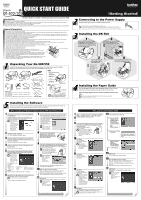
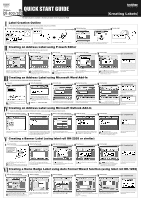
English Printed in China LB5719001A QUICK START GUIDE The User's Guide is available in the Manuals folder of the enclosed CD-ROM Label Creation Outline This section describes the general procedure for creating labels using your QL-500/550. 1 Choose the type of label you want to create. 2 Select the DK Roll. 3 Edit the label data. • Enter text in P-touch Editor. www.brother.com [Creating Labels] • Copy text from Microsoft Office. 4 Print the label. Shown above are a few of the type of labels you can create with the QL-500/550. Select an appropriate DK Roll for the label you have in mind, and insert the DK Roll in the QL-500/550. Separate DK Roll purchase may be necessary. Enter text directly using P-touch Editor, or copy text from a Microsoft Office application. Use P-touch Editor's variety of editing functions to format and decorate your label. Creating an Address Label using P-touch Editor Learn the basic workflow of P-touch Editor while creating a general label. 1 2 Start P-touch Editor and create a new label layout. Select the label size. 3 Enter the text. 4 Add a frame to the label. 5 Print the label. Print the label from the QL-500/550. Completed label Click [Start] - [All Programs (or Programs)] - [P-touch Editor 4.1] - [P-touch Editor]. Select "New Layout" in the dialog box displayed, and then click . Click on the Page Property box. If the required Property box is not displayed in the Property dock, click the corresponding button at the left of the dock to open it. Click in the Object dock to create a text box, and then enter the text. You can use the Text Property box to select options for formatting the text. Click in the Object dock. The Frame Properties dialog box appears. Select a frame and then click . Click in the Print Property box. If the required Property box is not displayed in the Property dock, click the corresponding button at the left of the dock to open it. Peel the printed label from backing and apply the label. Creating an Address Label using Microsoft Word Add-In Copy text from Microsoft Word and create an address label. 1 Copy text. 2 Verify the copied data. 3 Format the text. 4 Position the text box. 5 Print the label. Completed label In MS Word, select the text to be imported, and then click in the toolbar. Text can also be copied from MS Excel and MS Outlook. The Add-in Preview Window appears. Verify the contents. To make formatting changes click . Changes to the layout of a label can also be made using the Layout Style Function. For details refer to IV step 2 below. 2 Click on to print your label. Peel the printed label from backing and apply the label. Completed label Click the text box of the text you wish to format to select it. Use the Text Property box to change the text formatting. Select the text box you wish to move, then drag and drop to move it to the desired position. Click in the Print Property box. If the required Property box is not displayed in the Property dock, click the corresponding button at the left of the dock to open it. Peel the printed label from backing and apply the label. Creating an Address Label using Microsoft Outlook Add-In Create an address label using data from Microsoft Outlook, taking advantage of the Layout Style Function. 1 Copy the text from MS Outlook - Contacts. 2 Verify the copied data. 3 Select a Layout style for MS Outlook. 4 Verify the Layout. 5 Print the label. Completed label In Microsoft Outlook, select the contact to be imported, and then click in the Toolbar. The Add-in Preview Window appears. Verify the contents. The default layout style for the Standard Address DK roll is based on MS Word (Standard_Address_Default). To change the style for MS Outlook, click . The Apply Layout Style Window appears. Select the "Standard_Address_Outlook" layout and click . The Add-In Preview Window appears. Verify the Layout. If further editing is required, enter the P-touch Editor by clicking . Refer to step 2 of III. Click to print your label. If the contact does not have a Job Title, there may be a blank space before the address. Use P-touch Editor to change any formatting. Creating a Banner Label (using label roll DK-2205 or similar) Create a banner using DK Continuous Durable Paper Tape. 1 Insert the DK Roll. 2 Select the Tape Length. 3 Add clip art to the banner. 4 Enter the text. 5 Print the label. DK Continuous Durable Paper Tape 2-3/7 Peel the printed label from backing and apply the label. Completed label Insert the "DK Continuous Durable Paper Tape 2-3/7" into the QL-500/550. This DK Roll is provided as a starter roll with the QL-550. Separate purchase necessary when using the QL-500. Start P-touch Editor and create a new label layout. Use the tape length spin buttons in the Page Property box to set the banner length. Click in the Object dock. The Clip Art Gallery dialog box appears. Select a piece of clip art and then click . Click in the Object dock to create a text box, and then enter the text. Click in the Print Property box. If the required Property box is not displayed in the Property dock, click the corresponding button at the left of the dock to open it. Peel the printed label from backing and apply the label. Creating a Name Badge Label using Auto Format Wizard function (using label roll DK-1202) Create a name badge label quickly and easily using the Auto Format Wizard. 1 Start the Auto Format Wizard. 2 Select a category. 3 Select a template. 4 Enter the text. 5 Print the label. Completed label Start P-touch Editor, select "Use the Auto Format Wizard" in the dialog box displayed, and then click . This label cannot be created using the Starter Roll(s) provided with the QL-500/550. Separate purchase of suggested supply DK-1202 necessary. The Auto Format Wizard dialog box appears. Select a category "For Visitor Name Badges" and then click . A list of templates for the selected category appears. Select a template and then click . Change the text in the template's Input field. Use the and buttons to move between Input fields. Click when finished. Check the "Print Immediately After Creating the Layout" checkbox, and then click . Peel the printed label from backing and apply the label.
-
 1
1 -
 2
2
 |
 |
