Browning BAR ShortTrac Owners Manual - Page 20
Disassembly - finish
 |
View all Browning BAR ShortTrac manuals
Add to My Manuals
Save this manual to your list of manuals |
Page 20 highlights
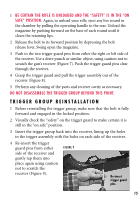
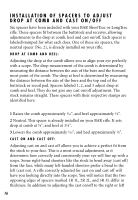
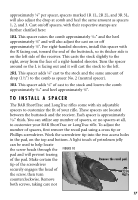
FIGURE 11 to scratch or mar the buttstock, and remove the Loosen the stock bolt. recoil pad (Figure 10). Using a long shaft flathead screwdriver, loosen the stock bolt completely by turning in a counterclockwise direction, and remove the stock bolt (Figure 11). FIGURE 12 Install with the rounded end toward the top. Completely remove the buttstock from the receiver. At this point you may add or remove the desired number of spacers. When adding spacers, make sure the rounded end of the spacers is installed towards the top of the rifle (Figure 12). When finished, fit the buttstock flush against the spacers or receiver and tighten in the stock bolt. Re-attach the recoil pad with the two screws, making sure not to scratch or mar the finish of the stock. D I S A S S E M B LY NEVER ATTEMPT TO TAKE YOUR BAR APART FURTHER THAN EXPLAINED IN THIS OWNER'S MANUAL. This rifle is a specialized, finely fitted mechanism. You may permanently mar it by attempting to disassemble the inner mechanism assemblies. Be sure to use eye protection whenever disassembling and reassembling your BAR due to the spring-tension parts. If further disassembly for service or cleaning is required, take your gun to a Browning recommended Service Center or a competent gunsmith, or send it to our Arnold, Missouri service facility as explained under "Service or Repair" on the inside back cover. 18
-
 1
1 -
2
-
3
-
4
-
5
-
6
-
7
-
8
-
9
-
10
-
11
-
12
-
13
-
14
-
 15
15 -
 16
16 -
 17
17 -
 18
18 -
 19
19 -
 20
20 -
 21
21 -
 22
22 -
 23
23 -
 24
24 -
 25
25 -
26
-
27
 |
 |
