Browning Citori Owners Manual - Page 8
Assembly, Barrel Selector, Top Lever - shotguns
 |
View all Browning Citori manuals
Add to My Manuals
Save this manual to your list of manuals |
Page 8 highlights
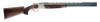
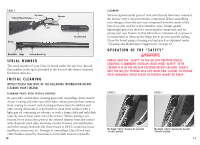
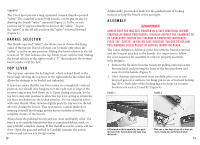
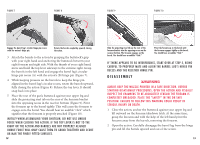
"Safety" The Citori incorporates a tang-mounted, manual thumb-operated "safety." The complete action (both barrels) can be put on safe by drawing the thumb "safety" rearward (Figure 3). In the on safe position an "S" appears directly in front of the "safety. " To put the "safety" in the off safe position the "safety" is moved forward (Figure 4). Barrel Selector The thumb-operated "safety" also allows you to choose the firing order of the barrels. Barrel selection can be made only when the "safety" is in the on safe position. Sliding the barrel selector to the left reveals an "O" that indicates the top barrel (over) will fire first. Sliding the barrel selector to the right reveals a "U" that indicates the bottom barrel (under) will fire first. TO P LEVER The top lever operates the locking bolt, which is hand fitted to the barrel lugs. Moving the top lever to the right unlocks the action and allows the shotgun to be loaded and unloaded. It is not necessary that the top lever return to a completely centered position, nor should it be hanging over the right side or edge of the receiver tang as you look down on it. Upon closing your gun, let the top lever snap into position to allow the top lever spring to return the top lever mechanism to the locked position. Do not retard its action with your thumb. Many shooters lightly push the top lever to the left after the closing the breech. This operation is a quick method of assuring yourself that foreign matter has not interfered with the complete closure of the breech. Always keep the polished breech surfaces clean and lightly oiled. The breech is so carefully hand fitted that accumulated debris, sand, etc. may prohibit complete closing. If this should occur the action will not close. Open the gun and unload it. Carefully examine the action surfaces and remove any foreign matter. 12 Additionally, provision is made for the gradual wear of locking surfaces to keep the breech of the gun tight. ASSEM B L Y ALWAYS KEEP the muzzles pointed in a safe direction. BEFORE STARTING ASSEMBLY PROCEDURES, VISUALLY INSPECT THE CHAMBERs TO BE ABSOLUTELY CERTAIN THE FIREARM IS COMPLETELY UNLOADED. place the "safety" in the on safe position. Failure to follow this warning could result in serious injury or death. The Citori shotgun is delivered in the box with the barrels removed and the forearm attached to the barrels. It is important to follow the exact sequence for assembly in order to properly assemble your shotgun. 1 Remove the forearm from the barrels by pulling outward on the forearm latch and pivoting the front of the forearm down and away from the barrels (Figure 5). 2 After cleaning exposed metal areas carefully, place one or two drops of gun oil at surfaces (A) hinge pin recess of forward locking lug; (B-C) both sides of the locking lug; two drops on forearm bracket (one each at D and E) (Figure 6). Figure 5 Figure 6 Pull outward on the forearm latch, then pivot the front of the forearm down and away from the barrels. D E A B C Place one or two drops of gun oil at hinge pin recess, locking lug, and forearm bracket. 13
-
 1
1 -
2
-
 3
3 -
 4
4 -
 5
5 -
 6
6 -
 7
7 -
 8
8 -
 9
9 -
 10
10 -
 11
11 -
 12
12 -
 13
13 -
14
-
15
-
16
-
17
-
18
-
19
 |
 |