Bushnell 11 1025 User Manual - Page 5
Operation Guide - 11
 |
View all Bushnell 11 1025 manuals
Add to My Manuals
Save this manual to your list of manuals |
Page 5 highlights
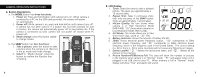
OPERATION GUIDE 1. The camera is powered by two "AAA" batteries (not included) or USB power (included) 2. Insert two AAA alkaline batteries into battery compartment 3. Press and hold MODE button until camera turns on. 4. Press SNAP to take a picture, or press MODE button quickly to change mode settings as described above. The camera is set at infinity and will not be focused on an object closer than 20 feet. 5. The mode setting operation is a cycle loop, so press MODE button to switch to another mode. The loop order of the different modes is shown here: 6. To change settings, toggle through the different modes by pressing the MODE button. When a mode is selected, the indicator symbol on the LCD will start flashing. You can then select that mode by then pressing the SNAP button. 7. When changing modes, if no buttons are pressed for 5 seconds, the camera will return to normal mode. 8. When in "Normal" mode, press SNAP to take a picture. 8 9. When in "Normal" mode, pressing the MODE button will cause the camera to enter "Mode Change." 10. To change to the "Self-Timer" mode, press MODE once and then press SNAP to select. The self-timer is now on. The camera will remain in this mode until you change the mode. Press MODE Press SNAP to enter this mode 11. When in "Normal" mode press MODE button twice to change to "Repeat Shot" mode. When you see the " " icon blinking, press SNAP to enter this mode (the " " icon will stop blinking). By pressing and holding the SNAP button you will now be able to take 3 consecutive pictures. The camera will remain in this mode until you change the mode or until the camera's memory is full. When memory is full the display will show "FUL" and an alarm will sound. Alarm will sound 9
-
 1
1 -
 2
2 -
 3
3 -
 4
4 -
 5
5 -
 6
6 -
 7
7 -
 8
8 -
 9
9 -
 10
10 -
 11
11 -
12
-
13
-
14
-
15
-
16
-
17
-
18
-
19
-
20
-
21
-
22
-
23
-
24
-
25
-
26
-
27
-
28
-
29
-
30
-
31
-
32
-
33
-
34
-
35
-
36
-
37
-
38
-
39
-
40
-
41
-
42
-
43
-
44
-
45
 |
 |
