Bushnell 78 9930 Owner's Manual - Page 6
Detailed Assembly - voyager telescope
 |
View all Bushnell 78 9930 manuals
Add to My Manuals
Save this manual to your list of manuals |
Page 6 highlights
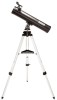
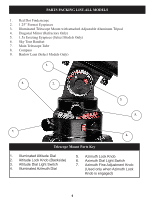
Detailed Assembly No tools are required for assembly of your telescope. Remove all components from the carton and identify all parts It is a good idea to lay all the parts out in front of you before assembly. Since your telescope is a precision optical system, the components require careful handling-particularly the Sky Tour Handset, Telescope, Eyepieces and various accessories. Set Up Tripod and Accessory Tray 1. Stand the Voyager Illuminated Mount Assembly with pre-attached tripod legs on a level surface. Spread the tripod legs to their fullest position. 2. Fold down the accessory tray braces and place the Quick Release Accessory Tray on top of the braces. 3 .Insert accessory tray bolt through the center of the accessory tray braces and tighten accessory tray bolt into the accessory tray brace. 4. Adjust the tripod height to suit by loosening the tripod leg adjustment bolts and extending the tripod legs to the desired height. Tighten the tripod leg adjustment bolts. Attach Telescope Tube 1. Locate Main Telescope Tube. 2. Remove the two telescope tube bolt nuts from the bolts extending from the under side of the telescope tube. 3. Position main telescope tube with the attachment bolts facing down through the two holes in the illuminated telescope mount top. 4. Reattach the telescope tube bolt nuts and tighten. Attach Final Telescope Accessories 1. Locate Red Dot Finderscope 2. Place finderscope over the corresponding attachment lug on the top of the telescope tube near the focusing mechanism. 3. Slide forward until the finderscope is seated securely. The large end of the finderscope should face the open end of the telescope tube. 4. Attach low power eyepiece. a. For Reflector Telescopes, insert eyepiece directly into the focusing tube mechanism. b. For Refractor Telescopes, insert eyepiece into the diagonal mirror, then insert the diagonal mirror into the focusing tube mechanism. 5. Tighten all set screws to secure accessories. Lens accessories Barlow Lens (Select Models) Some Voyager with Sky Tour units come with a Barlow lens. This accessory will allow you to now have dual use of any eyepiece. Simply put the Barlow lens between the focusing mechanism and the eyepiece for reflector style telescopes, or the focusing mechanism and the diagonal mirror on refractor style telescopes. Depending on the specification written on the Barlow lens, these accessories can double or even triple the magnification of the eyepiece when used with it. Remember, low power is always recommended, but higher powers are good especially on bigger and brighter objects such as the moon and planets. 6
-
 1
1 -
 2
2 -
 3
3 -
 4
4 -
 5
5 -
 6
6 -
 7
7 -
 8
8 -
 9
9 -
 10
10 -
 11
11 -
 12
12 -
13
-
14
-
15
-
16
-
17
-
18
-
19
-
20
-
21
-
22
-
23
-
24
-
25
-
26
-
27
-
28
-
29
-
30
-
31
-
32
-
33
-
34
-
35
-
36
-
37
-
38
-
39
-
40
-
41
-
42
-
43
-
44
-
45
-
46
-
47
-
48
-
49
-
50
-
51
-
52
-
53
-
54
-
55
-
56
-
57
-
58
-
59
-
60
-
61
-
62
-
63
-
64
-
65
-
66
-
67
-
68
-
69
-
70
-
71
-
72
-
73
-
74
 |
 |
