Bushnell Imageview Owner's Manual - Page 16
Downloading the Photos & Videos to Your PC - camera software
 |
View all Bushnell Imageview manuals
Add to My Manuals
Save this manual to your list of manuals |
Page 16 highlights
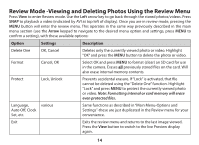
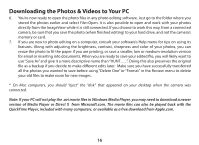
Downloading the Photos & Videos to Your PC 6. You're now ready to open the photo files in any photo editing software. Just go to the folder where you stored the photos earlier and select File>Open. It is also possible to open and work with your photos directly from the ImageView while it is still connected. If you choose to work this way, from a connected camera, be sure that you save the photo (when finished editing) to your hard drive, and not the camera's memory or card. 7. If you are new to photo editing on a computer, consult your software's Help menu for tips on using its features. Along with adjusting the brightness, contrast, sharpness and color of your photos, you can resize the photo to fit the paper if you are printing, or save a smaller, low or medium resolution version for email or inserting into documents. When you are ready to save your edited file, you will likely want to use "Save As" and give it a more descriptive name than "HUNT___". Doing this also preserves the original file as a backup if you decide to make different edits later. Make sure you have successfully transferred all the photos you wanted to save before using "Delete One" or "Format" in the Review menu to delete your old files to make room for new images. * On Mac computers, you should "eject" the "disk" that appeared on your desktop when the camera was connected. Note: If your PC will not play the .avi movie files in Windows Media Player, you may need to download a newer version of Media Player or Direct X from Microsoft.com. The movie files can also be played back with the QuickTime Player, included with many computers, or available as a free download from Apple.com. 16
-
 1
1 -
2
-
3
-
4
-
5
-
6
-
7
-
8
-
9
-
10
-
 11
11 -
 12
12 -
 13
13 -
 14
14 -
 15
15 -
 16
16 -
 17
17 -
 18
18 -
 19
19 -
 20
20
 |
 |
