Campbell Scientific PWS100 PWC100 Present Weather Sensor Calibrator - Page 14
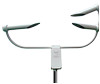
Step 5, Position 3: Right, Final calibration results
 |
View all Campbell Scientific PWS100 manuals
Add to My Manuals
Save this manual to your list of manuals |
Page 14 highlights
PWC100 Present Weather Sensor Calibrator Step 5: Position 3: Right • Move the calibrator into the right-hand position by unscrewing the calibrator mounting screws slightly and sliding the calibrator fully to the right. Then retighten the screws once in position. • Visually check that the calibrator is located correctly and securely. • LED R should now be flashing slowly and all other LEDs should be off. • Once you are ready, press START. • The test is now automated and the disk should start rotating. LED R will stay illuminated until this stage of the test is complete. • Wait for the calibration disk to stop rotating. This test will take approximately two and a half minutes. Final calibration results The calibration verification has now been completed. All three of the LEDs should be solidly illuminated indicating that the PWS100 is still within its calibration limits. If all three LEDs are flashing, then the calibration was found to be outside of desired levels and further action needs to be taken. If any of the calibration checks have failed (all three light flashing after test), then the tests should be re-run after ensuring the disk is clean and the area between the heads is clear of any obstructions. This should remove any chance that the calibrator or another external factor was the cause. If the PWC100 still indicates a problem, please contact Campbell Scientific for further advice. 8
-
 1
1 -
2
-
3
-
4
-
5
-
6
-
7
-
8
-
 9
9 -
 10
10 -
 11
11 -
 12
12 -
 13
13 -
 14
14 -
 15
15 -
 16
16 -
 17
17 -
 18
18 -
 19
19 -
20
-
21
-
22
 |
 |
