Canon 0206b003 Digital Photo Professional 3.8 for Macintosh Instruction Manual - Page 98
Introduction, Contents at, a Glance, Basic, Operation, Advanced, Image Editing, and Printing, Index
 |
UPC - 013803049626
View all Canon 0206b003 manuals
Add to My Manuals
Save this manual to your list of manuals |
Page 98 highlights
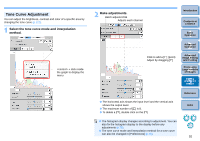
About trimmed images O The trimmed range can be reverted to its original condition at any time A trimmed image is displayed or printed as a trimmed image. However, since the image is not actually trimmed, you can always revert to the original image by clicking the [Reset] button in the trimming/angle adjustment window or performing the "Re-Editing an Image" procedure (p.103). O Display of the trimmed image in each window • Main window: The frame showing the trimming range is displayed on the image (p.109). • Edit window: The image is displayed in its trimmed condition. • Edit image window: The thumbnail image is the same as the main window display, and the enlarged image is the same as the edit window display. O Printing a trimmed image You can print as a trimmed image by printing it in DPP. O The image becomes a trimmed image when saved as a separate image The trimmed JPEG or TIFF image actually becomes a trimmed image when saved as a separate image (p.103). O Images that have aspect ratio set will be displayed as trimmed images When aspect ratio information is attached to an image shot with EOS1D Mark IV, EOS-1Ds Mark III, EOS-1D Mark III or EOS 7D, the set trimming range based on the aspect ratio information is displayed. However, since the image is not actually trimmed, you can change the trimming range or revert to the condition before trimming. When reverting to the condition before trimming is performed based on the aspect ratio information at the time of shooting, click the [Reset] button. Also, if you want to cancel all the trimming range, click the [Clear] button (p.117). Convenient functions of the trimming/angle adjustment window O Switch between screens using the keyboard You can also switch between full screen display/normal screen display by pressing the < > + keys. O Operate using the menu Each operation can also be performed with the menu which appears by clicking on the image while holding down the key. O Apply the trimmed range to another image You can apply the trimmed range to another image by clicking the [Copy] button to copy the trimmed range, displaying another image and then clicking the [Paste] button. To batch apply a copied trimming range to multiple images, select the trimmed image and the multiple images to which you want to apply the trimmed range in the main window, and display the trimming/angle adjustment window. With the trimmed image displayed, click the [Copy] button and then click the [Apply All] button. This will apply the trimming range to all the images selected when the trimming/angle adjustment window is displayed. Introduction Contents at a Glance 1Basic Operation 2Advanced Operation 3Advanced Image Editing and Printing 4 Processing Large Numbers of Images 5Editing JPEG/TIFF Images For images shot with ISO speed range expansion set, noticeable noise may make it difficult to view image details in the trimming/ angle adjustment window, so using this function is not recommended. For a list of the trimming/angle adjustment window functions, refer to p.117. Reference Index 97
-
 1
1 -
2
-
3
-
4
-
5
-
6
-
7
-
8
-
9
-
10
-
11
-
12
-
13
-
14
-
15
-
16
-
17
-
18
-
19
-
20
-
21
-
22
-
23
-
24
-
25
-
26
-
27
-
28
-
29
-
30
-
31
-
32
-
33
-
34
-
35
-
36
-
37
-
38
-
39
-
40
-
41
-
42
-
43
-
44
-
45
-
46
-
47
-
48
-
49
-
50
-
51
-
52
-
53
-
54
-
55
-
56
-
57
-
58
-
59
-
60
-
61
-
62
-
63
-
64
-
65
-
66
-
67
-
68
-
69
-
70
-
71
-
72
-
73
-
74
-
75
-
76
-
77
-
78
-
79
-
80
-
81
-
82
-
83
-
84
-
85
-
86
-
87
-
88
-
89
-
90
-
91
-
92
-
 93
93 -
 94
94 -
 95
95 -
 96
96 -
 97
97 -
 98
98 -
 99
99 -
 100
100 -
 101
101 -
 102
102 -
 103
103 -
104
-
105
-
106
-
107
-
108
-
109
-
110
-
111
-
112
-
113
-
114
-
115
-
116
-
117
-
118
-
119
-
120
-
121
-
122
-
123
-
124
-
125
-
126
-
127
-
128
-
129
 |
 |