Canon 0206b003 Digital Photo Professional INSTRUCTION MANUAL Windows (EOS DIGI
Canon 0206b003 - EOS Digital Rebel XT Camera SLR Manual
 |
UPC - 013803049626
View all Canon 0206b003 manuals
Add to My Manuals
Save this manual to your list of manuals |
Canon 0206b003 manual content summary:
- Canon 0206b003 | Digital Photo Professional INSTRUCTION MANUAL Windows (EOS DIGI - Page 1
Windows CT1-1293-000 © CANON INC. 2005 E INSTRUCTION MANUAL - Canon 0206b003 | Digital Photo Professional INSTRUCTION MANUAL Windows (EOS DIGI - Page 2
, fixes or support will be made available for the SOFTWARE. 4. LIMITED WARRANTY AND LIMITATION OF LIABILITY: It is your responsibility to choose, maintain and match the hardware and software components of your computer system. Thus Canon does not guarantee uninterrupted service or correction of - Canon 0206b003 | Digital Photo Professional INSTRUCTION MANUAL Windows (EOS DIGI - Page 3
if you fail to comply with any of the terms of this Agreement and you must then promptly return the SOFTWARE. In addition, Canon may enforce its other legal rights. 6. U.S. GOVERNMENT RESTRICTED RIGHTS NOTICE: The SOFTWARE is provided with restricted rights. Use, duplication or disclosure is subject - Canon 0206b003 | Digital Photo Professional INSTRUCTION MANUAL Windows (EOS DIGI - Page 4
Manual 5 Main Features and Structure 6 Operation Flow...7 Supported troubleshooting, the instructions on uninstalling Digital Photo Professional, and shortcut key list to allow you to use Digital Photo Professional easily. Shortcut Key List 4-4 Index ...4-8 Trademark Acknowledgments O Canon - Canon 0206b003 | Digital Photo Professional INSTRUCTION MANUAL Windows (EOS DIGI - Page 5
Instruction Manual may differ slightly from the actual software. O The contents of this Instruction Manual has been reviewed thoroughly. However, if you should notice any errors or omissions, please contact Canon Service ] are used to indicate items such as button names and prevent problems that - Canon 0206b003 | Digital Photo Professional INSTRUCTION MANUAL Windows (EOS DIGI - Page 6
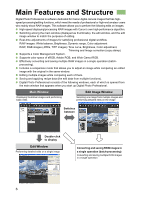
for Canon digital camera images that digital workflow. RAW images: White balance, Brightness, Dynamic range, Color adjustment RAW, RGB images (JPEG, TIFF images): Tone curve, Brightness, Color adjustment, Trimming and Image correction (copy stamp) O Supports a Color Management System. O Supports - Canon 0206b003 | Digital Photo Professional INSTRUCTION MANUAL Windows (EOS DIGI - Page 7
Photo Professional. Example 1: Displaying Thumbnail Images and Performing Basic Edits in the Main Window Start up Digital Photo Professional (1-2). Display an image in the main window (1-6). Perform the basic edits on the image (1-15, 1-22). Convert and save images in a single operation(1- - Canon 0206b003 | Digital Photo Professional INSTRUCTION MANUAL Windows (EOS DIGI - Page 8
Operation Flow Example 2: Performing Detailed Edits on a Single Image in the Edit Window Start up Digital Photo Professional (1-2). Select an image in the main window (1-7). Display the image in the edit window (2-2). Edit the image (2-7, 2-12). Compare the edited image with - Canon 0206b003 | Digital Photo Professional INSTRUCTION MANUAL Windows (EOS DIGI - Page 9
Flow Example 3: Selecting One Image from Multiple Images and Performing Detailed Edits on the Image in the Edit Image Window Start up Digital Photo Professional (1-2). Select images in the main window (1-7). Display the images in the edit image window (3-2). Edit the image (1-15, 1-22, 2-7, 2-12 - Canon 0206b003 | Digital Photo Professional INSTRUCTION MANUAL Windows (EOS DIGI - Page 10
Supported Images Image Type RAW images shot on an EOS-1Ds Mark II, EOS-1D Mark II, EOS 20D or EOS DIGITAL REBEL XT/350D DIGITAL camera RAW images shot on an EOS-1Ds or EOS-1D camera RAW images shot on an EOS 10D, EOS D60, EOS DIGITAL REBEL/300D DIGITAL or PowerShot Pro1* camera Exif 2.2 or 2.21- - Canon 0206b003 | Digital Photo Professional INSTRUCTION MANUAL Windows (EOS DIGI - Page 11
the functions of the main window, and how to display images and perform basic edits on them. 1 Starting up Digital Photo Professional ... 1-2 Displaying Images 1-6 Selecting Images 1-7 Selecting All Images 1-7 Selecting Images According to Conditions 1-7 Handling the Folders 1-8 Registering - Canon 0206b003 | Digital Photo Professional INSTRUCTION MANUAL Windows (EOS DIGI - Page 12
Start] button ` select [All Programs] ([Programs] in Windows 2000) ` [Canon Utilities] ` [Digital Photo Professional x.x] ` [Digital Photo Professional]. O Alternatively, you can start up Digital Photo Professional by double-clicking the [Digital Photo Professional] icon on the desktop. Main Window - Canon 0206b003 | Digital Photo Professional INSTRUCTION MANUAL Windows (EOS DIGI - Page 13
Starting up Digital Photo Professional File menu Menu Bar 2-2 1-33 1-33 1-33 1-34 1-36 1-40 1-40 1 1-10 1-13 1-2 Edit menu Pastes images on the clipboard. Copies images to - Canon 0206b003 | Digital Photo Professional INSTRUCTION MANUAL Windows (EOS DIGI - Page 14
Sets a check mark for the image. Removes the set check mark. Tools menu 1-41 1-18 1-20 1-38 1-42 Help menu Displays the version information of Digital Photo Professional. For the shortcut key list, see 4-4. 1-4 - Canon 0206b003 | Digital Photo Professional INSTRUCTION MANUAL Windows (EOS DIGI - Page 15
Starting up Digital Photo Professional Displaying Thumbnail Images and Performing Basic Edits in the Main Window Toolbar Clear check button Removes a [R] symbol is displayed). No symbol is displayed for JPEG and TIFF images. The [RAW] mark is not displayed for PowerShot Pro1 RAW images. 1-5 - Canon 0206b003 | Digital Photo Professional INSTRUCTION MANUAL Windows (EOS DIGI - Page 16
and taken with the EOS 10D, EOS DIGITAL REBEL/ 300D DIGITAL or PowerShot Pro1 may display with the sRGB color space applied. O A RAW image taken with the EOS 20D or EOS DIGITAL REBEL XT/350D DIGITAL in [B/W] setting will be displayed as a color image. O See "Supported Images" (10) for image that you - Canon 0206b003 | Digital Photo Professional INSTRUCTION MANUAL Windows (EOS DIGI - Page 17
Displaying Thumbnail Images and Performing Basic Edits in the Main Window Selecting Images Click the target image. ¿ The frame around the selected image is colored. O To select multiple images, hold down the key and click the images. O To select sequential images, click the first - Canon 0206b003 | Digital Photo Professional INSTRUCTION MANUAL Windows (EOS DIGI - Page 18
Handling the Folders You can handle the folder on the menu that appears by right-clicking the folder. Right-click on the folder and select an option from the menu that appears. O You can drag and drop folders to move them from the Tree View Area to the other folders. You can also copy the folders by - Canon 0206b003 | Digital Photo Professional INSTRUCTION MANUAL Windows (EOS DIGI - Page 19
Displaying Thumbnail Images and Performing Basic Edits in the Main Window Handling the Folders Organizing Frequent Use Folders You can change the name of the folder or delete the folder that was registered with the [Bookmark] menu. 1 Select [Bookmark] menu ` [Organize]. ¿ The [Sort bookmarks] - Canon 0206b003 | Digital Photo Professional INSTRUCTION MANUAL Windows (EOS DIGI - Page 20
.JPG] (JPEG images), [CRW_YYYY.THM] (images for displaying camera indexes) is saved in the folder [xxxCANON] where images you have taken with the EOS 10D, EOS DIGITAL REBEL/ 300D DIGITAL, EOS D60 and PowerShot Pro1 are saved. With Digital Photo Professional, [CRW_YYYY.THM] images are not displayed - Canon 0206b003 | Digital Photo Professional INSTRUCTION MANUAL Windows (EOS DIGI - Page 21
Displaying Thumbnail Images and Performing Basic Edits in the Main Window Selecting the Image Display Mode You can change the display size or method and sort images according to conditions. Selecting the Thumbnail Size The available image sizes are [Large thumbnail], [Middle thumbnail], and [Small - Canon 0206b003 | Digital Photo Professional INSTRUCTION MANUAL Windows (EOS DIGI - Page 22
Selecting the Image Display Mode Displaying the Edit Window You can enlarge the image and perform detailed edits. Double-click an image. ¿ The edit window appears. O See Chapter 2 "Performing Detailed Edits in the Edit Window" for the information on the edit window. Displaying the Edit Image Window - Canon 0206b003 | Digital Photo Professional INSTRUCTION MANUAL Windows (EOS DIGI - Page 23
dialog box. Image information may not appear for JPEG images set to Adobe RGB and taken with the EOS 10D, EOS DIGITAL REBEL/300D DIGITAL or PowerShot Pro1. 1 Sorting Images You can sort images according to conditions. Select [View] menu ` [Sort] ` [File name], [RAW priority], [Check mark], or - Canon 0206b003 | Digital Photo Professional INSTRUCTION MANUAL Windows (EOS DIGI - Page 24
Selecting the Image Display Mode Hiding the Tree View Area Click the [Folders] button. O Alternatively, you can hide the Tree View Area by selecting [View] menu ` [Folders]. O Performing the same operation again shows the Tree View Area. Hiding the Toolbar Select [View] menu ` [Toolbar]. O - Canon 0206b003 | Digital Photo Professional INSTRUCTION MANUAL Windows (EOS DIGI - Page 25
perform various edits on the RAW, JPEG, and TIFF images that are supported by Digital Photo Professional. 1 Select an image (1-7). 2 Edit the image (1-15 Left] or [Rotate Right]. O Images that were shot with the camera held vertically with [Auto rotate] setting to are automatically displayed - Canon 0206b003 | Digital Photo Professional INSTRUCTION MANUAL Windows (EOS DIGI - Page 26
Editing Images Click White Balance Function Makes white the standard for the part you selected and automatically adjusts the white balance. 1 Click the [Click] button. ¿ When you move the cursor over the image, the cursor [ ] changes to [ ]. 2 Click the part where is to be the standard. ¿ The white - Canon 0206b003 | Digital Photo Professional INSTRUCTION MANUAL Windows (EOS DIGI - Page 27
Editing Images Adjusting the Brightness You can adjust the brightness of an image in the range of -100 to +100 in 1-stop increments. 1 Click the [Brightness] button. ¿ The [Brightness adjustment] dialog box appears. O Alternatively, you can display this dialog box by selecting [Adjustment] - Canon 0206b003 | Digital Photo Professional INSTRUCTION MANUAL Windows (EOS DIGI - Page 28
Editing Images Trimming an Image You can trim an image within your desired range. 1 Select the [Tools] menu ` [Start Trimming Tool]. ¿ The trimming window appears. 2 Trim the image. O Select a ratio from the [Aspect ratio] list box, and drag the trimming range as shown in the diagram. Displays the - Canon 0206b003 | Digital Photo Professional INSTRUCTION MANUAL Windows (EOS DIGI - Page 29
Select the vertical/horizontal ratio of the trimming range. Editing Images Returns settings to the original settings. Displaying Thumbnail Images and Performing Basic Edits in the Main Window Displays the upper left coordinates of the trimming range you have set. You can also set the coordinates - Canon 0206b003 | Digital Photo Professional INSTRUCTION MANUAL Windows (EOS DIGI - Page 30
Editing Images Correcting an Image You can copy a section of an image and paste ("stamp") it on top of an area you want to correct in the same image. 1 Select the [Tools] menu X [Start Stamp tool]. ¿ The copy stamp tool window appears. 2 Click the [100% View] button. ¿ The image is displayed in the - Canon 0206b003 | Digital Photo Professional INSTRUCTION MANUAL Windows (EOS DIGI - Page 31
Editing Images Displaying Thumbnail Images and Performing Basic Edits in the Main Window Specifies the section to copy. Only available with [100% View]. Displays the image in the 100% view. Click this button again to display the image in the size that fits to the window. Fix the position of copy - Canon 0206b003 | Digital Photo Professional INSTRUCTION MANUAL Windows (EOS DIGI - Page 32
You can perform various edits on the RAW images that are supported by Digital Photo Professional. 1 Select a RAW image (1-7). 2 Edit the 3 Save the edited image (1-33). O You cannot edit PowerShot Pro1 RAW images. O Before exiting Digital Photo Professional, you must save the edited images (1-33). O - Canon 0206b003 | Digital Photo Professional INSTRUCTION MANUAL Windows (EOS DIGI - Page 33
Editing RAW Images Adjusting the White Balance You can adjust the white balance using the mode settings, color temperature settings, color wheel, and click white balance function. 1 Click the [White balance] button. ¿ The [White balance adjustment] dialog box appears. O Alternatively, you can - Canon 0206b003 | Digital Photo Professional INSTRUCTION MANUAL Windows (EOS DIGI - Page 34
) light. Approx. 3200 Fluorescent light For white fluorescent light. Approx. 4000 Flash When flash is used. Approx. 6000 Color temp. You can manually set color temperature for 2800 to 10000K (in 100K increments) (1-25). Approx. 2800 to 10000 Click white Displayed for images on which you - Canon 0206b003 | Digital Photo Professional INSTRUCTION MANUAL Windows (EOS DIGI - Page 35
Displaying Thumbnail Images and Performing Basic Edits in the Main Window Editing RAW Images Specifying the Color Temperature You can specify the color temperature in the range of 2800 to 10000K (in 100K increments) to adjust the white balance. 1 Select [Color temp.]. 1 2 Adjust an image while - Canon 0206b003 | Digital Photo Professional INSTRUCTION MANUAL Windows (EOS DIGI - Page 36
Editing RAW Images Adjusting with the Color Wheel You can select a desired color from the color wheel to adjust the white balance. You can also specify the hue in the range of 0 to 359 (in 1-stop increments), and the saturation in the range of 0 to 255 (in 1-stop increments). 1 Click the [Tune] - Canon 0206b003 | Digital Photo Professional INSTRUCTION MANUAL Windows (EOS DIGI - Page 37
Displaying Thumbnail Images and Performing Basic Edits in the Main Window Editing RAW Images Click White Balance Function Makes white the standard for the part you selected and automatically adjusts the white balance. 1 Click the [Click (RAW)] button. ¿ When you move the cursor over the image, the - Canon 0206b003 | Digital Photo Professional INSTRUCTION MANUAL Windows (EOS DIGI - Page 38
Editing RAW Images Adjusting the Brightness You can adjust the brightness in the range of -2.0 to +2.0 (in one-sixth-stop increments for the slider, and in 0.01-stop increments when entering a value). 1 Click the [Brightness (RAW)] button. ¿ The [Brightness adjustment] dialog box appears. O - Canon 0206b003 | Digital Photo Professional INSTRUCTION MANUAL Windows (EOS DIGI - Page 39
Photo Professional supports the color space of sRGB, Adobe RGB, and Wide Gamut RGB. sRGB : Widely used for the standard color space of monitors, digital cameras, and scanners. Adobe RGB : A wider color space than sRGB. Mainly used for printing for business purposes. Wide Gamut RGB : A wider - Canon 0206b003 | Digital Photo Professional INSTRUCTION MANUAL Windows (EOS DIGI - Page 40
and applied to other images. Editing data can also be saved as a separate file containing editing data only and loaded into other images. In Digital Photo Professional, editing data is referred to as "recipe data". Saving the Recipes 1 Select an image and then select [Edit] menu ` [Save recipe in - Canon 0206b003 | Digital Photo Professional INSTRUCTION MANUAL Windows (EOS DIGI - Page 41
Using Edits (Recipe Data) Copying Recipes and Applying to Other Images 1 Select the image from which a recipe will be copied and then select [Edit] menu ` [Copy recipe to clipboard]. ¿ The recipe is copied. 2 Select the image to which the recipe will be applied and then select [Edit] menu ` [ - Canon 0206b003 | Digital Photo Professional INSTRUCTION MANUAL Windows (EOS DIGI - Page 42
Reverting Edited Images to Their Original Condition You can cancel all the edits for images, and revert the edited images to their original settings before being edited or when shots were taken. Reverting to Last Saved Settings Select an image and then select [Adjustment] menu ` [Revert to last - Canon 0206b003 | Digital Photo Professional INSTRUCTION MANUAL Windows (EOS DIGI - Page 43
Displaying Thumbnail Images and Performing Basic Edits in the Main Window Saving Edited Images You can apply edits to one or more images and save the edited images. Saving by Overwriting You can apply edits to an image and overwrite the existing image. Select an image and then select [File] menu ` - Canon 0206b003 | Digital Photo Professional INSTRUCTION MANUAL Windows (EOS DIGI - Page 44
Saving Edited Images Converting and Saving RAW Images while Renaming Them You can convert edited RAW images to the TIFF or JPEG and save them with another name. 1 Select an image and then select [File] menu ` [Convert and save]. ¿ The [Save As] dialog box appears. Specify the drive or folder to - Canon 0206b003 | Digital Photo Professional INSTRUCTION MANUAL Windows (EOS DIGI - Page 45
Saving Edited Images When [Exif-JPEG] is selected from the [Save as type] list box, specify one of 10 levels ([1] to [10]) of image quality (compression rate). Higher values give better JPEG image quality. Specify one of 6 levels ([0] to [5]) of sharpness for the image to be saved. Higher values - Canon 0206b003 | Digital Photo Professional INSTRUCTION MANUAL Windows (EOS DIGI - Page 46
Saving Edited Images Converting and Saving Images in a Single Operation (Batch-processing) You can save and rename multiple edited images in a single operation. You can also convert edited RAW images to JPEG or TIFF formats and save them in a single operation. 1 Edit an image (1-15 to 1-29). 2 - Canon 0206b003 | Digital Photo Professional INSTRUCTION MANUAL Windows (EOS DIGI - Page 47
Saving Edited Images Displaying Thumbnail Images and Performing Basic Edits in the Main Window Specify a value between 1 and 60,000 dpi as the output resolution used for the images to be saved. Click this checkbox to embed an ICC profile in the images to be saved. Set the height of the images. - Canon 0206b003 | Digital Photo Professional INSTRUCTION MANUAL Windows (EOS DIGI - Page 48
and the file names are changed. Set the file name by selecting [String], [Shooting Date/Time] and [Sequence number] from each item. You can set [String] for more than one item but you can only set [Shooting Date/Time] and [Sequence number] for one of each. To set [Shooting Date/Time] or - Canon 0206b003 | Digital Photo Professional INSTRUCTION MANUAL Windows (EOS DIGI - Page 49
Displaying Thumbnail Images and Performing Basic Edits in the Main Window Saving Edited Images Transferring Images to Retouching Software You can transfer images converted/saved in a single operation to retouching software. The description given here use Adobe Photoshop 7.0, as an example. 1 Set - Canon 0206b003 | Digital Photo Professional INSTRUCTION MANUAL Windows (EOS DIGI - Page 50
EasyPhotoPrint]. ¿ Easy-PhotoPrint starts up. O Follow the instructions displayed on the Easy-PhotoPrint window to print images. O To print images with Easy-PhotoPrint, you need Easy-PhotoPrint 2.1 or later and a Canon BJ printer that supports Easy-PhotoPrint 2.1 or later. O The specified Output - Canon 0206b003 | Digital Photo Professional INSTRUCTION MANUAL Windows (EOS DIGI - Page 51
¿ EOS Capture starts up. 3 Take a shot. O Click the [Release] button in EOS Capture or press the shutter button on the camera 1 to take a shot. ¿ The shot is displayed on the Digital Photo Professional main window. Displaying Thumbnail Images and Performing Basic Edits in the Main Window 1-41 - Canon 0206b003 | Digital Photo Professional INSTRUCTION MANUAL Windows (EOS DIGI - Page 52
dialog box closes. Allows you to select whether the edited image is saved automatically, or the confirmation dialog box is displayed when you exit Digital Photo Professional or change images displayed in the main window to the ones in another folder. Allows you to select whether the folder that was - Canon 0206b003 | Digital Photo Professional INSTRUCTION MANUAL Windows (EOS DIGI - Page 53
Displaying Thumbnail Images and Performing Basic Edits in the Main Window Specifying the Preferences Allows you to specify the grid spacing in a range of 8 to 256 pixels used when the grid line is displayed on the edit window or the edit image window. Removing the check mark hides the [Click] - Canon 0206b003 | Digital Photo Professional INSTRUCTION MANUAL Windows (EOS DIGI - Page 54
for [Default settings of RGB Tone curve mode] or [Default settings of RGB Tone curve interpolation method], the changed setting is applied after restarting Digital Photo Professional. However, the changed setting is not applied to images with the [RGB] mark (1-5) that have been edited (1-16 to 1-17 - Canon 0206b003 | Digital Photo Professional INSTRUCTION MANUAL Windows (EOS DIGI - Page 55
and printer profiles to be used on the computer. For details on the monitor and printer profiles to be used, please refer to the user manual of Professional supports the color space of sRGB, Adobe RGB, and Wide Gamut RGB. sRGB : Widely used for the standard color space of monitors, digital cameras, - Canon 0206b003 | Digital Photo Professional INSTRUCTION MANUAL Windows (EOS DIGI - Page 56
Memo 1-46 - Canon 0206b003 | Digital Photo Professional INSTRUCTION MANUAL Windows (EOS DIGI - Page 57
Performing Detailed Edits in the Edit Window This chapter describes the functions of the edit window, and how to display images and perform detailed edits on them. Displaying the Edit Window 2-2 Selecting the Image Display Mode 2-5 2 Selecting the Display Size 2-5 Displaying the Grid lines - Canon 0206b003 | Digital Photo Professional INSTRUCTION MANUAL Windows (EOS DIGI - Page 58
36 images can be displayed in the edit window. O This chapter describes the functions that you can operate in the edit window only. For instructions on operating the functions common to those in the main window, refer to the page described with each function. Double-click a thumbnail image. ¿ The - Canon 0206b003 | Digital Photo Professional INSTRUCTION MANUAL Windows (EOS DIGI - Page 59
Tools menu 2 1-18 1-20 1-42 View menu Shows/hides the tool palette. 2-5 2-6 2-6 2-5 2-5 2-5 2-5 For the shortcut key list, see 4-5. Help menu Displays the version information for Digital Photo Professional. 2-3 - Canon 0206b003 | Digital Photo Professional INSTRUCTION MANUAL Windows (EOS DIGI - Page 60
Displaying the Edit Window Tool Palette RGB image adjustment tab sheet (2-7) RAW image adjustment tab sheet (2-12) 2-4 - Canon 0206b003 | Digital Photo Professional INSTRUCTION MANUAL Windows (EOS DIGI - Page 61
Performing Detailed Edits in the Edit Window Selecting the Image Display Mode You can change the size and method in which images are displayed. Selecting the Display Size You can select the image size from [Fit to window] (Fitting to the image display area), [50% view], [100% view] (actual pixel - Canon 0206b003 | Digital Photo Professional INSTRUCTION MANUAL Windows (EOS DIGI - Page 62
Selecting the Image Display Mode Displaying the Edited Image and the Original at the Same Time You can display the edited image and the original at the same time. Select [View] menu ` [Before/after comparison]. O You can also display edited and original images in one split window (1-43). Changing - Canon 0206b003 | Digital Photo Professional INSTRUCTION MANUAL Windows (EOS DIGI - Page 63
edits on the RAW, JPEG, and TIFF images that are supported by Digital Photo Professional. 1 Display the image on the edit window image with the original (2-6). 5 Save the edited image (1-33). Before exiting Digital Photo Professional, you must save the edited images (1-33). The editing data - Canon 0206b003 | Digital Photo Professional INSTRUCTION MANUAL Windows (EOS DIGI - Page 64
curve to adjust the image brightness and color saturation values that were set by the camera automatically when the shot was taken. Also, you can adjust the input and Click the button to select a channel. The settings are applied to the B channel. The same settings are applied The settings are applied - Canon 0206b003 | Digital Photo Professional INSTRUCTION MANUAL Windows (EOS DIGI - Page 65
Editing Images 2 Adjust the tone curve. O Clicking the tone curve shows [ ] on the tone curve. Drag [ ] to your desired location. O You can specify up to 8 points of [ ]. O Double-clicking [ ] or pressing the key on the keyboard deletes it. When you move the cursor to the top of the graph - Canon 0206b003 | Digital Photo Professional INSTRUCTION MANUAL Windows (EOS DIGI - Page 66
Editing Images Click White Balance Function Makes white the standard for the part you selected and automatically adjust the white balance. 1 Click the [Click] button. ¿ When you move the cursor over the image, the cursor [ ] changes to [ ]. 2 Click the part where is to be the standard. ¿ The white - Canon 0206b003 | Digital Photo Professional INSTRUCTION MANUAL Windows (EOS DIGI - Page 67
Editing Images Adjusting the Brightness and Contrast You can adjust the brightness and contrast in the range of -100 to +100 (in 1-stop increments). Adjust an image while viewing it. Enter a value to adjust the brightness and contrast. Drag the slider left or right to adjust the brightness and - Canon 0206b003 | Digital Photo Professional INSTRUCTION MANUAL Windows (EOS DIGI - Page 68
perform more detailed edits on RAW images that are supported by Digital Photo Professional, than in the main window. 1 (2-6). 5 Save the edited image (1-33). O You cannot edit PowerShot Pro1 RAW images. O Before exiting Digital Photo Professional, you must save the edited images (1-33). The editing - Canon 0206b003 | Digital Photo Professional INSTRUCTION MANUAL Windows (EOS DIGI - Page 69
Editing RAW Images Adjusting the Brightness You can adjust the brightness in the range of -2.0 to +2.0 (in one-sixth-stop increments for the slider, and in 0.01-stop increments when entering a value). Adjust an image while viewing it. Restores the image to its original settings. Drag the slider - Canon 0206b003 | Digital Photo Professional INSTRUCTION MANUAL Windows (EOS DIGI - Page 70
Editing RAW Images Click White Balance Function Makes white the standard for the part you selected and automatically adjusts the white balance. 1 Click the [Click] button. ¿ When you move the cursor over the image, the cursor [ ] changes to [ ]. 2 Click the part where is to be the standard. ¿ The - Canon 0206b003 | Digital Photo Professional INSTRUCTION MANUAL Windows (EOS DIGI - Page 71
Editing RAW Images Adjusting with the Color Wheel (1-26) You can select a desired color from the color wheel to adjust the white balance. You can also specify the hue in the range of 0 to 359 (in 1-stop increments), and the saturation in the range of 0 to 255 (in 1-stop increments). Registering - Canon 0206b003 | Digital Photo Professional INSTRUCTION MANUAL Windows (EOS DIGI - Page 72
Editing RAW Images Adjusting the Dynamic Range You can adjust the highlight and shadow points of images, and select the characteristics of the tone curve. Adjusting the Shadow and Highlight Points You can specify the shadow point (the darkest point) and highlight point (the brightest point) to - Canon 0206b003 | Digital Photo Professional INSTRUCTION MANUAL Windows (EOS DIGI - Page 73
Editing RAW Images Selecting the Tone Curve Select [Shot settings] or [Linear]. [Shot settings]: Selects the tone curve used when shots were taken. [Linear]: Selects the linear tone curve. You can select linear processing when you wish to adjust the image separately in retouching software such as - Canon 0206b003 | Digital Photo Professional INSTRUCTION MANUAL Windows (EOS DIGI - Page 74
the hue and saturation. You can adjust the hue and saturation in the range of -2.0 to +2.0 (1-step increments). [Faithful settings], a feature of EOS DIGITAL cameras, are settings that are faithful to the original image. This setting adjusts colors so that the images that are taken in an ambient - Canon 0206b003 | Digital Photo Professional INSTRUCTION MANUAL Windows (EOS DIGI - Page 75
. The functions of the edit image window are the same as those of the main window (chapter 1) and of the edit window (chapter 2). For detailed instructions on operating these functions, refer to the page described with each function. Displaying the Edit Image Window 3-2 3 - Canon 0206b003 | Digital Photo Professional INSTRUCTION MANUAL Windows (EOS DIGI - Page 76
of the edit image window are the same as those of the main window (chapter 1) and of the edit window (chapter 2). For detailed instructions on operating these functions, refer to the page described with each function. 1 Select multiple images in the main window (1-7). 2 Click the [Edit image - Canon 0206b003 | Digital Photo Professional INSTRUCTION MANUAL Windows (EOS DIGI - Page 77
Displaying the Edit Image Window Edit Image Window Toolbar Menu bar Displays the [File], [Edit], [View], [Adjustment], [Tools], and [Help] menus. Path display Displays the path of the drive, folder and file name that contain the currently displayed image. Tool palette 3 Performing Detailed Edits in - Canon 0206b003 | Digital Photo Professional INSTRUCTION MANUAL Windows (EOS DIGI - Page 78
Displaying the Edit Image Window File menu Menu Bar 1-33 1-33 1-34 1-36 1-40 1-40 1-13 1-2 Deletes the images from the thumbnail image display area. Edit menu 1-30 1-30 1-31 1-30, 1-31 The copied recipe data is pasted to all images. View menu 2-5 1-14 2-6 2-6 2-5 2-5 2-5 2-5 Returns to the - Canon 0206b003 | Digital Photo Professional INSTRUCTION MANUAL Windows (EOS DIGI - Page 79
1-32 Removes the set check mark. Sets a check mark for the image. Tools menu 1-41 1-18 1-20 1-42 Help menu Displays the version information for Digital Photo Professional. For the shortcut key list, see 4-5. Displaying the Edit Image Window 3 Performing Detailed Edits in the Edit Image Window 3-5 - Canon 0206b003 | Digital Photo Professional INSTRUCTION MANUAL Windows (EOS DIGI - Page 80
Displaying the Edit Image Window 50% view button Scales down the image 50%. Fit to window button Fits the image in the window. Main window button The edit image window switches to the main window. Toolbar 100% view button Displays the image as an actual pixel size. Previous photo button Select the - Canon 0206b003 | Digital Photo Professional INSTRUCTION MANUAL Windows (EOS DIGI - Page 81
Reference This chapter provides troubleshooting, the instructions on uninstalling Digital Photo Professional, and shortcut key list to allow you to use Digital Photo Professional easily. Troubleshooting 4-2 Uninstalling the Software 4-3 Shortcut Key List 4-4 Index ...4-8 4 - Canon 0206b003 | Digital Photo Professional INSTRUCTION MANUAL Windows (EOS DIGI - Page 82
Troubleshooting If you could not complete the installation correctly, or Digital Photo Professional does not work, or images are not displayed, consult the items described below. O For instructions on installing and system requirements, refer to the "Software Guide to the manuals supplied Digital - Canon 0206b003 | Digital Photo Professional INSTRUCTION MANUAL Windows (EOS DIGI - Page 83
the [Add/Remove Programs] icon. ¿ The [Add or Remove Programs] dialog box (the [Add/Remove Programs] dialog box in Windows 2000) appears. 2 Select [Canon Utilities Digital Photo Professional x.x] from the software list, and then click the [Change/Remove] button. O "x.x" represents the version of - Canon 0206b003 | Digital Photo Professional INSTRUCTION MANUAL Windows (EOS DIGI - Page 84
Shortcut Key List Main Window Operation Open in Edit window Add recipe and save Add recipe and save as Save Thumbnail Convert and save Batch process Print Print with Easy-PhotoPrint Delete Info Exit Cut Copy Paste Select All Clear All Key Operation Key Ctrl + O Select RAW photos only Alt + - Canon 0206b003 | Digital Photo Professional INSTRUCTION MANUAL Windows (EOS DIGI - Page 85
Edit Window Operation Add recipe and save Add recipe and save as Convert and save Print Info Close Tool palette Fit to window Key Operation Ctrl + S 50% view Shift + Ctrl + S 100% view Ctrl + D 200% view Ctrl + P Rotate Left Ctrl + I Rotate Right Ctrl + W Start Trimming tool Ctrl + T - Canon 0206b003 | Digital Photo Professional INSTRUCTION MANUAL Windows (EOS DIGI - Page 86
Shortcut Key List Trimming Window Operation Key Operation Key Switch between full screen/ Alt + Enter, F11 Reset the trimming range normal screen ESC Close the trimming window without saving the settings Ctrl + W, Alt + F4 Move the trimming range Up, Down, Left and Right Arrows Display - Canon 0206b003 | Digital Photo Professional INSTRUCTION MANUAL Windows (EOS DIGI - Page 87
Shortcut Key List Stamp Tool Window Operation Key Operation Key Switch between full screen/ normal screen Alt + Enter, F11 Revert to the original condition before any corrections were performed Ctrl + Shift + Z Close the stamp tool window without applying the content of the corrections - Canon 0206b003 | Digital Photo Professional INSTRUCTION MANUAL Windows (EOS DIGI - Page 88
Displaying the Grid lines 2-5 E Edit Image Window 3-3 Edit Window 2-2 Editing Images 1-15, 2-7 Editing RAW Images 1-22, 2-12 Exiting Digital Photo Professional 1-2 Exiting the Edit Image Window 3-3 Exiting the Edit Window 2-2 I Image with Information Display 1-11 Information Displayed with - Canon 0206b003 | Digital Photo Professional INSTRUCTION MANUAL Windows (EOS DIGI - Page 89
1-42 Starting up Digital Photo Professional ...... 1-2 Supported Images 10 T Tool Palette RAW image adjustment tab sheet . 2-4, 3-6 RGB image adjustment tab sheet .. 2-4, 3-6 Transferring Images to Retouching Software 1-39 Trimming an Image 1-18 Troubleshooting 4-2 U Uninstalling the Software
-
 1
1 -
 2
2 -
 3
3 -
 4
4 -
 5
5 -
 6
6 -
 7
7 -
8
-
9
-
10
-
11
-
12
-
13
-
14
-
15
-
16
-
17
-
18
-
19
-
20
-
21
-
22
-
23
-
24
-
25
-
26
-
27
-
28
-
29
-
30
-
31
-
32
-
33
-
34
-
35
-
36
-
37
-
38
-
39
-
40
-
41
-
42
-
43
-
44
-
45
-
46
-
47
-
48
-
49
-
50
-
51
-
52
-
53
-
54
-
55
-
56
-
57
-
58
-
59
-
60
-
61
-
62
-
63
-
64
-
65
-
66
-
67
-
68
-
69
-
70
-
71
-
72
-
73
-
74
-
75
-
76
-
77
-
78
-
79
-
80
-
81
-
82
-
83
-
84
-
85
-
86
-
87
-
88
-
89
 |
 |

Windows
E
INSTRUCTION
MANUAL
CT1-1293-000
© CANON INC. 2005