Canon 0435B008 Startup Guide - Page 58
Turn back the ink cartridge lock lever in the direction of the arrow in
 |
View all Canon 0435B008 manuals
Add to My Manuals
Save this manual to your list of manuals |
Page 58 highlights
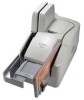
3 Open the imprinter cover. 4 Squeeze in both sizes of the print position adjustment lever and move the print cartridge carriage to its lowest position. IMPORTANT When removing the ink cartridge, always make sure that the carriage is lowered to its lowest position. You cannot remove the ink cartridge without lowering the carriage to its lowest position. 5 Turn back the ink cartridge lock lever in the direction of the arrow in the illustration below, and pull out the ink cartridge by grasping the tab as shown in the illustration. Regular Maintenance 53
-
 1
1 -
2
-
3
-
4
-
5
-
6
-
7
-
8
-
9
-
10
-
11
-
12
-
13
-
14
-
15
-
16
-
17
-
18
-
19
-
20
-
21
-
22
-
23
-
24
-
25
-
26
-
27
-
28
-
29
-
30
-
31
-
32
-
33
-
34
-
35
-
36
-
37
-
38
-
39
-
40
-
41
-
42
-
43
-
44
-
45
-
46
-
47
-
48
-
49
-
50
-
51
-
52
-
 53
53 -
 54
54 -
 55
55 -
 56
56 -
 57
57 -
 58
58 -
 59
59 -
 60
60 -
 61
61 -
 62
62 -
 63
63 -
64
-
65
-
66
-
67
-
68
-
69
-
70
-
71
-
72
 |
 |

Regular Maintenance
53
3
Open the imprinter cover.
4
Squeeze in both sizes of the print position adjustment lever and move the print
cartridge carriage to its lowest position.
IMPORTANT
When removing the ink cartridge, always make sure that the carriage is
lowered to its lowest position. You cannot remove the ink cartridge without
lowering the carriage to its lowest position.
5
Turn back the ink cartridge lock lever in the direction of the arrow in the
illustration below, and pull out the ink cartridge by grasping the tab as shown
in the illustration.