Canon 1211B002 Easy Start Guide - Page 2
Step 4., Connecting the Scanner to Your PC, Step 5. Scanning, This setup is now complete - dr driver
 |
UPC - 013803063721
View all Canon 1211B002 manuals
Add to My Manuals
Save this manual to your list of manuals |
Page 2 highlights
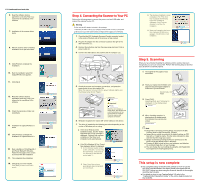
☞Continued from front side 6. Read the software license agreement, and click [Yes] if you consent to the conditions of the software. 7. Installation of the scanner driver starts. 8. After the scanner driver is installed, installation of the job tools starts. 9. Click [Finish] to complete the installation. 10. Next the installation wizard for CapturePerfect 3.0 appears. 11. Click [Next]. 12. Read the software license agreement, and click [Yes] if you consent to the conditions of the software. 13. Check the destination folder and click [Next]. 14. Installation of CapturePerfect 3.0 starts. 15. Click [Finish] to complete the installation of CapturePerfect 3.0. 16. Next, installation of OmniPage SE 4 and Presto! BizCard 5 SE starts. Follow the messages on the screen to proceed with the installation. 17. This completes the installation. 18. Click [Exit] to exit the installer. Click [Back] to return to the menu screen. Step 4. Connecting the Scanner to Your PC Perform the following steps to connect the power cord and USB cable, and connect the scanner to your PC. Warning ❏ Use only the AC adapter included in the package. ❏ Connect the DR-1210C to your computer while the DR-1210C is turned OFF. ❏ Be sure to log on with administrator privileges when logging on to Windows. 1. Check that the ADF (Automatic Document Feeder) connector, located in the center of the back side of the scanner, is fully inserted. 2. Plug the AC adapter into the connector located to the right of the ADF connector (1). 3. Remove the protective cap from the power plug and insert it into a power outlet (2). 4. Connect the USB cable to the scanner and the computer (3). To PC 5. Check the scanner and computer connections, and press the power button to turn the scanner ON. When the scanner is turned ON, the power indicator lights, and the display panel shows "Ready". Display Panel Important! Power Indicator Power Button When the icon changes as shown above, this indicates that a communications error has occurred with the computer. Check the scanner and computer connections. 6. Windows recognizes the Canon DR-1210C USB as a new device. 7. The driver is installed by the following procedure depending on the version of Windows you are using. ● If the OS is Windows 2000, installation starts, and the "Digital Signature Not Found" message is displayed. Clicking [Yes] resumes installation of the driver, and installation ends automatically. ● If the OS is Windows XP, the "Found New Hardware Wizard" is displayed. 1. On the Windows Update search screen, select [No, not this time], and click [Next]. (This screen is not displayed for Windows XP service pack 1.) 2. Select [Install the software automatically (Recommended)] and click [Next]. 3. The Hardware Installation screen is displayed. The "This driver has not passed the Windows Logo Test" message is displayed. Click [Continue Anyway] to continue the installation. 4. When the Completing the Found New Hardware Wizard screen appears, click [Finish] to finish installation. Step 5. Scanning When you have finished installing the software and the scanner has been recognized, you can scan a document. Perform the following steps to test that your document is scanned properly. 1. Thoroughly fan the pages of your documents. 2. Place your original into the feeder, and adjust the document guide adapter to fit the size of your documents. Document Guide Adapter 3. Press [FILE]. Scanning starts, and "Scanning" is displayed on the display panel. Scanning··· Display Panel 4. When "Sending complete" is displayed on the display panel, this indicates the scanning has ended. Sending complete. [FILE] button Note ● Image files scanned by pressing [FILE] are saved in the [My Pictures] folder in [My Documents]. (Default) ● Image files are saved according to the default settings as PDF files with a 17-digit file name. This file name indicates the date and time that the image was saved. ● Images scanned by pressing [COPY] are printed out on the printer set as the default printer in Windows. ● Pressing [E-MAIL] starts up the e-mail software, and attaches the scanned image file to a new message. ● You can change the scan settings by using the Job Registration Tool registered in the [Programs] menu. This setup is now complete ● This completes setup of the DR-1210C. Details on how to use the DR-1210C are described in the User's Guide packaged with the DR-1210C. Before you start using the Scanner, be sure to thoroughly read the User's Guide. ● For details on how to use CapturePerfect 3.0, refer to the "CapturePerfect Operation Guide" or the online Help included on the CD-ROM.
-
 1
1 -
 2
2
 |
 |
