Canon 3060 Startup Guide - Page 56
Resulting scanned images are not correct
 |
View all Canon 3060 manuals
Add to My Manuals
Save this manual to your list of manuals |
Page 56 highlights
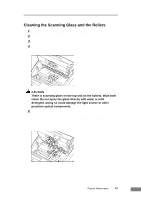
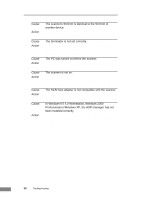
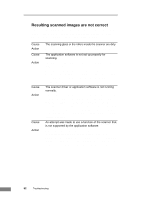
✘ Resulting scanned images are not correct If the resulting scanned images are not crisp, if there are lines or spots on the image, or if there is some other problem with a scanned image, likely causes are listed below. Check each item and take the appropriate action. Cause Action Cause Action Cause Action Cause Action The scanning glass or the rollers inside the scanner are dirty. Clean the scanning glass and rollers as described on page 47. The application software is not set up properly for scanning. Check the scanning-related settings, such as "brightness," in the application software. For example, if the document cannot be scanned at all, it is possible that the "brightness" setting is too high. If the resulting scanned image is too dark, it is possible that the "brightness" setting is too low. The scanner driver or application software is not running normally. If the software is set properly for scanning and normal scanning is still not possible, it is possible that the scanner driver or the application software is not running normally. Re-install the scanning driver or the application software. For details on how to install the scanner driver, refer to page 24. For details on how to install the application software, refer to the application software instruction manual. An attempt was made to use a function of the scanner that is not supported by the application software. Some application software may not support certain functions, such as automatic paper size detection and user-specified margins. Using such application software for scanning may yield abnormal scanning results. Try scanning without using functions such as automatic paper size detection or margins settings. 52 Troubleshooting
-
 1
1 -
2
-
3
-
4
-
5
-
6
-
7
-
8
-
9
-
10
-
11
-
12
-
13
-
14
-
15
-
16
-
17
-
18
-
19
-
20
-
21
-
22
-
23
-
24
-
25
-
26
-
27
-
28
-
29
-
30
-
31
-
32
-
33
-
34
-
35
-
36
-
37
-
38
-
39
-
40
-
41
-
42
-
43
-
44
-
45
-
46
-
47
-
48
-
49
-
50
-
 51
51 -
 52
52 -
 53
53 -
 54
54 -
 55
55 -
 56
56 -
 57
57 -
 58
58 -
 59
59 -
 60
60
 |
 |