Canon 50D w/ 18-55mm & 75-300mm 24GB Digital Photo Professional 3.6 for Macin - Page 102
Applying Editing Contents to Another Image, Printing, Re-Editing an Image, Saving as a Separate Image
 |
UPC - 818282567179
View all Canon 50D w/ 18-55mm & 75-300mm 24GB manuals
Add to My Manuals
Save this manual to your list of manuals |
Page 102 highlights
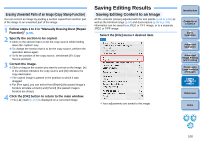
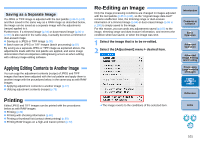
Saving as a Separate Image If a JPEG or TIFF image is adjusted with the tool palette (p.86 to p.93) and then saved in the same way as a RAW image as described below, the image can be saved as a separate image with the adjustments (recipe) applied to it. Furthermore, if a trimmed image (p.94) or dust-erased image (p.96 to p.100) is also saved in the same way, it actually becomes a trimmed or dust-erased image. O Saving as a JPEG or TIFF Image (p.38) O Batch save as JPEG or TIFF images (batch processing) (p.82) By saving as a separate JPEG or TIFF image as explained above, the adjustments made with the tool palette are applied, and some image deterioration that accompanies editing/saving occurs as when editing with ordinary image editing software. Applying Editing Contents to Another Image You can copy the adjustment contents (recipe) of JPEG and TIFF images that have been adjusted with the tool palette and apply them to another image with the procedures below, in the same way as with RAW images. O Applying adjustment contents to another image (p.37) O Utilizing adjustment contents (recipe) (p.79) Printing Edited JPEG and TIFF images can be printed with the procedures below as with RAW images. O Printing (p.39) O Printing with shooting information (p.68) O Printing a thumbnail list (contact sheet printing) (p.69) O Printing RAW images on a high-end Canon printer (p.70) Re-Editing an Image Only the image processing conditions are changed in images adjusted with the tool palette (p.86 to p.93), so the "original image data itself" remains unaffected. Also, the trimming range or dust-erasure information of a trimmed image (p.94) or dust-erased image (p.96 to p.100) is simply saved to the image. For this reason, you can undo any adjustments saved (p.100) to the image, trimming range and dust-erasure information, and revert to the condition when last saved, or when the image was shot. 1 Select the image that is to be re-edited. 2 Select the [Adjustment] menu ` desired item. Introduction Contents at a Glance 1Basic Operation 2Advanced Operation 3Advanced Image Editing and Printing 4 Processing Large Numbers of Images 5Editing JPEG/TIFF Images Reference ¿ The image reverts to the conditions of the selected item. Index 101
-
 1
1 -
2
-
3
-
4
-
5
-
6
-
7
-
8
-
9
-
10
-
11
-
12
-
13
-
14
-
15
-
16
-
17
-
18
-
19
-
20
-
21
-
22
-
23
-
24
-
25
-
26
-
27
-
28
-
29
-
30
-
31
-
32
-
33
-
34
-
35
-
36
-
37
-
38
-
39
-
40
-
41
-
42
-
43
-
44
-
45
-
46
-
47
-
48
-
49
-
50
-
51
-
52
-
53
-
54
-
55
-
56
-
57
-
58
-
59
-
60
-
61
-
62
-
63
-
64
-
65
-
66
-
67
-
68
-
69
-
70
-
71
-
72
-
73
-
74
-
75
-
76
-
77
-
78
-
79
-
80
-
81
-
82
-
83
-
84
-
85
-
86
-
87
-
88
-
89
-
90
-
91
-
92
-
93
-
94
-
95
-
96
-
 97
97 -
 98
98 -
 99
99 -
 100
100 -
 101
101 -
 102
102 -
 103
103 -
 104
104 -
 105
105 -
 106
106 -
 107
107 -
108
-
109
-
110
-
111
-
112
-
113
-
114
-
115
-
116
-
117
-
118
-
119
-
120
-
121
-
122
-
123
-
124
-
125
-
126
 |
 |
