Canon 820D Photo Application Guide(Mac) - Page 98
Layout Options, Custom1, Paper Size, Select
 |
View all Canon 820D manuals
Add to My Manuals
Save this manual to your list of manuals |
Page 98 highlights
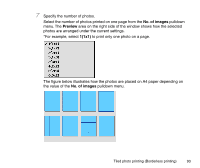
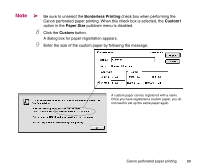
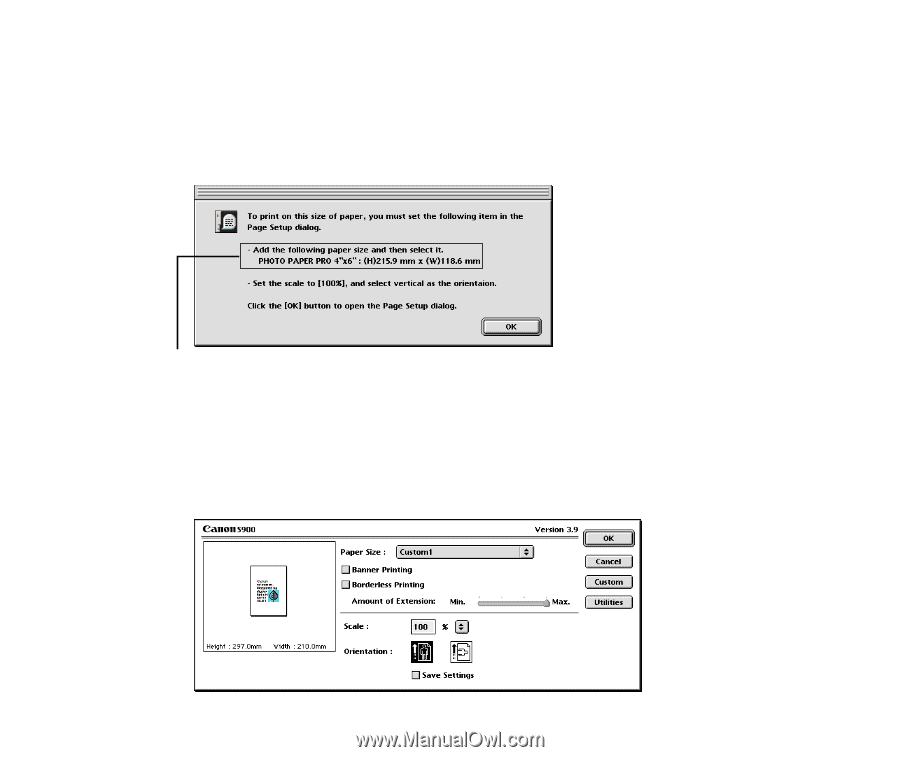
5 Click the OK button. A message dialog box appears, indicating the size of Canon perforated paper you just selected in the Layout Options window. This paper size must be registered in the Page Setup dialog box that appears in the next step. The size of Canon perforated paper you selected in the Layout Options window. The figure above shows the size of Photo Paper PRO . 6 Click the OK button on the message box. The Page Setup dialog box for the printer selected in the Chooser appears. 7 Select the Custom1 option from the Paper Size pulldown menu. The Custom button becomes active. Canon perforated paper printing 98
-
 1
1 -
2
-
3
-
4
-
5
-
6
-
7
-
8
-
9
-
10
-
11
-
12
-
13
-
14
-
15
-
16
-
17
-
18
-
19
-
20
-
21
-
22
-
23
-
24
-
25
-
26
-
27
-
28
-
29
-
30
-
31
-
32
-
33
-
34
-
35
-
36
-
37
-
38
-
39
-
40
-
41
-
42
-
43
-
44
-
45
-
46
-
47
-
48
-
49
-
50
-
51
-
52
-
53
-
54
-
55
-
56
-
57
-
58
-
59
-
60
-
61
-
62
-
63
-
64
-
65
-
66
-
67
-
68
-
69
-
70
-
71
-
72
-
73
-
74
-
75
-
76
-
77
-
78
-
79
-
80
-
81
-
82
-
83
-
84
-
85
-
86
-
87
-
88
-
89
-
90
-
91
-
92
-
 93
93 -
 94
94 -
 95
95 -
 96
96 -
 97
97 -
 98
98 -
 99
99 -
 100
100 -
 101
101 -
 102
102 -
 103
103 -
104
-
105
-
106
-
107
-
108
-
109
-
110
-
111
-
112
-
113
-
114
-
115
-
116
-
117
-
118
-
119
-
120
-
121
-
122
-
123
-
124
-
125
-
126
-
127
-
128
-
129
-
130
-
131
-
132
-
133
-
134
-
135
-
136
-
137
-
138
-
139
-
140
 |
 |
Canon perforated paper printing
98
5
Click the
OK
button.
A message dialog box appears, indicating the size of Canon perforated paper you
just selected in the
Layout Options
window.
This paper size must be registered in the Page Setup dialog box that appears in the
next step.
6
Click the
OK
button on the message box.
The Page Setup dialog box for the printer selected in the Chooser appears.
7
Select the
Custom1
option from the
Paper Size
pulldown menu.
The
Custom
button becomes active.
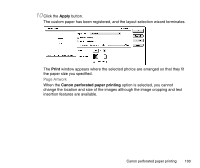
The size of Canon perforated paper you
selected in the
Layout Options
window.
The figure above shows the size of Photo Paper PRO <PC-
101S>.