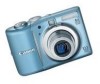
Canon A1100 PowerShot A1100 IS Camera User Guide - Page 42
Information Displayed on the Screen
 |
UPC - 013803107012
View all Canon A1100 manuals
Add to My Manuals
Save this manual to your list of manuals |
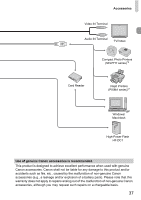
Page 42 highlights
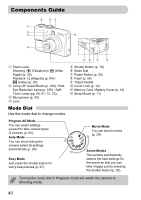
Information Displayed on the Screen Shooting (Information Display) Shooting Mode (p. 40) ISO Speed (p. 69) White Balance (p. 70) My Colors (p. 71) Metering Modes (p. 80) Drive Mode (p. 68) Image Quality (Compression) (p. 66)/ Recording Pixels (p. 66) Digital Zoom Magnification (p. 58)/ Digital Tele-Converter (p. 59) AF Frame (p. 21) Macro (p. 65), Infinity (p. 65) Flash Mode (pp. 56, 64, 81) Red-Eye Correction (p. 83) Self Timer (pp. 60, 61, 72, 73) Camera Orientation* Spot AE Point Frame (p. 80) AF Lock (p. 77) i-Contrast (p. 82) AE Lock (pp. 80, 87), FE Lock (p. 81) Create Folder (p. 107) Still Images: Recordable shots (p. 15) Movies: Remaining Time/Elapsed Time (p. 30) Disp. Overlay (p. 111) Shutter Speed Aperture Value Image Stabilizer (p. 111) Exposure Compensation (p. 68) Date Taken/Recorded (p. 57) * : Standard, : Held vertically When shooting, the camera detects if it is held vertically or horizontally, and adjusts settings accordingly for the best shot. It also detects orientation during playback, so you can hold the camera in either orientation and it will automatically rotate images for correct viewing. This function may not operate correctly when the camera is pointed straight up or down. Switching the Display You can change the display using the l button. No Information Display 42 Information Display Display Off
-
 1
1 -
2
-
3
-
4
-
5
-
6
-
7
-
8
-
9
-
10
-
11
-
12
-
13
-
14
-
15
-
16
-
17
-
18
-
19
-
20
-
21
-
22
-
23
-
24
-
25
-
26
-
27
-
28
-
29
-
30
-
31
-
32
-
33
-
34
-
35
-
36
-
 37
37 -
 38
38 -
 39
39 -
 40
40 -
 41
41 -
 42
42 -
 43
43 -
 44
44 -
 45
45 -
 46
46 -
 47
47 -
48
-
49
-
50
-
51
-
52
-
53
-
54
-
55
-
56
-
57
-
58
-
59
-
60
-
61
-
62
-
63
-
64
-
65
-
66
-
67
-
68
-
69
-
70
-
71
-
72
-
73
-
74
-
75
-
76
-
77
-
78
-
79
-
80
-
81
-
82
-
83
-
84
-
85
-
86
-
87
-
88
-
89
-
90
-
91
-
92
-
93
-
94
-
95
-
96
-
97
-
98
-
99
-
100
-
101
-
102
-
103
-
104
-
105
-
106
-
107
-
108
-
109
-
110
-
111
-
112
-
113
-
114
-
115
-
116
-
117
-
118
-
119
-
120
-
121
-
122
-
123
-
124
-
125
-
126
-
127
-
128
-
129
-
130
-
131
-
132
 |
 |
