Canon CP1213DIII Instruction Manual
Canon CP1213DIII Manual
 |
View all Canon CP1213DIII manuals
Add to My Manuals
Save this manual to your list of manuals |
Canon CP1213DIII manual content summary:
- Canon CP1213DIII | Instruction Manual - Page 1
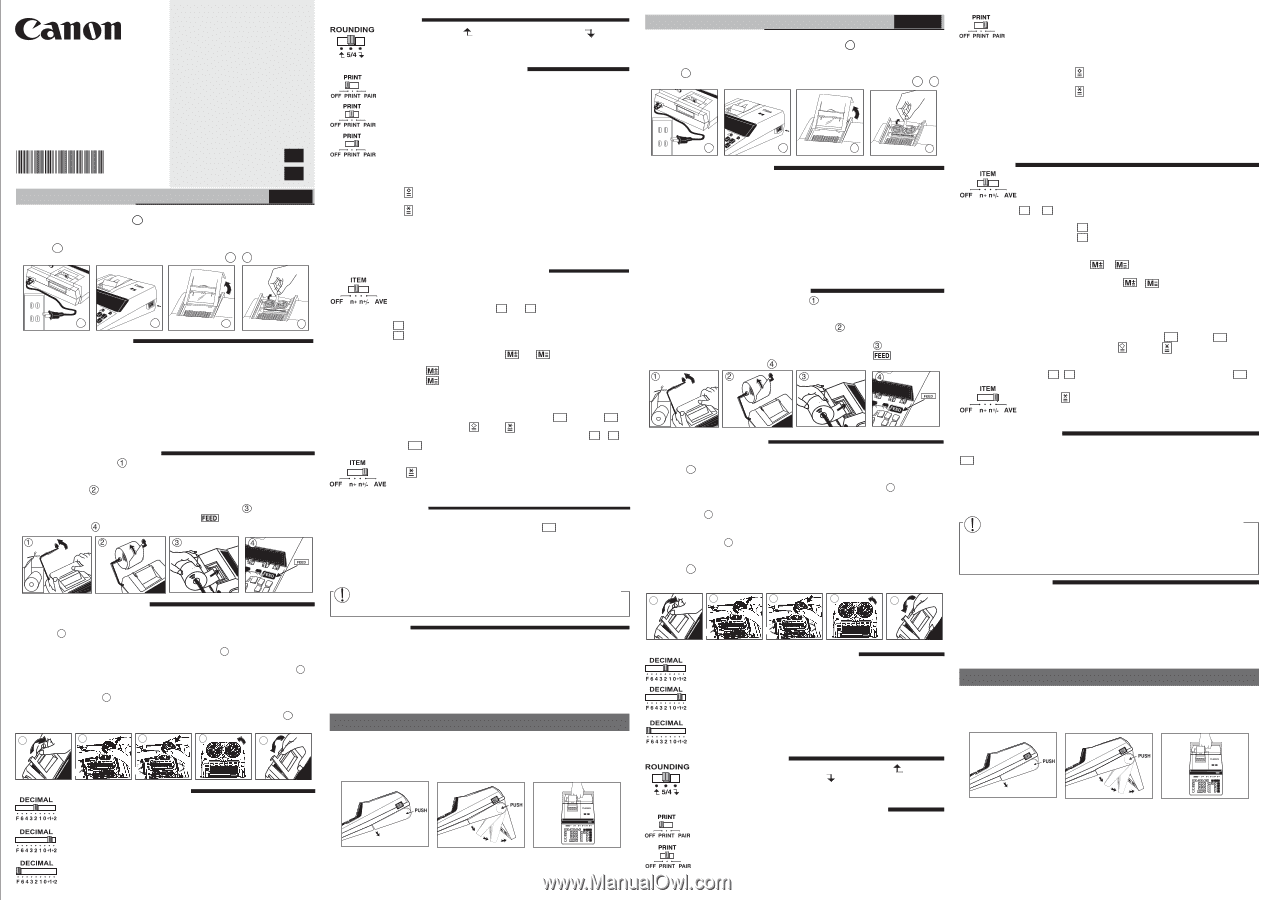
CP1213DIII Calculator / Calculadora E-IM-2914 INSTRUCTIONS EN INSTRUCCIONES ES BEFORE STARTING ENGLISH • Read all instructions before use. • Plug in AC power cord. (Figure a ) • Turn power switch on. (Power switch is located on the right side of the cabinet.) "C" will automatically be printed - Canon CP1213DIII | Instruction Manual - Page 2
Recall Item Count & Item Plus Calculation / Conteo de Elemento de Recuperación y Calculo Suma de Elemento EN Recalls and prints the number of items. An 7,860.00 Overflow / Besbordamiento Printed in China / Impreso en China © CANON ELECTRONIC BUSINESS MACHINES (H.K.) CO., LTD. 2014 E-IM-2914
-
 1
1 -
 2
2
 |
 |
Calculator / Calculadora
CP1213DIII
INSTRUCTIONS
INSTRUCCIONES
ES
EN
1)
Lift up paper arm.
(Figure
)
• When inserting the paper, cut the edge of the paper as shown.
2)
Place the new paper roll on the arm. The edge of the paper should be positioned
as shown.
(Figure
)
• Suitable paper roll – Width: 57mm (2-1/4") /
Diameter: 86mm (3-3/8") max.
3)
Insert the paper into the slot of the machine as indicated.
(Figure
)
4)
Turn the power switch on. Press the paper feed key
to advance the paper
as shown. (Figure
)
REPLACING THE INK RIBBON
Note:
Turn the power switch off.
1)
Lift the tab on the back-side of the printer cover, and then remove the cover.
(Figure
)
2)
While pinching the ribbon lock (A) in the direction of the arrow, lift ribbon spools
off the shafts. Discard the old ribbon and spools. (Figure
)
3)
Separate the spools of new ribbon between the tape and printer head. Guide it around
the four positions of the ribbon guide (B) and place the spools on the shafts. (Figure
)
4)
When the ribbon spools are settled, release the ribbon locks. If necessary, rotate the
spools until the pegs on the botton of the spool seat themselves in the holes of the
spool holder. (Figure
)
5)
Rotate either spool to take up any ribbon slack, making sure that the ribbon is
positioned around the four ribbon guides. Replace the printer cover. (Figure
)
IMPORTANT:
Use only the same type of ribbon spools.
5
6
7
8
9
•
Read all instructions before use.
•
Plug in AC power cord.
(Figure
)
•
Turn power switch on. (Power switch is located on the right side of the cabinet.)
"
C
" will automatically be printed on the paper tape if the switch is set to "PRINT"
.
(Figure
)
•
Remove the tape on the ink ribbon of the calculator. (Figure
,
)
a
b
c
d
BEFORE STARTING
ENGLISH
GENERAL MAINTENANCE
a
CP1200DII
b
CP1213DIII
c
d
INSTALLING PRINTING PAPER
– Used for designating the decimal point position (6, 4, 3, 2, 1, 0) for
calculated results.
+1, +2 (Add Mode)
– Addition and subtraction (+1) or multiplication (+2)
functions are performed with an automatic 2-digit decimal. It is convenient
for currency calculation.
F (Floating Decimal point)
– All effective numbers up to 12 digits are
printed or displayed.
DECIMAL POINT SELECTOR SWITCH
ROUNDING SWITCH
–
Used to round-up [
] , round-off [5/4], or round-down [
] to the
pre-selected decimal digits in the result.
SPECIFICATIONS
Power Source:
AC 120V, 60Hz, 0.2A
Operation Temperature:
0
o
C to 40
o
C (32
o
F to 104
o
F)
Calculating Capacity:
12 digits maximum
Dimension: 343mm(L) x 243mm(W) x 98mm(H) /
13-1/2" (L) x 19-9/16" (W) x 3-55/64" (H)
Weight:
1.95 kg (4.3 lb)
(Subject to change without notice)
•
Lea todas las instrucciones antes de usar.
•
Enchufe el cable de alimentación eléctrica de CA (Figura
)
• Encienda la calculadora.
El interruptor de energia está localizado en el lado derecho.
Esté imprementara automaticamente la letra "C" si el interruptor indica "Imprimir"
(Figura
)
•
Antes de utilizar la calculadora, retire la cinta gris del carrete de cinta. (Figura
,
)
MANTENIMIENTO GENERAL
■
No use o deje la calculadora expuesta directamente a la luz solar. También debe evitar
áreas sujetas a cambios rápidos de temperatura, y áreas de alta humedad y suciedad.
■
Para limpiar la caja use un paño seco. No use agua o detergentes.
■
Encienda el impresor únicamente cuando haya cargardo paper para impression.
■
Evite usar la calculadora en lugares con limaduras de hierro, debido a que esto puede
afectar los circuitos eléctricos de la calculadora.
■
No coloque objetos sobre la calculadora, especialmente sobre el mecanismo de
impresión.
■
Apague el interruptor de energía antes de retirar el enchufe del tomacorrientes.
■
En caso de falla eléctrica (por ejemplo, humo), desconecte el enchufe de la toma
eléctrica inmediatamente.
La toma de electricidad debe estar cerca del equipo y ser
accessible fácilmente.
INSTALANDO PAPEL DE IMPRESIÓN
1)
Levantar la cubierta de la impresora. (Figura
)
•
Antes de introducir el papel, corte el borde del papel como se muestra.
2)
Coloque el nuevo rollo de papel en el brazo de la calculadora. El borde del papel
deberá ser
colocado como se muestra en la (Figura
).
•
Rollo de papel adecuado – Ancho: 57mm (2-1/4") /
Diámetro: 86mm (3-3/8") max.
3)
Introduzca el papel de la máquina, como se indica en la (Figura
).
4)
Encienda la calculadora. Presione la tecla de advance de papel
para avanzar el
papel como se muestra. (Figura
).
COMO CAMBIAR LA CINTA
Nota:
Apáguela.
1)
Levante la pestaña del lado posterior de la tapa de la impresora y luego retire la tapa.
(Figura
)
2)
Mientras sostiene el seguro de la cinta (A) en la dirección de las flechas, levante los
carretes de cinta del eje. Deseche la cinta y carretes viejos. (Figura
)
3)
Separe los carretes de cinta nueva entre la cinta y la cabeza de la impresora. Guíe la
cinta alrededor de las cuatro guias de cinta (B) y coloque los carretes encima de los
ejes. (Figura
)
4)
Permita que los carretes se asienten y suelte los seguros de cinta. Si es necesario,
gire los carretes hasta que las clavijas en la base encajen en los huecos del soporte
de carrete. (Figura
)
5)
Gire cualquiera de los carretes para templar la cinta y asegúrese que la cinta pase
por las cuatro guias de cinta. Coloque nuevamente la cubierta de la impresora.
(Figura
)
NOTA IMPORTANTE:
Utilice únicamente el mismo tipo de carretes de cinta y coloque la
cinta de la manera indicada
INTERRUPTOR SELECTOR DE PUNTO DECIMAL
– Se utiliza para designar la posición del punto decimal para
resultados calculados (0, 2, 3, 4, 6).
+1, +2 (Modo Adición)
– Las adiciones y substracciones (+1)
o
multiplicaci
ón (+2) son realizadas con dos dígitos decimales
automáticamente. Es conveniente para cálculos monetarios.
F (Punto Decimal Flotante)
– Todos los números efectivos hasta 12
dígitos son impresos o desplegados.
CONMUTADOR DE REDONDEO
– Es usado para redondear el resultado hacia arriba [
], redondear
[5/4], o redondear hacia abajo [
] a la cantidad de decimales
pre-seleccionados.
IMPRESIÓN / INTERRUPTOR DE CALCULO MODO PAR
Imprimir OFF
– Entradas y resultados aparecerán en la pantalla, pero no
serán impresos.
Imprimir On
– Entradas y resultados aparecerán en pantalla y serán
impresos.
ANTES DE EMPEZAR
ESPAŇOL
CANON ELECTRONIC BUSINESS MACHINES (H.K.) CO., LTD.
17/F., Tower One, Ever Gain Plaza, 82-100 Container Port Road, Kwai Chung,
New Territories, Hong Kong
CANON U.S.A., INC.
One Canon Park, Melville, NY 11747, 1-800-OK-CANON
CANON LATIN AMERICA, INC.
One Canon Park, Melville, NY 11747, U.S.A.
a
CP1200DII
b
CP1213DIII
c
d
At "n+" or "n+/–" position, the calculator counts and prints the number
of calculation items up to 9999.
ITEM COUNTER
–
When the "ITEM" switch is set at "n+", the calculator
counts the number
of times the
and
keys are pressed. When
the switch is set at
"n+/–", the calculator counts the number of times the
key is pressed
and subtracts from the total numbers of times the
key is pressed.
MEMORY ITEM COUNT
–
When the "ITEM" switch is set at "n+", the
calculator counts number of times
and
keys
are pressed.
When the switch is set at "n+/–", the calculator counts the number of
times the
key is pressed and subtracts from the total number of
times the
key is pressed.
PRINTOUT OF ITEM COUNT
–
When the "PRINT" switch is position at
"ON", and the "ITEM" switch is at the "n+" or "n+/–" position, the number
of items recorded by the counter can print up to three digits on the
left-hand side of the paper by pressing either the
key or the
key for item count and
key or
key for memory item count.
DISPLAY OF ITEM COUNT
– When press and holding the
,
and
key to display the item count number.
AVERAGE CALCULATION
–
Set the switch to "AVE", after pressing
the
to total the entries, the calculator prints the average below the
total. The number to the left of the total shows the number of entries in
the calculation.
ITEM COUNT / AVERAGE CALCULATION SWITCH
b
c
d
a
5
6
7
8
9
PRINT OFF –
Entries and results will appear on the display, but will not be
printed out.
PRINT ON –
Entries and results will appear on the display and will be
printed out.
PAIR MODE CALCULATION –
Setting the switch to "PAIR", enables you
to total two kinds of corresponding data at the same time.
In the Pair mode, the first number entered and every alternate number
entered after that is accumulated in the first register.
Correspondingly, the second number and every alternate number entered
after that is accumulated in the second register.
Press
key to simultaneously print out entries accumulated in both
registers and obtain their Sub-total.
Press
key to simultaneously print out entries accumulated in both
registers and obtain their total. This function can only be used for addition
calculations.
• Multiplication and division are not possible.
• All entries and results in the first register are printed in
BLACK
and
those in second register are printed in
RED
.
PRINT / PAIR MODE CALCULATION SWITCH
■
Do not use or leave the calculator under direct sunlight. Areas subject to rapid
temperature changes, high humidity, dust and dirt should also be avoided.
■
Use a dry cloth to clean the casing of the unit. Do not use water or detergents.
■
Only use the printer when the paper roll is loaded.
■
Avoid using the calculator in places where there are iron filings, as this may affect the
electrical circuits of the calculator.
■
Do not place anything on top of the machine, particularly on top of the printer mechanism.
■
Turn the calculator off before removing the plug from the electrical outlet.
■
In case of electrical fault (i.e. smoke), disconnect the plug from the electrical
socket-outlet immediately. The socket-outlet should be installed near the equipment
and should be easily accessible.
CARRYING HANDLE
A handle is provided for your convenience to carry the calculator. When using the
calculator, you can raise the back by locking the handle into position as shown in the
illustration. when the handle is placed against a wall, it will prevent the calculator from
moving towards the wall and pressing against the paper roll.
CP1213DIII
La calculadora tiene una conveniente asa para que la pueda transportar con facilidad.
Además, cuando use la calculadora puede elevar su parte trasera fijando para ello el asa
en esa posición como mostrada en la ilustración. Cuando el asa se coloca contra un muro,
esto evita que la calculadora se desplace hacia el muro y oprima el rollo de papel.
ASA DE TRANSPORTACIÓN
CP1213DIII
+
–
+
–
T
S
OVERFLOW FUNCTION
In the following cases, when "E" is displayed, "ERR" is printed, the keyboard is
electronically locked, and further operation is impossible. Press
to clear the overflow.
The overflow function occurs when:
1)
The result or the memory content exceeds 12 digits to the left of the decimal point.
2) Dividing by "0".
3)
The sequential operation speed is faster than the calculation processing speed.
(Buffer Register Overflow)
Electromagnetic interference or electrostatic discharge may cause the display to
malfunction or the contents of the memory to be lost or altered. Should this occur,
disconnect the plug from the electrical outlet and connect to restart the calculator.
C
+
–
+
–
T
S
CALCULO MODO PAR
–
Coloque el interruptor en "PAIR", esta functión
le permite totalizar dos clases de datos correspondientes al mismo tiempo.
En el modo Par, el primer número alterno ingresado después que sea
acumulado en el primer registro.
De igual forma, el segundo número y cada número alterno ingresado
después que sea acumulado en el segundo registro.
Presione la tecla
para simultáneamente imprimir entradas
acumuladas en ambos registros y obtener su Subtotal.
Presione la tecla
para simultáneamente imprimir entradas
acumuladas en ambos registros y obtener su total. Esta función
solamente puede ser usada para cálculos de sumas.
• La multiplicación y división no son posibles.
• Todas las entradas y resultados en el primer registro e impresos en
negro
y aquellos en el segundo registro son impresos en
rojo
.
CONTADOR DE ENTRADAS / INTERRUPTOR DE CALCULO
PROMEDIO
La calculadora cuenta y imprime los números de calculación hasta
9999.
CONTADOR DE ENTRADAS –
Cuando el contador de n.º de entradas
está situado en n+, la calculadora contará el n.º de veces que las teclas
y
se presionan. Cuando el contador de n.º de entradas
está situado en n+/– la calculadora contará el n.º de veces que se
presiona la tecla
y restará del total el n.º de veces que se
presiona la tecla
.
CONTADOR DE ENTRADAS DE MEMORIA –
Cuando el contador de
n.º de entradas está situado en n+, la calculadora contará el n.º
de
veces que las teclas
y
se presionan. Cuando el contador de
n.º de entradas está situado en n+/– la calculadora contará el n.º
de
veces que se presiona la tecla
y
restará del total el n de
veces que se
presiona la tecla
.
IMPRESIÓN DE LA CUENTA DE ARTICULOS –
Cuando el interruptor
de impresión "PRINT" se posiciona en ON, y el interruptor de cuenta de
entradas (ITEM) está en la posición n+ o n+/–, puede imprimirse el
número de entradas registradas por el contador, hasta tres dígitos, en
la izquierda del papel, presionando la tecla
o la tecla
para la
cuenta de entradas y la tecla
o la tecla
para la memoria de
cuenta de entradas.
PANTALLA DE RECUENTO ARTÍCULO – Cuando presiona y sostiene
el botón
,
para mostrar el número de cuenta de artículos
y.
CALCULO PROMEDIO
– Coloque el interruptor en “AVE”, después de
presionar el
para el total de las entradas, la calculadora imprime el
promedio debajo del total. El número a la izquierda del total muestra el
número de entradas en el cá
lculo.
FUNCIÓN DE REBOSE
En los siguientes casos, cuando aparece una "E" en la pantalla, "ERR" es impresa, el
teclado se bloquea electrónicamente, y la operación subsiguiente no es posible, presione
para borrar el rebose. La función de rebose ocurre cuando:
1)
El resultado o el contenido de la memoria excede de 12 dígitos a la izquierda del
punto decimal.
2) Divide por "0"
3)
La velocidad de la operación secuencial es más rápida que la velocidad del proceso
de cálculo. (Rebosamiento del registro de la memoria intermedia)
Las interferencias electromagnéticas o las descargas electrostáticas pueden
provocar problemas de funcionamiento en la pantalla, o pérdidas o alteraciones
en el contenido de la memoria o en los tipos impositivos. Si se encuentra en esta
situación, desconecte el enchufe de la toma
eléctrica y vuelva a conectario para
reiniciar la calculadora. Después de reiniciar, asegúrese de
introducir
nuevamente los
valores de cambio e impuestos.
ESPECIFICACIONES
Suministro de Energía: CA120V 60Hz, 0.2A
Temperatura de operación: 0
o
C a 40
o
C (32
o
F a 104
o
F)
Capacidad de Cálculos: Máximo de 12 dígitos
Dimensiones:
343mm (longitud) x 243mm (ancho) x 98mm (alto) /
13-1/2" (longitud) x 9-9/16" (ancho) x 3-55/64" (alto)
Peso: 1.95 kg (4.3 lb)
(Sujeto a cambios sin previo aviso)
C
+
–
CE
+
–
CE
5
8
9
6
A
7
B
B
5
8
9
6
A
7
B
B
E-IM-2914