Canon CanoScan D2400UF CanoScan D1230U/D2400U Film Adapter Unit Guide - Page 2
Settings for Scanning Film with the Driver Software Canon Plug-in Module CS-U - windows 7 driver
 |
View all Canon CanoScan D2400UF manuals
Add to My Manuals
Save this manual to your list of manuals |
Page 2 highlights
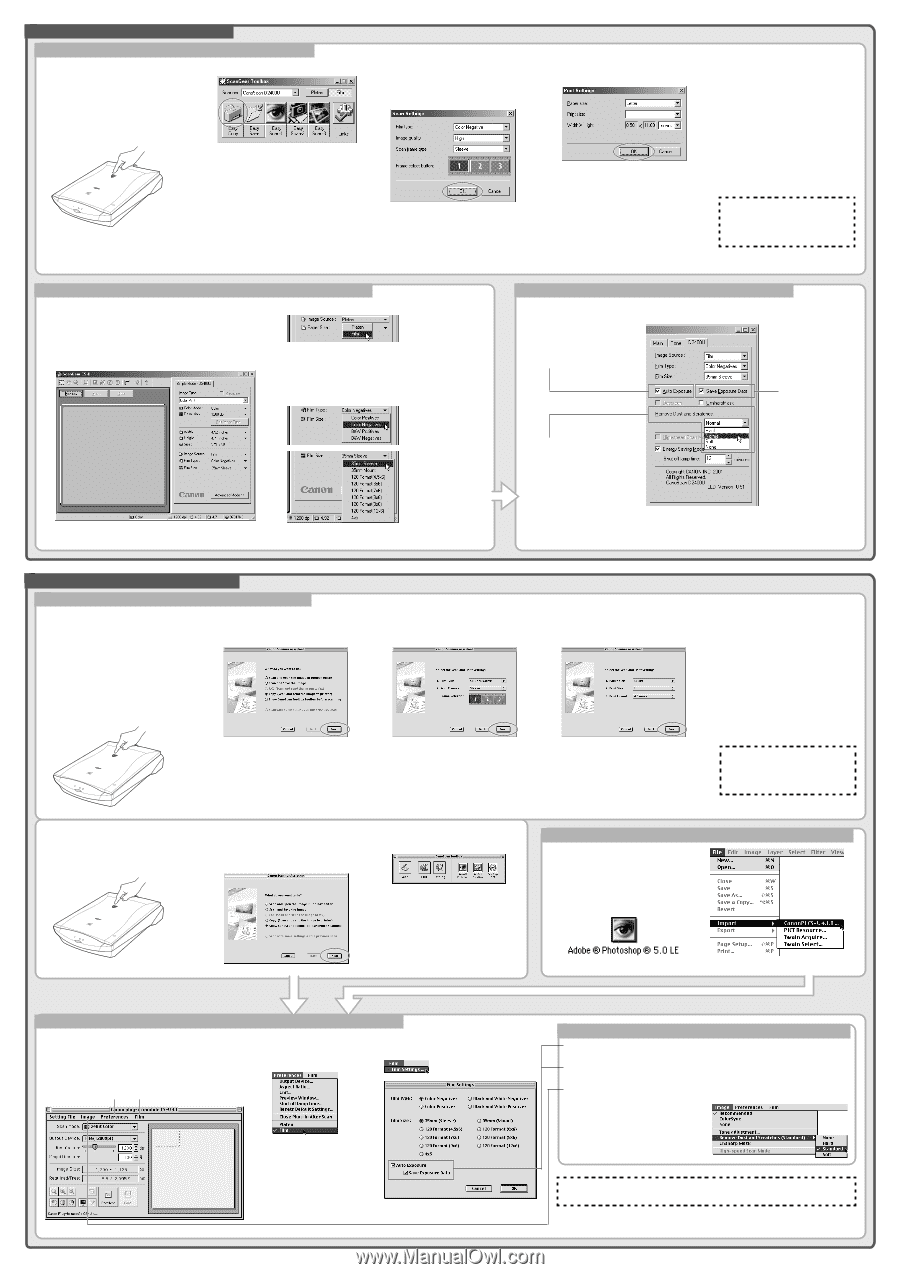
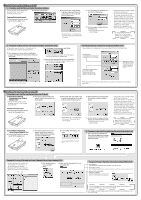
Film Scanning Procedures (Windows) 1. Procedures with the Film Scan Button (ScanGear Toolbox) Only 35 mm film can be scanned with this method. The fax and email functions cannot be used. 2. Click the [Copy] button. Copying (Printing) Example 1. Press the Film Scan Button on the top of the film adapter unit. 3. Select a Film type, Image quality, Scan frame type, and a frame for scanning (35 mm film strips) and click the [OK] button. 4. Select the Paper size and Print size and click the [OK] button. • Frame Button No. 1 corresponds to the frame at the extreme right of the film guide. 5. Set the number of copies and click the [OK] button. • The printer will print out the scanned images. • The scanned size of an image is slightly smaller than its frame size. • Up to three frames of 35 mm film can be scanned consecutively. Set the number of frames to be scanned with the Frame Selection buttons. Please note that with certain films the gaps between frames may be included with the images in consecutive scans. If this happens, scan frames singly. • In the Print size category, you can select between the L, LL, postcard, etc. • For more detailed instructions, please refer to the ScanGear Toolbox User's Guide (electronic manual) on the CD-ROM. 2. Procedures without the Film Scan Button (ScanGear Toolbox Not Used) All three film types, 35 mm film, 120 format and 4"x5" format films, can be scanned using this method. 2. In the [Image Source] category, select [Film]. 1. Start ScanGear CS-U from within an application program according to the instructions in the Quick Start Guide. • In Advanced Mode, you can set the film settings by clicking the [D1230U] or [D2400U] tab. 3. Select the film type and film size of the loaded film. • The Film Type and Film Size categories appear when the film option is selected in Step 2. This illustration shows the Simple Mode. Convenient Features of the Driver Software (ScanGear CS-U) These settings can be adjusted in the Advanced Mode's [D1230U] or [D2400U] tab. Auto Exposure Automatically adjusts the exposure compensation to an optimal value. Remove Dust and Scratches (CanoScan D2400U) Removes small dirt spots or scratches. Scan between 252400 dpi scanning resolution. Save Exposure Data Saves the exposure data for a particular frame, making it available for scanning subsequent frames. After adjusting the film settings, initiate the scan according to the instructions in the Quick Start Guide. Film Scanning Procedures (Macintosh) 1. Procedures with the Film Scan Button (CanoScan Toolbox) (1) Procedures without Displaying Canon Plug-in Module CS-U • Only 35 mm film can be scanned using this method. The fax function cannot be used. 2. The Canon Scanner Assistant will appear. Select [Copy] and click the [Next] button. Copying (Printing) Example 1. Press the Film Scan Button on the top of the film adapter unit. 3. Select a Film Type, Scan Frames, and a frame for scanning (for 35 mm film strips), and click the [Next] button. • Frame Button No. 1 corresponds to the frame at the extreme right of the film guide. 4. Select the Paper Size, Print Size and Print Layout, and click the [Next] button. 5. Set the number of copies and other settings, and click the [Print] button. • The printer will print out the scanned images. • The scanned size of an image is slightly smaller than its frame size. • Up to three frames of 35 mm film can be scanned consecutively. Set the number of frames to be scanned with the Frame Selection buttons. Please note that with certain films the gaps between frames may be included with the images in consecutive scans. If this happens, scan frames singly. • In the Print Size category, you can select between the L, LL, postcard, etc. • For more detailed instructions, please refer to the CanoScan Toolbox User's Guide (electronic manual) on the CD-ROM. (2) Procedures Displaying Canon Plug-in Module CS-U 1. Press the Film Scan Button on the top of the film adapter unit. 2. The Canon Scanner Assistant will appear. Select [Show CanoScan Toolbox Toolbar before scanning], and click the [Next] button. 3. In the toolbar that displays, click [Scan]. Canon Plug-in Module CS-U will start. 2. Procedures without the Film Scan Button (CanoScan Toolbox Not Used) 1. Start Canon Plug-in Module CS-U from within an application program according to the instructions in the Quick Start Guide. Settings for Scanning Film with the Driver Software (Canon Plug-in Module CS-U) • All three film types, 35 mm film, 120 format and 4"x5" format films, can be scanned using this method. • Display the Film menu by clicking the [Preferences] menu and selecting [Film]. 1. 2. 1. Click the [Preferences] menu and select [Film]. 2. Select the Film Type and Film Size of the loaded film. Convenient Features of the Driver Software (Canon Plug-in Module CS-U) Auto Exposure Automatically adjusts the exposure compensation to an optimal value. Save Exposure Data Saves the exposure data for a particular frame, making it available for scanning subsequent frames. Remove Dust and Scratches (CanoScan D2400U) Removes small dirt spots or scratches. Scan between 25-2400 dpi scanning resolution. • For more detailed instructions, please refer to the Canon Plug-in Module CS-U User's Guide (electronic manual) on the CD-ROM. After adjusting the film settings, initiate the scan according to the instructions in the Quick Start Guide.
-
 1
1 -
 2
2
 |
 |