Canon CanoScan FB 1200S User Manual - Page 25
Setting the Scan Mode, Black and White, bit Grayscale, bit Color
 |
View all Canon CanoScan FB 1200S manuals
Add to My Manuals
Save this manual to your list of manuals |
Page 25 highlights
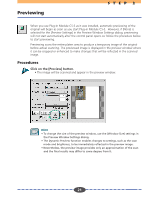
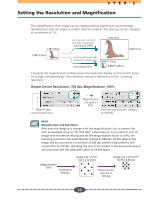
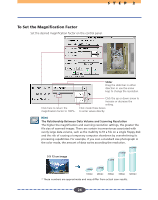
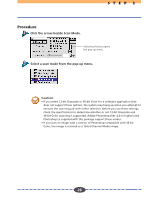
Setting the Scan Mode STEP 2 When an image is scanned, it is read as a collection of "dots." The scan mode that is selected determines how each of these dots is represented in the output. The following five scan modes are available. Black and White Expresses the image with dots of only two shades: black or white. Select Threshold to lighten or darken the entire image by setting the value by which dots are judged to be either black or white. Select this option for scanning photographs and text for printing in monochrome. 8-bit Grayscale Expresses a dot in up to 256 shades of gray. Select this option for scanning black and white graphics and photographs. 12-bit Grayscale Expresses a dot in up to 4,096 shades of gray. Select this option for exceptionally high quality grayscale images. However, the file will be approximately twice the size of an 8-bit Grayscale file. 24-bit Color Expresses a dot with 8 bits for each primary color - red, green, and blue (RGB) - for a total of 24 bits. A dot can be expressed in up to 16.8 million distinct shades. Use this option for most color photographs. 36-bit Color Expresses a dot with 12-bits for each primary color - red, green, and blue (RGB) - for a total of 36 bits. A dot can be expressed in up to 68.7 billion distinct shades. However, the file will be approximately twice the size of a 24-bit Color file. Hint Scanning the same image in the three different scan modes produces different file sizes. By size, black and white mode requires the least disk space, followed in order by the grayscale and the color modes. Before scanning, check the data volume indicator on the control panel. The numerator indicates the amount of disk space required for the scanned image while the denominator indicates the amount of disk space available. When the required space exceeds the available space, the scan button is unavailable. 25 25
-
 1
1 -
2
-
3
-
4
-
5
-
6
-
7
-
8
-
9
-
10
-
11
-
12
-
13
-
14
-
15
-
16
-
17
-
18
-
19
-
 20
20 -
 21
21 -
 22
22 -
 23
23 -
 24
24 -
 25
25 -
 26
26 -
 27
27 -
 28
28 -
 29
29 -
 30
30 -
31
-
32
-
33
-
34
-
35
-
36
-
37
-
38
-
39
-
40
-
41
-
42
-
43
-
44
-
45
-
46
-
47
-
48
-
49
-
50
-
51
-
52
-
53
-
54
-
55
-
56
-
57
-
58
-
59
-
60
-
61
-
62
-
63
-
64
-
65
-
66
-
67
-
68
-
69
-
70
 |
 |
