Canon DR-3080CII User Manual - Page 19
Installation Procedure
 |
View all Canon DR-3080CII manuals
Add to My Manuals
Save this manual to your list of manuals |
Page 19 highlights
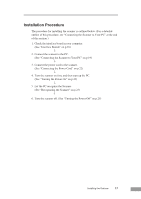
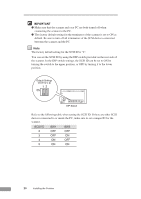
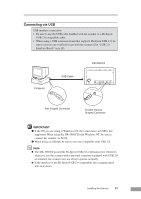
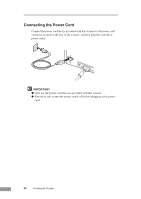
Installation Procedure The procedure for installing the scanner is outlined below. (For a detailed outline of this procedure, see "Connecting the Scanner to Your PC" at the end of this section.) 1. Check the interface board in your computer. (See "Interface Boards" on p.18) ↓ 2. Connect the scanner to the PC. (See "Connecting the Scanner to Your PC" on p.19) ↓ 3. Connect the power cord to the scanner. (See "Connecting the Power Cord" on p.22) ↓ 4. Turn the scanner on first, and then start up the PC. (See "Turning the Power On" on p.23) ↓ 5. Let the PC recognize the Scanner. (See "Recognizing the Scanner" on p.23) ↓ 6. Turn the scanner off. (See "Turning the Power Off" on p.25) Installing the Scanner 17
-
 1
1 -
2
-
3
-
4
-
5
-
6
-
7
-
8
-
9
-
10
-
11
-
12
-
13
-
 14
14 -
 15
15 -
 16
16 -
 17
17 -
 18
18 -
 19
19 -
 20
20 -
 21
21 -
 22
22 -
 23
23 -
 24
24 -
25
-
26
-
27
-
28
-
29
-
30
-
31
-
32
-
33
-
34
-
35
-
36
-
37
-
38
-
39
-
40
-
41
-
42
-
43
-
44
-
45
-
46
-
47
-
48
-
49
-
50
-
51
-
52
-
53
-
54
-
55
-
56
-
57
-
58
-
59
-
60
-
61
-
62
-
63
-
64
-
65
-
66
-
67
-
68
-
69
-
70
-
71
 |
 |

Installing the Scanner
17
Installation Procedure
The procedure for installing the scanner is outlined below. (For a detailed
outline of this procedure, see “Connecting the Scanner to Your PC” at the end
of this section.)
1.
Check the interface board in your computer.
(See “Interface Boards” on p.18)
↓
2.
Connect the scanner to the PC.
(See “Connecting the Scanner to Your PC” on p.19)
↓
3.
Connect the power cord to the scanner.
(See “Connecting the Power Cord” on p.22)
↓
4.
Turn the scanner on first, and then start up the PC.
(See “Turning the Power On” on p.23)
↓
5.
Let the PC recognize the Scanner.
(See “Recognizing the Scanner” on p.23)
↓
6.
Turn the scanner off. (See “Turning the Power Off” on p.25)