Canon EOS 30D EOS Utility 2.8 for Macintosh Instruction Manual - Page 54
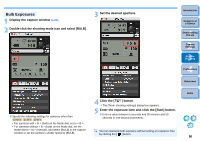
Click the, button to shoot., Quick Preview] window.
 |
UPC - 013803065114
View all Canon EOS 30D manuals
Add to My Manuals
Save this manual to your list of manuals |
Page 54 highlights
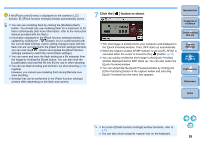
If the [Flash control] menu is displayed on the camera's LCD monitor, EU [Flash function settings] window automatically closes. O You can use modeling flash by clicking the [Modeling flash] button. You should only use modeling flash for a maximum of 10 times continuously. (For more information, refer to the Instruction Manual provided with the flash.) O Information displayed in the [Flash function settings] window is updated by clicking the [ ] button, so it is synchronized with the current flash settings. (Since setting changes made with the flash unit are not reflected in the [Flash function settings] window, you can click the [ ] button and update the [Flash function settings] window to match the current flash settings.) O You can name and save the flash setting as a file separate from the image by clicking the [Save] button. You can also click the [Load] button and load this file into EU for use in other shooting. O You can use flash shooting and Remote Live View shooting (p.26) together. However, you cannot use modeling flash during Remote Live View shooting. O Settings that can be performed in the [Flash function settings] window differ depending on the flash and camera. 7 Click the [ ] button to shoot. Introduction Contents at a Glance 1 Downloading Images ¿ The shot image is transferred to your computer and displayed in the [Quick Preview] window. Then, DPP starts up automatically. O When the capture window AF/MF selector is set to [AF], AF/AE is executed when the cursor is moved to the [ ] button. (p.70) O You can quickly review the shot image in the [Quick Preview] window displayed before DPP starts up. You can also resize the [Quick Preview] window. O You can show/hide the [Quick Preview] window by clicking the [Other Functions] button in the capture widow and selecting [Quick Preview] from the menu that appears. 2Camera Settings 3Remote Shooting 4 Preferences Reference Index O For a list of [Flash function settings] window functions, refer to p.72. O You can also shoot using the bar on the keyboard. 53
-
 1
1 -
2
-
3
-
4
-
5
-
6
-
7
-
8
-
9
-
10
-
11
-
12
-
13
-
14
-
15
-
16
-
17
-
18
-
19
-
20
-
21
-
22
-
23
-
24
-
25
-
26
-
27
-
28
-
29
-
30
-
31
-
32
-
33
-
34
-
35
-
36
-
37
-
38
-
39
-
40
-
41
-
42
-
43
-
44
-
45
-
46
-
47
-
48
-
 49
49 -
 50
50 -
 51
51 -
 52
52 -
 53
53 -
 54
54 -
 55
55 -
 56
56 -
 57
57 -
 58
58 -
 59
59 -
60
-
61
-
62
-
63
-
64
-
65
-
66
-
67
-
68
-
69
-
70
-
71
-
72
-
73
-
74
-
75
-
76
-
77
-
78
 |
 |