Canon LV-7255 LV-7255_manual.pdf - Page 14
To turn the logo upside down, follow the steps below.
 |
View all Canon LV-7255 manuals
Add to My Manuals
Save this manual to your list of manuals |
Page 14 highlights
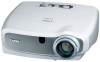
Bottom Adjustable Tilt Foot (See page 23) Adjustable Tilt Foot Lock Button (See page 23) 1. Introduction Lamp Cover (See page 50) NOTE: A spacer is attached to the rear foot at the factory. To fine-adjust the height of the rear foot, remove the spacer and rotate the rear foot to the desired height. Do not throw away or lose the spacer. HINT: The Canon logo is on the panel of the projector cabinet . When projecting an image with the projector hung from the ceiling, turn the Canon logo upside down. To turn the logo upside down, follow the steps below. 1. Push one end of the logo gently. The other end will pop up slightly. • The right drawing shows the part "C" is pressed gently. • The part "n" on the other end will pop up. 2. Push and hold the end of the logo gently and rotate the logo by holding the other end. • The right drawing shows that with the part "C" pressed the logo is rotated by holding the part "n" on the other end. 3. Release your hold and turn the logo upside down. 5
-
 1
1 -
2
-
3
-
4
-
5
-
6
-
7
-
8
-
 9
9 -
 10
10 -
 11
11 -
 12
12 -
 13
13 -
 14
14 -
 15
15 -
 16
16 -
 17
17 -
 18
18 -
 19
19 -
20
-
21
-
22
-
23
-
24
-
25
-
26
-
27
-
28
-
29
-
30
-
31
-
32
-
33
-
34
-
35
-
36
-
37
-
38
-
39
-
40
-
41
-
42
-
43
-
44
-
45
-
46
-
47
-
48
-
49
-
50
-
51
-
52
-
53
-
54
-
55
-
56
-
57
-
58
-
59
-
60
-
61
-
62
-
63
-
64
-
65
-
66
-
67
-
68
-
69
-
70
-
71
-
72
-
73
-
74
 |
 |
