Canon MF4370DN imageCLASS MF4370dn/MF4350d Starter Guide - Page 36
Check Installation, Verify that there is the [Canon MF Toolbox 4.9] icon on the Windows desktop. - scanner
 |
UPC - 013803092127
View all Canon MF4370DN manuals
Add to My Manuals
Save this manual to your list of manuals |
Page 36 highlights
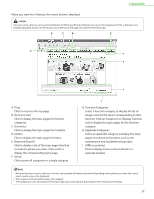
5 Set Up Computers and Software Check Installation Verify that the driver has been installed successfully and that the machine has been set as the default printer. If the name of the machine is selected on the [Printer] screen from an application, it is set as the default printer. 1 Open the [Printers and Faxes] folder (for Windows 2000: The [Printers] dialog box). Windows XP: From the Windows task bar, click [start] → select [Printers and Faxes]. Windows Vista: From the Windows task bar, click [Start] → select [Control Panel] → [Hardware and Sound] → double-click [Printers]. Windows 2000: From the Windows task bar, click [Start] → [Settings] → [Control Panel] → double-click [Printers]. Verify that the corresponding printer driver icon is displayed. 2 Set your machine as the default printer. Verify that the printer icon for this machine is displayed. Select [Set as Default Printer] from the [File] menu. 3 Open the [Scanners and Cameras] folder (for Windows 2000: The [Scanners and Cameras Properties] dialog box). Windows XP: From the Windows task bar, click [start] → select [Control Panel] → [Printers and Other Hardware] → [Scanners and Cameras]. Windows Vista: From the Windows task bar, click [Start] → select [Control Panel] → [Hardware and Sound] → double-click [Scanners and Cameras]. Windows 2000: From the Windows task bar, click [Start] → [Settings] → [Control Panel] → double-click [Scanners and Cameras]. Verify that the corresponding scanner driver icon is displayed. 4 Verify that there is the [Canon MF Toolbox 4.9] icon on the Windows desktop. If the [Canon MF Toolbox 4.9] icon is displayed on the Windows desktop, installation of the MF Toolbox 4.9 was successful. 34
-
 1
1 -
2
-
3
-
4
-
5
-
6
-
7
-
8
-
9
-
10
-
11
-
12
-
13
-
14
-
15
-
16
-
17
-
18
-
19
-
20
-
21
-
22
-
23
-
24
-
25
-
26
-
27
-
28
-
29
-
30
-
 31
31 -
 32
32 -
 33
33 -
 34
34 -
 35
35 -
 36
36 -
 37
37 -
 38
38 -
 39
39 -
 40
40 -
 41
41 -
42
-
43
-
44
 |
 |