Canon MF6590 imageCLASS MF6500 Series Reference Guide - Page 167
Fuser Roller, Open the multi-purpose tray. - cartridge
 |
UPC - 013803082043
View all Canon MF6590 manuals
Add to My Manuals
Save this manual to your list of manuals |
Page 167 highlights
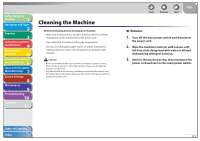
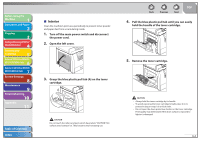
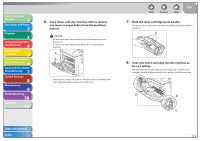
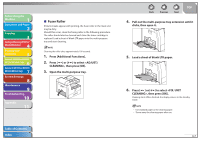
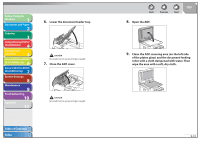
Before Using the Machine 1 Document and Paper 2 Copying 3 Sending and Receiving (MF6595cx/ MF6595/MF6590 Only) 4 Printing and Scanning 5 Network (MF6595cx/MF6595/ 6 MF6590/MF6540 Only) Remote UI (MF6595cx/MF6595/ 7 MF6590/MF6540 Only) System Settings 8 Maintenance 9 Troubleshooting 10 Appendix 11 ˙ Fuser Roller If black streaks appear with printing, the fuser roller in the main unit may be dirty. Should this occur, clean the fusing roller in the following procedure. The roller should also be cleaned each time the toner cartridge is replaced. Load a sheet of blank LTR paper into the multi-purpose tray and start cleaning. Cleaning the roller takes approximately 100 seconds. 1. Press [Additional Functions]. 2. Press [ ] or [ ] to select , then press [OK]. 3. Open the multi-purpose tray. Table of Contents Index Back Previous Next TOP 4. Pull out the multi-purpose tray extension until it clicks, then open it. 5. Load a sheet of blank LTR paper. 6. Press [ ] or [ ] to select , then press [OK]. Cleaning starts. When finished, the display returns to the standby mode. - Use standard paper as the cleaning paper. - Throw away the cleaning paper after use. 9-7
-
 1
1 -
2
-
3
-
4
-
5
-
6
-
7
-
8
-
9
-
10
-
11
-
12
-
13
-
14
-
15
-
16
-
17
-
18
-
19
-
20
-
21
-
22
-
23
-
24
-
25
-
26
-
27
-
28
-
29
-
30
-
31
-
32
-
33
-
34
-
35
-
36
-
37
-
38
-
39
-
40
-
41
-
42
-
43
-
44
-
45
-
46
-
47
-
48
-
49
-
50
-
51
-
52
-
53
-
54
-
55
-
56
-
57
-
58
-
59
-
60
-
61
-
62
-
63
-
64
-
65
-
66
-
67
-
68
-
69
-
70
-
71
-
72
-
73
-
74
-
75
-
76
-
77
-
78
-
79
-
80
-
81
-
82
-
83
-
84
-
85
-
86
-
87
-
88
-
89
-
90
-
91
-
92
-
93
-
94
-
95
-
96
-
97
-
98
-
99
-
100
-
101
-
102
-
103
-
104
-
105
-
106
-
107
-
108
-
109
-
110
-
111
-
112
-
113
-
114
-
115
-
116
-
117
-
118
-
119
-
120
-
121
-
122
-
123
-
124
-
125
-
126
-
127
-
128
-
129
-
130
-
131
-
132
-
133
-
134
-
135
-
136
-
137
-
138
-
139
-
140
-
141
-
142
-
143
-
144
-
145
-
146
-
147
-
148
-
149
-
150
-
151
-
152
-
153
-
154
-
155
-
156
-
157
-
158
-
159
-
160
-
161
-
 162
162 -
 163
163 -
 164
164 -
 165
165 -
 166
166 -
 167
167 -
 168
168 -
 169
169 -
 170
170 -
 171
171 -
 172
172 -
173
-
174
-
175
-
176
-
177
-
178
-
179
-
180
-
181
-
182
-
183
-
184
-
185
-
186
-
187
-
188
-
189
-
190
-
191
-
192
-
193
-
194
-
195
-
196
-
197
-
198
-
199
-
200
-
201
-
202
-
203
-
204
-
205
-
206
-
207
-
208
-
209
-
210
-
211
-
212
-
213
-
214
-
215
-
216
-
217
-
218
-
219
-
220
-
221
-
222
-
223
-
224
-
225
-
226
-
227
-
228
-
229
-
230
-
231
-
232
-
233
-
234
-
235
-
236
-
237
-
238
-
239
-
240
-
241
-
242
-
243
-
244
-
245
-
246
-
247
-
248
-
249
-
250
-
251
-
252
-
253
-
254
-
255
-
256
-
257
-
258
-
259
-
260
-
261
-
262
-
263
-
264
-
265
-
266
-
267
-
268
-
269
-
270
-
271
-
272
-
273
-
274
-
275
-
276
-
277
-
278
-
279
-
280
-
281
-
282
-
283
-
284
-
285
-
286
-
287
-
288
-
289
-
290
-
291
-
292
 |
 |
