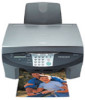
Canon MultiPASS MP700 MultiPASS MP700 Set-Up Sheet - Page 6
Install the ink tanks., Align the printhead. - print head
 |
View all Canon MultiPASS MP700 manuals
Add to My Manuals
Save this manual to your list of manuals |
Page 6 highlights
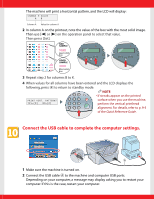
Install the ink tanks. 1 Start with the yellow ink tank. Pull the orange tape in the direction of the arrow and remove the plastic wrapper so you can see the air hole A. Turn the ink tank over so that the protective cap B is facing up. Then hold the ink tank as shown below and remove the protective cap B. B B NOTE A Ink Tank BCI-3eY PULL PULL InkBTCanI-k3eY Yellow Made in Japan PUSU DC • To avoid spilling ink, never press on the long sides of the ink tank C. • Once you remove the protective cap B, do not touch the ink port D. 2 Insert the ink tank (label-side up) into the correct slot (refer to the color guide on the printhead). Press down gently on the ink tank until an audible click is heard. BCI-3eY Yellow PUSH BCI-3eY Yellow PUSH Black Cian Magenta Yellow Black Cian Magenta Yellow 3 Repeat steps 1 and 2 to install the remaining magenta, cyan, and black ink tanks. BCI-3eBK Black BCI-3eC Cian BCI-3eM BCI-3eY Magenta Yellow PUSH PUSH PUSH PUSH BCI-3eBK Black BCI-3eC BCI-3eM BCI-3eY Yellow Cian Magenta PUSH PUSH PUSH PUSH IMPORTANT • Make sure the ink tanks are inserted all the way into their slots. Black Cian Magenta Yellow Correct position Black Cian Magenta Yellow Incorrect position 4 Close the scanning unit until it locks into place. Align the printhead as explained in step 9. Align the printhead. NOTE • You can also align the printhead from the software. For details, refer to the Software Guide. 1 When the LCD A displays the following, press [Set]. ALIGN PRINT HEAD PRESS SET KEY A NOTE • If a display other than appears, refer to p. 9-5 of the Quick Reference Guide to align the printhead.
-
 1
1 -
 2
2 -
 3
3 -
 4
4 -
 5
5 -
 6
6 -
 7
7 -
 8
8
 |
 |
