Canon PIXMA MX479 Printing Guide - Page 62
Printing with ICC Profiles
 |
View all Canon PIXMA MX479 manuals
Add to My Manuals
Save this manual to your list of manuals |
Page 62 highlights
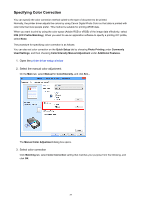
Printing with ICC Profiles When the image data has a specified input ICC profile, you can print by using the color space (Adobe RGB or sRGB) of the data effectively. The printer driver setting procedure varies depending on the application software used to print. Specify an ICC Profile from the Application Software and Print the Data When you print the editing and touch-up results of Adobe Photoshop, Canon Digital Photo Professional, or any application software that allows you to specify input and printing ICC profiles, you print by effectively using the color space of the input ICC profile specified in the image data. To use this printing method, use your application software to select color management items and specify an input ICC profile and a printing ICC profile in the image data. Even if you print using a printing ICC profile that you created yourself from your application software, be sure to select color management items from your application software. For instructions, refer to the manual of the application software you are using. 1. Open the printer driver setup window 2. Select the manual color adjustment On the Main tab, select Manual for Color/Intensity, and click Set.... The Manual Color Adjustment dialog box opens. 3. Select color correction Click Matching tab, and select None for Color Correction. 4. Set the other items If necessary, click Color Adjustment tab, and adjust the color balance (Cyan, Magenta, Yellow) and adjust Brightness, Intensity, and Contrast settings, and then click OK. 62
-
 1
1 -
2
-
3
-
4
-
5
-
6
-
7
-
8
-
9
-
10
-
11
-
12
-
13
-
14
-
15
-
16
-
17
-
18
-
19
-
20
-
21
-
22
-
23
-
24
-
25
-
26
-
27
-
28
-
29
-
30
-
31
-
32
-
33
-
34
-
35
-
36
-
37
-
38
-
39
-
40
-
41
-
42
-
43
-
44
-
45
-
46
-
47
-
48
-
49
-
50
-
51
-
52
-
53
-
54
-
55
-
56
-
 57
57 -
 58
58 -
 59
59 -
 60
60 -
 61
61 -
 62
62 -
 63
63 -
 64
64 -
 65
65 -
 66
66 -
 67
67 -
68
-
69
-
70
-
71
-
72
-
73
-
74
-
75
-
76
-
77
-
78
-
79
-
80
-
81
-
82
-
83
-
84
-
85
-
86
-
87
-
88
-
89
-
90
-
91
-
92
-
93
-
94
-
95
-
96
-
97
-
98
-
99
-
100
-
101
-
102
-
103
-
104
-
105
-
106
-
107
-
108
-
109
-
110
-
111
-
112
-
113
-
114
-
115
-
116
-
117
-
118
-
119
-
120
-
121
-
122
-
123
-
124
-
125
-
126
-
127
-
128
-
129
-
130
-
131
-
132
-
133
-
134
-
135
-
136
-
137
-
138
-
139
-
140
-
141
-
142
-
143
-
144
-
145
-
146
-
147
-
148
-
149
-
150
-
151
-
152
-
153
-
154
-
155
-
156
-
157
-
158
-
159
-
160
-
161
 |
 |
