Canon PIXMA MX712 Guide for Printer Setup for Network - Page 10
Wired Connection - wireless
 |
View all Canon PIXMA MX712 manuals
Add to My Manuals
Save this manual to your list of manuals |
Page 10 highlights
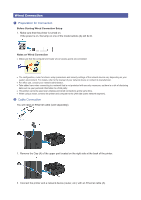
Wired Connection a Preparation for Connection Before Starting Wired Connection Setup 1. Make sure that the printer is turned on. If the power is on, the lamp on one of the mode buttons (A) will be lit. Notes on Wired Connection • Make sure that the computer and router (A) (or access point) are connected. • The configuration, router functions, setup procedures and security settings of the network device vary depending on your system environment. For details, refer to the manual of your network device or contact its manufacturer. • For office use, consult your network administrator. • Take added care when connecting to a network that is not protected with security measures, as there is a risk of disclosing data such as your personal information to a third party. • This printer cannot be used over wireless and wired connections at the same time. • When using a router, connect the printer and computer to the LAN side (same network segment). b Cable Connection You will need an Ethernet cable (sold separately). 1. Remove the Cap (A) of the upper port located on the right side at the back of the printer. 2. Connect the printer and a network device (router, etc.) with an Ethernet cable (A).
-
 1
1 -
2
-
3
-
4
-
 5
5 -
 6
6 -
 7
7 -
 8
8 -
 9
9 -
 10
10 -
 11
11 -
 12
12 -
 13
13 -
 14
14 -
 15
15 -
16
-
17
-
18
-
19
-
20
-
21
-
22
 |
 |
