Canon PIXMA MX892 Setting Up the FAX - Page 1
Canon PIXMA MX892 Manual
 |
View all Canon PIXMA MX892 manuals
Add to My Manuals
Save this manual to your list of manuals |
Page 1 highlights
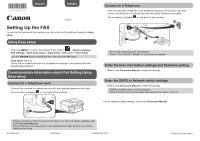
ENGLISH ESPAÑOL K10376 Setting Up the FAX To use the fax features of the machine, you can enter the fax settings through the Easy setup. Using Easy setup Press the MENU button, then select in the order of > Device settings > FAX settings > Start Easy setup or Easy setup > OK button or Start setup. Use the []{} button to select the item, then press the OK button. Easy setup starts up. Follow the on-screen instruction to complete the settings in accordance with the operating environment. Complementary Information about Fax Setting Using Easy setup Connect to a Telephone Jack Connect the machine to a telephone jack with the supplied telephone line cable. The connector is labeled on the back of the machine. Connect to a Telephone When connecting a telephone or an answering machine, remove the Cap, then connect a telephone or an answering machine with a telephone line cable. The connector is labeled on the back of the machine. 1 2 • Do not use a telephone jack line duplexer. • Users in UK: Use a B.T. adapter for connection as required. Enter the User information settings and Date/time setting Refer to the On-screen Manual to enter the settings. Enter the DRPD or Network switch settings Refer to the On-screen Manual to enter the settings. • DRPD is available only in US and Canada. • Network switch may not be available depending on the region or country. For the details of other settings, refer to the On-screen Manual. • A basic connection method is shown in this figure. For other connection methods, refer to the On-screen Manual. • Users in Europe: If you prepare your own telephone line cable, be sure it is a 6-wire telephone line cable. QT5-4896-V01 XXXXXXXX ©CANON INC.2012 PRINTED IN XXXXXXXX
-
 1
1 -
 2
2
 |
 |