Canon PIXMA iP2820 Getting Started Guide - Page 67
Aligning the Print Head Position from Your Computer
 |
View all Canon PIXMA iP2820 manuals
Add to My Manuals
Save this manual to your list of manuals |
Page 67 highlights
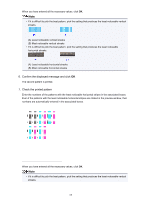
Aligning the Print Head Position from Your Computer Print head alignment corrects the installation positions of the print head and improves deviated colors and lines. The procedure for performing print head alignment is as follows: Note • If you are adjusting the head position while the software is being installed from the Setup CD-ROM, start from Step 3. Print Head Alignment 1. Open the printer driver setup window 2. Click Print Head Alignment on the Maintenance tab The Start Print Head Alignment dialog box opens. 3. Load paper in the printer Load three sheets of A4 size or Letter size plain paper into the rear tray. 4. Execute head alignment Make sure that the printer is on and click Align Print Head. Follow the instruction in the message. 5. Check the printed pattern Enter the numbers of the patterns with the least amount of streaks in the associated boxes. Even if the patterns with the least amount of streaks are clicked in the preview window, their numbers are automatically entered in the associated boxes. 67
-
 1
1 -
2
-
3
-
4
-
5
-
6
-
7
-
8
-
9
-
10
-
11
-
12
-
13
-
14
-
15
-
16
-
17
-
18
-
19
-
20
-
21
-
22
-
23
-
24
-
25
-
26
-
27
-
28
-
29
-
30
-
31
-
32
-
33
-
34
-
35
-
36
-
37
-
38
-
39
-
40
-
41
-
42
-
43
-
44
-
45
-
46
-
47
-
48
-
49
-
50
-
51
-
52
-
53
-
54
-
55
-
56
-
57
-
58
-
59
-
60
-
61
-
 62
62 -
 63
63 -
 64
64 -
 65
65 -
 66
66 -
 67
67 -
 68
68 -
 69
69 -
 70
70 -
 71
71 -
 72
72 -
73
-
74
-
75
-
76
-
77
-
78
-
79
-
80
-
81
-
82
-
83
-
84
-
85
-
86
-
87
-
88
-
89
-
90
-
91
-
92
-
93
-
94
-
95
-
96
-
97
-
98
 |
 |
