Canon PIXMA iP90 iP90 Easy Setup Instructions - Page 1
Canon PIXMA iP90 Manual
 |
View all Canon PIXMA iP90 manuals
Add to My Manuals
Save this manual to your list of manuals |
Page 1 highlights
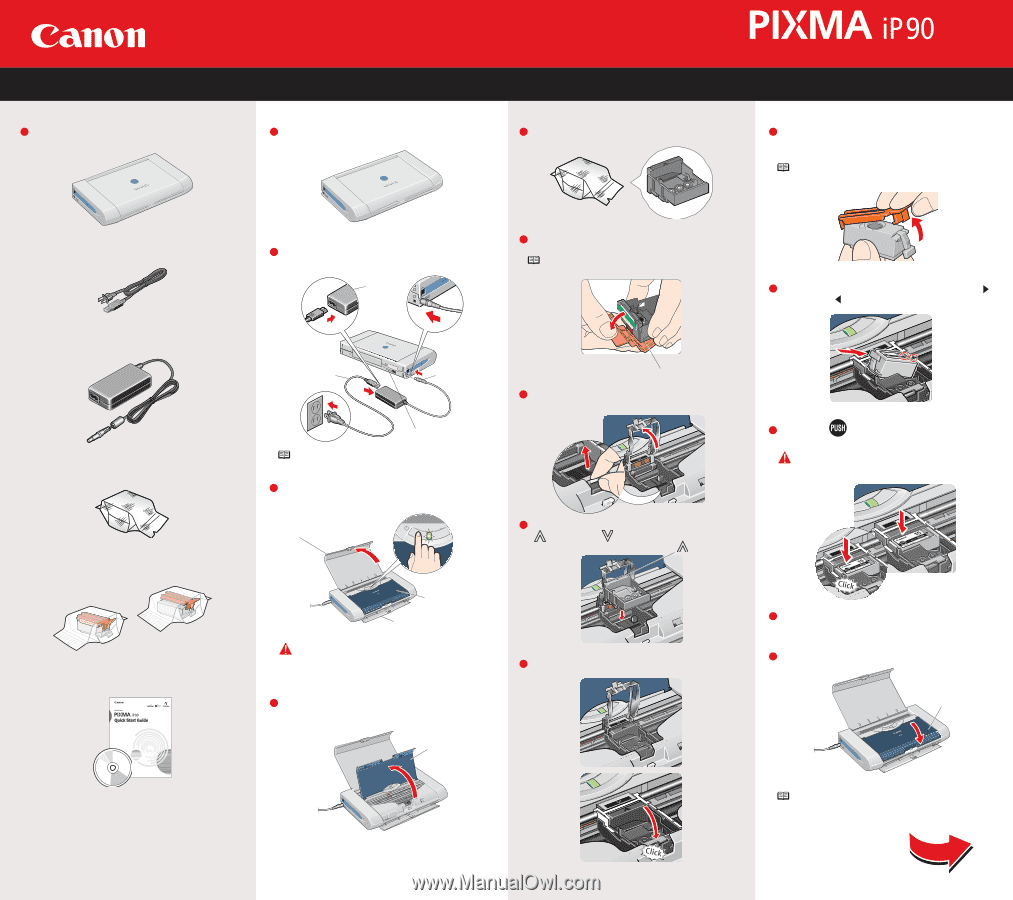
1 Unpack the Printer 1 Carefully remove all items from the box. PIXMA iP90 Photo Printer Power Cord AC Adapter Print Head BCI-15 Black Ink Tanks BCI-16 Color Ink Tanks Documentation and Software Kit 2 Prepare the Printer Start Here Easy Setup Instructions 3 Install the Print Head 1 Remove the shipping materials from the printer. 1 Remove the Print Head from its package. Series Photo Printer 4 Install the Ink Tanks 1 Remove the Black Ink Tank(BCI-15 Black) from its package, and pull off the Protective Cap. NOTE: To avoid spilling ink, do not touch the bottom of the tank once you have removed the Protective Cap. 2 Plug the Power Cord into the AC Adapter. Connect the DC plug to the printer. Plug the Power Cord into a power outlet. AC Adapter 2 Remove the Protective Cap from the Print Head. NOTE: Do not touch the Print Head Nozzles. 1 2 2 Insert the Black Ink Tank into the back slot aligning the mark with the mark. Power Cord 3 DC Plug Serial Number Nozzles 3 Press in on the Lock Button and raise the gray Lock Lever. NOTE: You will need the Serial Number to register the product. 3 Lift open the Paper Support and TURN THE PRINTER ON. The printer will initialize. Paper Support 4 Place the Print Head into the holder by aligning the mark with the mark. mark 3 Press on the until the Ink Tank clicks into place. IMPORTANT: For correct printer operation, make sure ink tanks are secure in slots. Print Head Cover Paper Output Slot Cover IMPORTANT: Do not open the Print Head Cover before the printer has finished initializing. Wait until the POWER lamp remains fully lit. 5 Lower the Lock Lever until it clicks into place. 4 After the printer finishes initializing, open the Print Head Cover. Print Head Cover 4 Repeat the procedure for the Color Ink Tank(BCI-16 Color), inserting it into the front slot. 5 Close the Print Head Cover. Print Head Cover NOTE: The printer will perform a Print Head cleaning after the cover is closed. Wait until the process is complete before proceeding. Continue with Step 5 on side two.
-
 1
1 -
 2
2
 |
 |