Canon POWERSHOT A80 A80_QuickStart.pdf - Page 1
Canon POWERSHOT A80 - Digital Camera - 4.0 Megapixel Manual
 |
UPC - 838030324328
View all Canon POWERSHOT A80 manuals
Add to My Manuals
Save this manual to your list of manuals |
Page 1 highlights
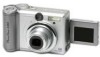
ENGLISH 1 Preparing the Camera 1. Install the batteries. Slide the cover lock. This guide explains the required operations the first time the camera is used, and how to connect to a computer. For usage precautions and detailed instructions, please refer to the manuals listed below. CDI-E109-010 xxxxCHxx © 2003 CANON INC. PRINTED IN JAPAN Do not connect the camera to the computer before the software is installed. Camera Camera User Guide Handling precautions and detailed operations for the camera Computers and Software Software Starter Guide Basic software operations ZoomBrowser EX Software User Guide (Windows®) ImageBrowser Software User Guide (Macintosh) These PDF format manuals contain detailed software operations, and are available on the Canon website. Please download them from the following URL: http://web.canon.jp/Imaging/information-e.html Printers Direct Printer User Guide Detailed printer operations Open the battery cover. Insert the batteries. 2. Install the CF card. Close the cover. Open the CF card slot cover. Insert the CF card. Close the CF card slot cover. 2 Shooting 1. Open the LCD monitor as shown, and tilt it 180 degrees toward the lens. Then fold it back against the camera body. Turn the power on. ON/OFF Button 2. Slide the mode switch to (Shooting) and turn the shooting mode dial to . Shooting Mode Dial Mode Switch The first time you use the camera, set the date and time. See "Set the date and time" below. 3. Focus. Press the shutter button halfway. The camera beeps twice when the subject is in focus. 4. Shoot. Press the shutter button all the way. You will hear the sound of the shutter close when the shot is complete. Basic Shooting Operations For an overview of basic shooting operations, see "Overview" on the reverse side. Set the date and time. Use the left or right button to select items, and use the up or down button to change the value. To put the settings into effect, press the button. 3 Reviewing an Image 1. Slide the mode switch to (Playback). 2. Use the left or right button to display an image. Right Button Left Button 4 Erasing an Image 1. Select the image you wish to erase using the left or right button. 2. Press the button. 3. Check that [Erase] is selected and press the button. To exit instead of erasing, select [Cancel] using the left or right button and press the button. Please note that erased images cannot be recovered. Exercise caution before erasing a file. Continued on the reverse side.
-
 1
1 -
 2
2
 |
 |
