Canon PowerShot A100 PowerShot A200/A100 Camera User Guide - Page 4
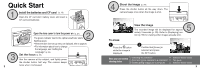
About this Camera User Guide - orange
 |
View all Canon PowerShot A100 manuals
Add to My Manuals
Save this manual to your list of manuals |
Page 4 highlights
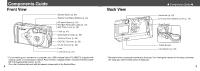
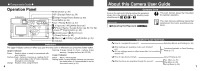
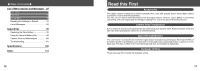
● Components Guide ● Operation Panel MENU Button (p. 36) DISP (Display) Button (p. 29) Indicators (Single Image Erase) Button (p. 65) Zoom Button (p. 35) DISP MENU WB Power / Replay Button (p. 27) ON (Exposure) / WB (White Balance) / (Photo Effects) / (Up) Button (pp. 52, 53, 54) Flash / (Right) Button (p. 43) (Continuous) / (Self-Timer) / SET (Down) Button (p. 46) (Macro) / (Infinity) / (Left) Button (p. 45) SET Button Indicators The upper indicator comes on when you open the lens cover or whenever you press the shutter button. Upper Indicator Green: Ready to shoot, or ready to communicate with your computer. Flashing Green: Camera is starting up, reading the CF card, erasing data on the CF card, or transmitting data to your computer. Orange: Ready to shoot, using the flash. Flashing Orange: Ready to shoot, (camera shake warning) / charging the flash (at LCD ON). Lower Indicator Yellow: Macro / Infinity modes Flashing Yellow: Focusing difficulty (Although you can press the shutter button, it is recommended to use the focus lock to shoot (p. 50)). 6 About this Camera User Guide Symbols Used Icons on the right end of title bars show the operations mode. As in the example below, the shooting mode should be set to , , or . This mark denotes issues that may affect the camera's operation. Shooting Adjusting the Exposure This mark denotes additional topics that complement the basic operating procedures. Question? Look here first. How do I navigate the menus? Selecting Menus and Settings (p. 36) What settings are available under each function? and Will my settings remain in effect even after I've turned the camera off? Functions Available in Each Shooting Mode (p. 57) How do I go about printing? About Printing (p. 67) What functions are available through the menus? Rec. Menu (p. 87) Play Menu (p. 89) Set up Menu (p. 90) 7
-
 1
1 -
 2
2 -
 3
3 -
 4
4 -
 5
5 -
 6
6 -
 7
7 -
 8
8 -
 9
9 -
 10
10 -
11
-
12
-
13
-
14
-
15
-
16
-
17
-
18
-
19
-
20
-
21
-
22
-
23
-
24
-
25
-
26
-
27
-
28
-
29
-
30
-
31
-
32
-
33
-
34
-
35
-
36
-
37
-
38
-
39
-
40
-
41
-
42
-
43
-
44
-
45
-
46
-
47
-
48
-
49
-
50
-
51
-
52
-
53
-
54
-
55
-
56
-
57
-
58
-
59
-
60
-
61
 |
 |
