Canon PowerShot A410 ZoomBrowser EX 5.5 Software User Guide - Page 14
Downloading Images to a Computer 3/8
 |
View all Canon PowerShot A410 manuals
Add to My Manuals
Save this manual to your list of manuals |
Page 14 highlights
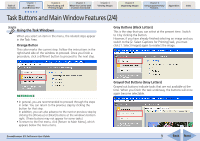
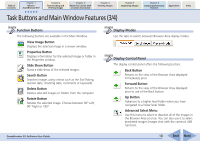
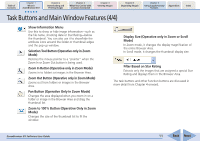
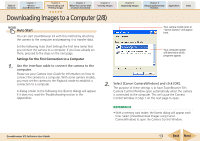
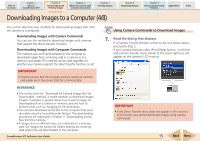
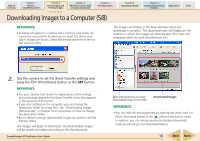
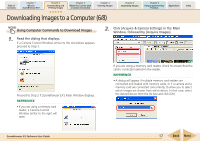
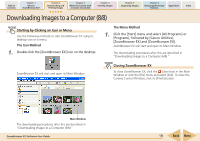
Table of Contents Chapter 1 What is ZoomBrowser EX? Chapter 2 Downloading and Printing Images Chapter 3 What You Can Do with a Camera Connected Chapter 4 Viewing Images Chapter 5 Organizing Images Chapter 6 Using Supplementary Features Appendices Index Downloading Images to a Computer (3/8) ■ Procedures for Subsequent Connections to a Computer IMPORTANT • With some versions of Windows, you may not be able to use this method of starting ZoomBrowser EX the very first time the camera is connected to the computer after it is booted up. (The dialog shown to the right will not display even if you connect the camera to the computer correctly.) In this case, use the icon method to start ZoomBrowser EX. 1. Use the interface cable to connect the camera to the computer. Please see your Camera User Guide for information on how to connect the camera to a computer. If the Auto Start settings have been set according to the previous page, the Camera Control Window will open just by connecting the camera to the computer with the interface cable. REFERENCE • If the Scanners and Cameras Wizard displays, close it and use the icon method to start ZoomBrowser EX. • A device selection dialog will display if you have both a camera and a memory card reader connected at the same time. Confirm that your camera model name or [Canon Camera] appears in the list box and click [OK]. Camera Control Window If you place a check mark here, this window automatically opens when the camera is connected to the computer. REFERENCE • If you do not need to download images (if you wish to proceed directly to ZoomBrowser EX's Main Window), click [Finish] and use the icon method to start ZoomBrowser EX. • The explanation of which downloading method should be used after ZoomBrowser EX has started automatically is contained in the "Downloading Images Automatically" section in Chapter 3. ZoomBrowser EX Software User Guide 14 Back Next
-
 1
1 -
2
-
3
-
4
-
5
-
6
-
7
-
8
-
 9
9 -
 10
10 -
 11
11 -
 12
12 -
 13
13 -
 14
14 -
 15
15 -
 16
16 -
 17
17 -
 18
18 -
 19
19 -
20
-
21
-
22
-
23
-
24
-
25
-
26
-
27
-
28
-
29
-
30
-
31
-
32
-
33
-
34
-
35
-
36
-
37
-
38
-
39
-
40
-
41
-
42
-
43
-
44
-
45
-
46
-
47
-
48
-
49
-
50
-
51
-
52
-
53
-
54
-
55
-
56
-
57
-
58
-
59
-
60
-
61
-
62
-
63
-
64
-
65
-
66
-
67
-
68
-
69
-
70
-
71
-
72
-
73
-
74
-
75
-
76
-
77
-
78
-
79
-
80
-
81
-
82
-
83
-
84
-
85
-
86
-
87
-
88
-
89
-
90
-
91
-
92
-
93
-
94
-
95
-
96
-
97
-
98
-
99
-
100
-
101
-
102
-
103
-
104
-
105
-
106
-
107
-
108
-
109
-
110
-
111
-
112
-
113
-
114
-
115
-
116
-
117
-
118
-
119
-
120
-
121
-
122
-
123
-
124
-
125
-
126
-
127
-
128
-
129
-
130
-
131
-
132
-
133
-
134
-
135
-
136
-
137
-
138
-
139
-
140
-
141
-
142
-
143
-
144
-
145
-
146
-
147
-
148
-
149
-
150
-
151
-
152
-
153
-
154
-
155
-
156
-
157
 |
 |