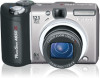
Canon PowerShot A650 IS PowerShot A650 IS Camera User Guide - Page 29
Connecting the camera to a computer., Preparing to download images to the computer. - driver
 |
View all Canon PowerShot A650 IS manuals
Add to My Manuals
Save this manual to your list of manuals |
Page 29 highlights
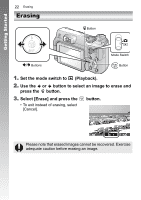
Getting Started Downloading Images to a Computer 27 2. Connecting the camera to a computer. 1. Connect the supplied interface cable to the computer's USB port and to the camera's DIGITAL terminal. • Slip a fingernail under the left edge of the terminal cover to open it and insert the interface cable all the way into the connector. USB Port DIGITAL Terminal Terminal Cover Interface Cable Interface Cable 3. Preparing to download images to the computer. 1. Set the camera's mode switch to the power. The camera and computer will be able to communicate. (Playback) and turn on Mode Switch Power Button Always grasp the sides of the connector when disconnecting the interface cable from the camera's DIGITAL terminal. If the Digital Signature Not Found window appears, click [Yes]. The USB driver will automatically finish installing onto the computer when you attach the camera and open a connection.
-
 1
1 -
2
-
3
-
4
-
5
-
6
-
7
-
8
-
9
-
10
-
11
-
12
-
13
-
14
-
15
-
16
-
17
-
18
-
19
-
20
-
21
-
22
-
23
-
 24
24 -
 25
25 -
 26
26 -
 27
27 -
 28
28 -
 29
29 -
 30
30 -
 31
31 -
 32
32 -
 33
33 -
 34
34 -
35
-
36
-
37
-
38
-
39
-
40
-
41
-
42
-
43
-
44
-
45
-
46
-
47
-
48
-
49
-
50
-
51
-
52
-
53
-
54
-
55
-
56
-
57
-
58
-
59
-
60
-
61
-
62
-
63
-
64
-
65
-
66
-
67
-
68
-
69
-
70
-
71
-
72
-
73
-
74
-
75
-
76
-
77
-
78
-
79
-
80
-
81
-
82
-
83
-
84
-
85
-
86
-
87
-
88
-
89
-
90
-
91
-
92
-
93
-
94
-
95
-
96
-
97
-
98
-
99
-
100
-
101
-
102
-
103
-
104
-
105
-
106
-
107
-
108
-
109
-
110
-
111
-
112
-
113
-
114
-
115
-
116
-
117
-
118
-
119
-
120
-
121
-
122
-
123
-
124
-
125
-
126
-
127
-
128
-
129
-
130
-
131
-
132
-
133
-
134
-
135
-
136
-
137
-
138
-
139
-
140
-
141
-
142
-
143
-
144
-
145
-
146
-
147
-
148
-
149
-
150
-
151
-
152
-
153
-
154
-
155
-
156
-
157
-
158
-
159
-
160
-
161
-
162
-
163
-
164
-
165
-
166
-
167
-
168
-
169
-
170
-
171
-
172
-
173
-
174
-
175
-
176
-
177
-
178
-
179
-
180
-
181
-
182
-
183
-
184
-
185
-
186
-
187
-
188
-
189
-
190
-
191
-
192
-
193
-
194
-
195
-
196
-
197
-
198
-
199
-
200
-
201
-
202
-
203
-
204
-
205
-
206
-
207
-
208
-
209
-
210
-
211
-
212
-
213
-
214
-
215
-
216
-
217
-
218
-
219
 |
 |
