Canon PowerShot G5 Service Manual - Page 54
Battery Lid Unit, Date Battery Holder
 |
View all Canon PowerShot G5 manuals
Add to My Manuals
Save this manual to your list of manuals |
Page 54 highlights
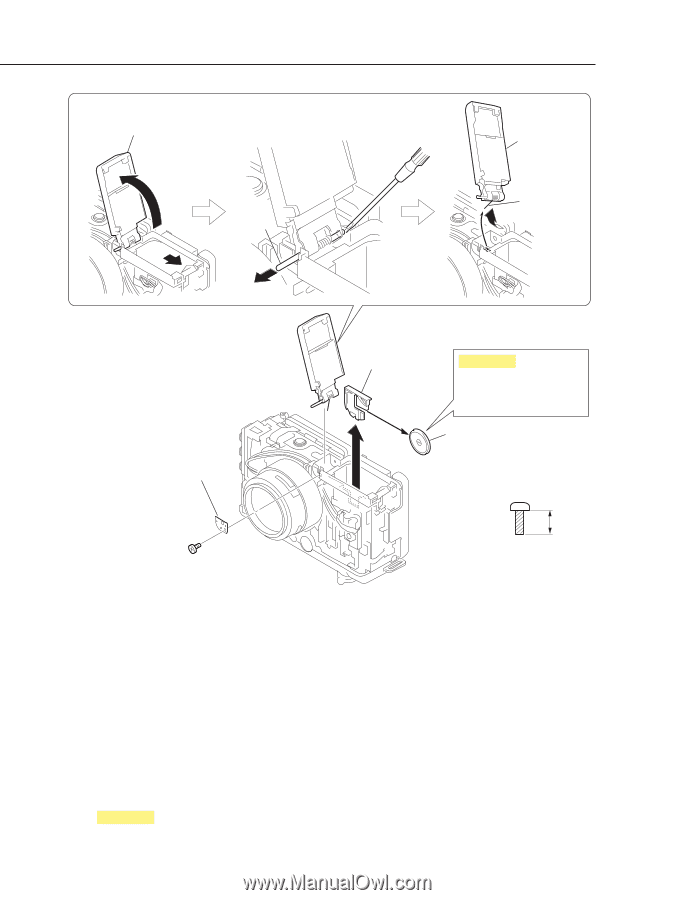
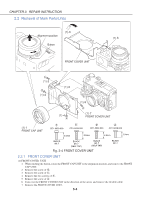
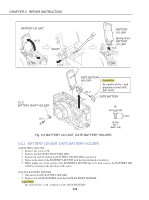
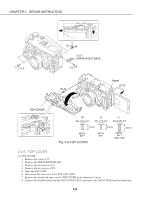
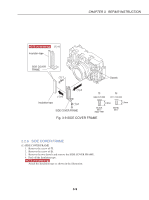
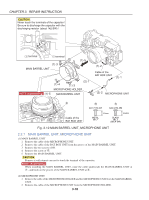
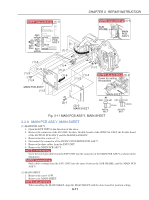
CHAPTER 3. REPAIR INSTRUCTION BATTERY LID UNIT (1)-3 (1)-3 SHAFT (1)-4 BATTERY LID UNIT Spring of the BATTERY LID UNIT (1)-5 (1)-2 BATTERY SHAFT HOLDER (1)-1 q DATE BATTERY HOLDER (2)-2 CAUTION Be careful of the + and polarities of the DATE BATTERY. (2)-1 DATE BATTERY q XA4-9170-359 3.5mm BLACK M1.7 (SELF TAP) Fig. 3-6 BATTERY LID UNIT, DATE BATTERY HOLDER 2.2.3 BATTERY LID UNIT, DATE BATTERY HOLDER (1) BATTERY LID UNIT 1. Remove the screw of q. 2. Remove the BATTERY SHAFT HOLDER. 3. Release the lock by sliding the BATTERY LID HOLDER, and open it. 4. Push out the shaft of the BATTERY LID UNIT with the thin flat-head screwdriver. 5. While taking care of the spring of the BATTERY LID UNIT not to be bent, remove the BATTERY LID UNIT by twisting in the direction of the arrow. (2) DATE BATTERY HOLDER 1. Pull out the DATE BATTERY HOLDER. 2. Remove the DATE BATTERY from the DATE BATTERY HOLDER. CAUTION Be careful of the + and - polarities of the DATE BATTERY. 3-6
-
 1
1 -
2
-
3
-
4
-
5
-
6
-
7
-
8
-
9
-
10
-
11
-
12
-
13
-
14
-
15
-
16
-
17
-
18
-
19
-
20
-
21
-
22
-
23
-
24
-
25
-
26
-
27
-
28
-
29
-
30
-
31
-
32
-
33
-
34
-
35
-
36
-
37
-
38
-
39
-
40
-
41
-
42
-
43
-
44
-
45
-
46
-
47
-
48
-
 49
49 -
 50
50 -
 51
51 -
 52
52 -
 53
53 -
 54
54 -
 55
55 -
 56
56 -
 57
57 -
 58
58 -
 59
59 -
60
-
61
-
62
-
63
-
64
-
65
-
66
-
67
-
68
-
69
-
70
-
71
-
72
-
73
-
74
-
75
-
76
-
77
-
78
-
79
-
80
-
81
-
82
-
83
-
84
-
85
-
86
-
87
-
88
-
89
-
90
-
91
-
92
-
93
-
94
-
95
-
96
-
97
-
98
-
99
-
100
-
101
-
102
-
103
-
104
-
105
-
106
-
107
-
108
-
109
-
110
-
111
-
112
-
113
-
114
-
115
-
116
-
117
-
118
-
119
-
120
-
121
-
122
-
123
-
124
-
125
-
126
-
127
-
128
-
129
-
130
-
131
-
132
-
133
-
134
-
135
-
136
-
137
-
138
-
139
-
140
-
141
-
142
-
143
-
144
-
145
-
146
-
147
-
148
-
149
-
150
-
151
-
152
-
153
-
154
-
155
-
156
-
157
-
158
-
159
-
160
-
161
 |
 |