Canon PowerShot S110 User Guide for ImageBrowser version 3.6 - Page 51
Creating Images for E-mail 1/2
 |
View all Canon PowerShot S110 manuals
Add to My Manuals
Save this manual to your list of manuals |
Page 51 highlights
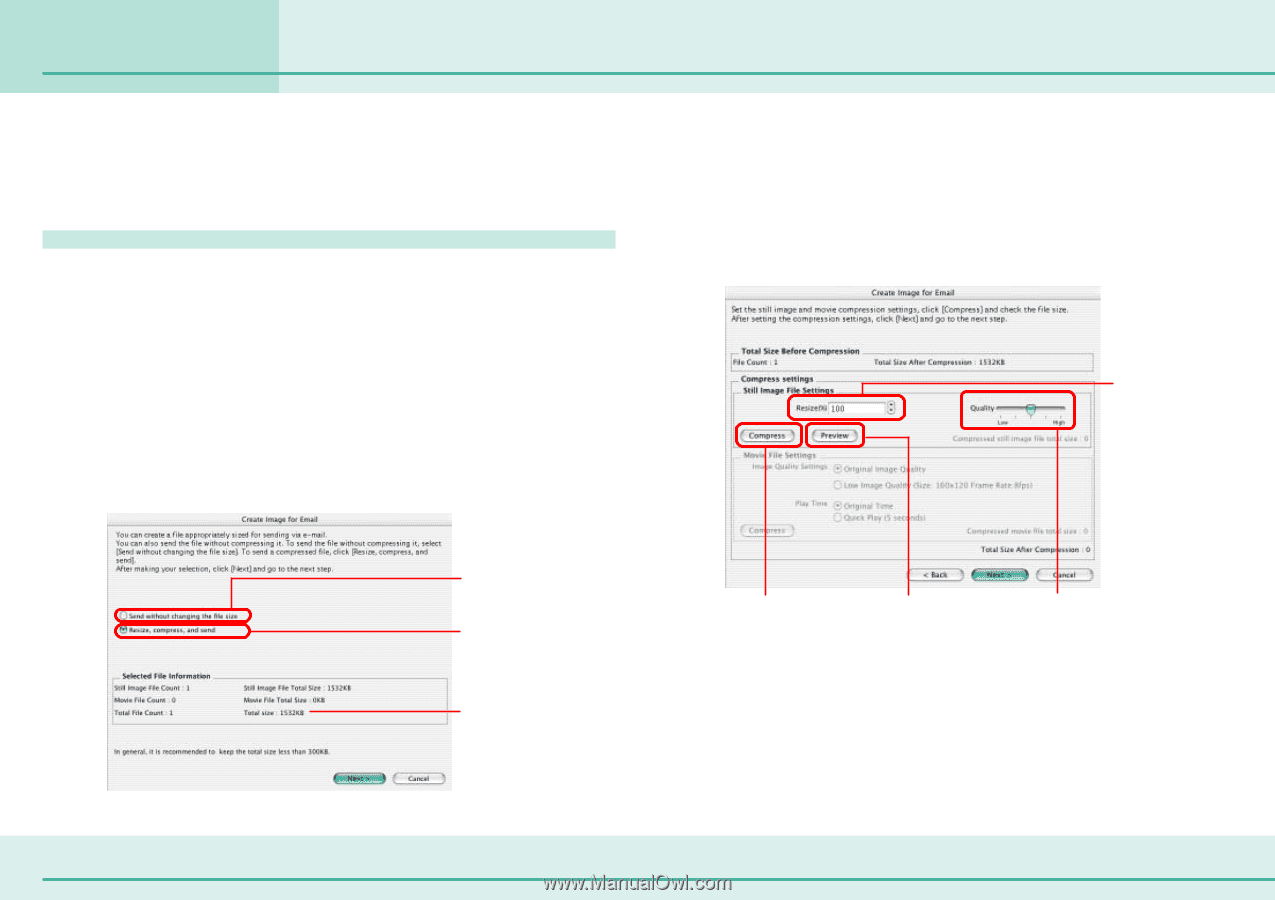
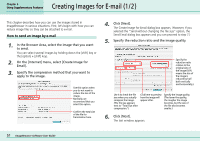
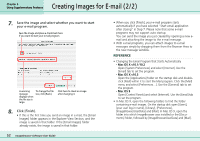
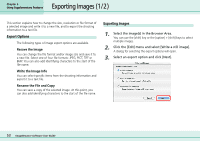
Chapter 6 Using Supplementary Features Creating Images for E-mail (1/2) This chapter describes how you can use the images stored in ImageBrowser in various situations. First, let's begin with how you can reduce image files so they can be attached to e-mail. How to send an image by e-mail 1. In the Browser Area, select the image that you want to send. You can select several images by holding down the [shift] key or the [option] + [shift] keys. 2. On the [Internet] menu, select [Create Image for Email]. 3. Specify the compression method that you want to apply to the image. Use this option when you do not want to reduce the size of the image. Normally, we recommend that you select this option. Confirm the total size of the file for transmission here. 4. Click [Next]. The Create Image for Email dialog box appears. (However, if you selected the "Send without changing the file size" option, the Send Email dialog box appears and you can proceed to step 7.) 5. Specify the reduction ratio and the image quality. Specify the reduction ratio relative to the original size of the image (50% means the size of the image is reduced by half both vertically and horizontally.) Use it to check the file size when you actually compress the image. (The file size appears next to "Total Size after compression.") Click here to preview how the image will appear after. Specify the image quality. (The lower the quality, the rougher the image becomes, but the size of the file also becomes smaller.) 6. Click [Next]. The last window appears. 51 ImageBrowser Software User Guide
-
 1
1 -
2
-
3
-
4
-
5
-
6
-
7
-
8
-
9
-
10
-
11
-
12
-
13
-
14
-
15
-
16
-
17
-
18
-
19
-
20
-
21
-
22
-
23
-
24
-
25
-
26
-
27
-
28
-
29
-
30
-
31
-
32
-
33
-
34
-
35
-
36
-
37
-
38
-
39
-
40
-
41
-
42
-
43
-
44
-
45
-
 46
46 -
 47
47 -
 48
48 -
 49
49 -
 50
50 -
 51
51 -
 52
52 -
 53
53 -
 54
54 -
 55
55 -
 56
56 -
57
-
58
-
59
-
60
-
61
-
62
-
63
-
64
-
65
-
66
-
67
-
68
-
69
-
70
-
71
-
72
-
73
-
74
-
75
-
76
-
77
-
78
-
79
-
80
-
81
-
82
-
83
-
84
-
85
-
86
-
87
-
88
-
89
-
90
-
91
-
92
-
93
-
94
-
95
-
96
-
97
-
98
-
99
-
100
-
101
-
102
-
103
-
104
-
105
-
106
-
107
-
108
-
109
-
110
 |
 |