Canon PowerShot S80 Direct Print User Guide - Page 17
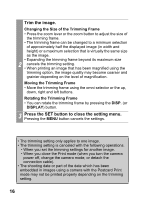
Setting the Printing Area Trimming
 |
View all Canon PowerShot S80 manuals
Add to My Manuals
Save this manual to your list of manuals |
Page 17 highlights
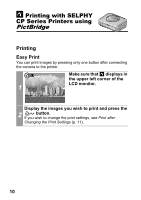
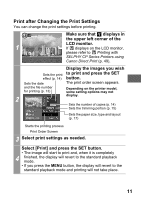
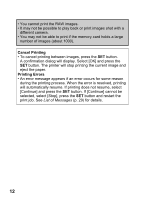
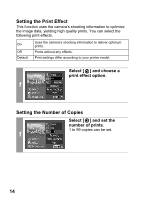
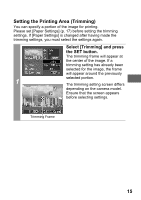
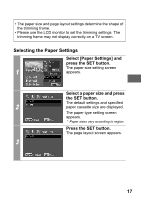
Setting the Printing Area (Trimming) You can specify a portion of the image for printing. Please set [Paper Settings] (p. 17) before setting the trimming settings. If [Paper Settings] is changed after having made the trimming settings, you must select the settings again. Select [Trimming] and press the SET button. The trimming frame will appear at the center of the image. If a trimming setting has already been selected for the image, the frame will appear around the previously selected portion. 1 The trimming setting screen differs depending on the camera model. Ensure that the screen appears before selecting settings. Trimming Frame 15
-
 1
1 -
2
-
3
-
4
-
5
-
6
-
7
-
8
-
9
-
10
-
11
-
 12
12 -
 13
13 -
 14
14 -
 15
15 -
 16
16 -
 17
17 -
 18
18 -
 19
19 -
 20
20 -
 21
21 -
 22
22 -
23
-
24
-
25
-
26
-
27
-
28
-
29
-
30
-
31
-
32
-
33
-
34
-
35
-
36
-
37
-
38
-
39
-
40
-
41
-
42
-
43
-
44
-
45
-
46
-
47
-
48
-
49
-
50
-
51
-
52
-
53
-
54
-
55
-
56
-
57
-
58
-
59
-
60
-
61
-
62
-
63
-
64
-
65
-
66
-
67
-
68
-
69
-
70
-
71
-
72
-
73
-
74
-
75
-
76
-
77
-
78
-
79
-
80
 |
 |

15
Setting the Printing Area (Trimming)
You can specify a portion of the image for printing.
Please set [Paper Settings] (p. 17) before setting the trimming
settings. If [Paper Settings] is changed after having made the
trimming settings, you must select the settings again.
1
Select [Trimming] and press
the SET button.
The trimming frame will appear at
the center of the image. If a
trimming setting has already been
selected for the image, the frame
will appear around the previously
selected portion.
The trimming setting screen differs
depending on the camera model.
Ensure that the screen appears
before selecting settings.
Trimming Frame