Canon PowerShot SD400 Software Starter Guide (For the Canon Digital Camera Sol - Page 76
Tone Curve Tab, Advanced Adjustments
 |
View all Canon PowerShot SD400 manuals
Add to My Manuals
Save this manual to your list of manuals |
Page 76 highlights
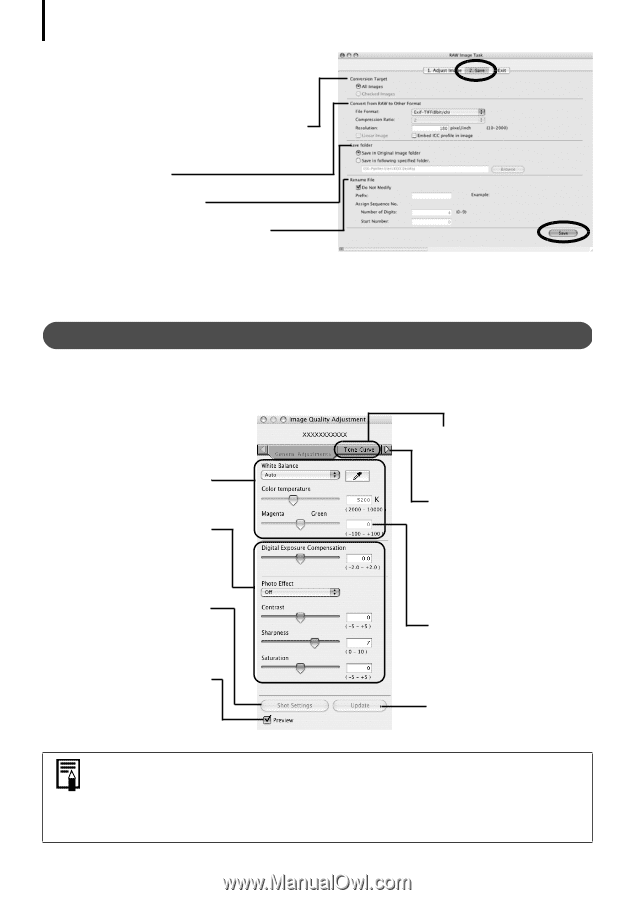
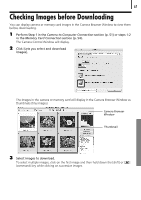
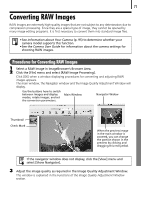
72 Converting RAW Images 4 Click the [2. Save] tab, set the file type and destination, and then click [Save]. Select [All Images] or [Checked Images] (images checked in the main window) to apply the common conversion settings. Select a file type Set the file destination You can also change the file name This will convert the image. 5 Click the [3. Exit] tab and click [OK]. Functions of the Image Quality Adjustment Window The following adjustments can be made in the Image Quality Adjustment Window. The available settings may vary depending on the camera used. This section adjusts the white balance according to the light source and color temperature. This section adjusts the digital exposure compensation, photo effect, contrast, sharpness, and saturation. Restores all settings to the settings stored in the camera at the time of shooting. The effect of the settings above can be viewed immediately if you place a check mark here. Tone Curve Tab You can set the levels for the RGB channels separately or together. Advanced Adjustments Tab You can set the settings for adaptive noise control and the color space for the output. Click the arrow to display the tab. If you cannot set the desired setting with the slider on the left, directly enter the setting here. Applies the settings to the displayed image You can change the coloration of the image to your preferred settings when you convert a RAW image. You can also select preset color schemes, such as Positive Film. Furthermore, you can add your own color schemes (My Color) to apply to other RAW images when they are being converted. See the PDF manual for ImageBrowser for more information (p. 2).
-
 1
1 -
2
-
3
-
4
-
5
-
6
-
7
-
8
-
9
-
10
-
11
-
12
-
13
-
14
-
15
-
16
-
17
-
18
-
19
-
20
-
21
-
22
-
23
-
24
-
25
-
26
-
27
-
28
-
29
-
30
-
31
-
32
-
33
-
34
-
35
-
36
-
37
-
38
-
39
-
40
-
41
-
42
-
43
-
44
-
45
-
46
-
47
-
48
-
49
-
50
-
51
-
52
-
53
-
54
-
55
-
56
-
57
-
58
-
59
-
60
-
61
-
62
-
63
-
64
-
65
-
66
-
67
-
68
-
69
-
70
-
 71
71 -
 72
72 -
 73
73 -
 74
74 -
 75
75 -
 76
76 -
 77
77 -
 78
78 -
 79
79 -
 80
80 -
 81
81 -
82
-
83
-
84
-
85
-
86
-
87
-
88
-
89
-
90
-
91
-
92
-
93
-
94
-
95
-
96
-
97
-
98
-
99
-
100
-
101
-
102
-
103
-
104
-
105
-
106
 |
 |