Canon REALiS LCOS WUX10 Mark II Multimedia Projector WUX10 MarkII Users Manual - Page 47
Setting Up the Screen Automatically, Auto Setup
 |
View all Canon REALiS LCOS WUX10 Mark II manuals
Add to My Manuals
Save this manual to your list of manuals |
Page 47 highlights
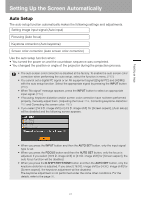
Projecting an Image Setting Up the Screen Automatically Auto Setup The auto setup function automatically makes the following settings and adjustments. Setting image input signal (Auto input) Focusing (Auto focus) Keystone correction (Auto keystone) Screen color correction (Auto screen color correction) Use the auto setup function when: • You turned the power on and the countdown sequence was completed. • You changed the position or angle of the projector during the projection process. • The auto screen color correction is disabled at the factory. To enable the auto screen color correction when performing the auto setup, select the function in menu. (P82) • You cannot set a digital PC signal or an AV equipment signal ([Digital PC] and [HDMI]) with the auto setup function. Select the appropriate signal by pressing the INPUT button. (P50) • When "No signal" message appears, press the INPUT button to select an appropriate input signal. (P50) • If focusing, keystone distortion and/or screen color correction have not been performed properly, manually adjust them. (Adjusting the focus: P54, Correcting keystone distortion: P55 and Correcting the screen color: P82) • If you select [16:9 D. image shift] or [4:3 D. image shift] for [Screen aspect], [Auto setup] will be disabled and the following screen appears. • When you press the INPUT button and then the AUTO SET button, only the input signal type is set. • When you press the FOCUS button and then the AUTO SET button, only the focus is adjusted. If you select [16:9 D. image shift] or [4:3 D. image shift] for [Screen aspect], the auto focus function will be disabled. • When you press the D.SHIFT/KEYSTONE button and then the AUTO SET button, only the keystone distortion is adjusted. If you select [16:9 D. image shift] or [4:3 D. image shift] for [Screen aspect], the keystone adjustment will be disabled. The keystone adjustment is not performed under the some other conditions. For the details, refer to the page 56. 47
-
 1
1 -
2
-
3
-
4
-
5
-
6
-
7
-
8
-
9
-
10
-
11
-
12
-
13
-
14
-
15
-
16
-
17
-
18
-
19
-
20
-
21
-
22
-
23
-
24
-
25
-
26
-
27
-
28
-
29
-
30
-
31
-
32
-
33
-
34
-
35
-
36
-
37
-
38
-
39
-
40
-
41
-
 42
42 -
 43
43 -
 44
44 -
 45
45 -
 46
46 -
 47
47 -
 48
48 -
 49
49 -
 50
50 -
 51
51 -
 52
52 -
53
-
54
-
55
-
56
-
57
-
58
-
59
-
60
-
61
-
62
-
63
-
64
-
65
-
66
-
67
-
68
-
69
-
70
-
71
-
72
-
73
-
74
-
75
-
76
-
77
-
78
-
79
-
80
-
81
-
82
-
83
-
84
-
85
-
86
-
87
-
88
-
89
-
90
-
91
-
92
-
93
-
94
-
95
-
96
-
97
-
98
-
99
-
100
-
101
-
102
-
103
-
104
-
105
-
106
-
107
-
108
-
109
-
110
-
111
-
112
-
113
-
114
-
115
-
116
-
117
-
118
-
119
-
120
-
121
-
122
-
123
-
124
-
125
-
126
-
127
-
128
-
129
-
130
-
131
-
132
-
133
-
134
-
135
-
136
-
137
-
138
-
139
-
140
-
141
-
142
-
143
-
144
-
145
-
146
 |
 |
