Canon RM-25 V1.0 Network Video Recording Software RM Series Viewer Operation G - Page 1
Canon RM-25 V1.0 Manual
 |
View all Canon RM-25 V1.0 manuals
Add to My Manuals
Save this manual to your list of manuals |
Page 1 highlights
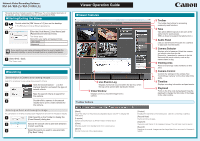
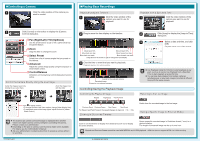
Network Video Recording Software / / / This guide describes the basic operation of RM Viewer. For a more detailed description of the operation, see the "Administrator's Manual" on the supplied CD-ROM. Starting/Exiting the Viewer 1 Double-click the [RM Viewer v1.0] icon on the desktop. The RM-Lite icon has a different appearance. 2 Enter the [Host Name], [User Name] and [Password] and click [Connect]. The Viewer starts. Record the user name and password here: User name Password If you record your user name and password here, be sure to handle this document carefully, so as not to reveal them to an unauthorized person. Note 3 Select [File] > [Exit]. The Viewer exits. Searching Searching for a Camera and Viewing Images Search for a camera to view using various search criteria. 1 Click the search button ( ) on the Camera Selector and select the type of search criteria. 2 Type the search criteria to search for the camera. 3 Double-click a camera in the search results list to open a video window for the camera. Selecting an Event and Viewing the Image You can search for events and play back images from an event in the search results. 1 Click [Search] on the Toolbar to display the [Event Search] dialog box. 2 Specify the search criteria and click [Search] to start searching. 3 Select the event you want to view and click [Play Back Video]. Viewer Operation Guide Viewer Features Live Events Log Displays events that occurred within the last hour when the log is first opened after starting the Viewer. Video Window Displays a live or a recorded image from a camera. Toolbar buttons Toolbar The toolbar has buttons for accessing commonly used functions. Tabs Tabs allow different layouts to be open at the same time for quick access. (RM-Lite does not support the tabs function.) Audio Panel Lets you send/receive live audio for a camera or play back recorded audio. Camera Selector Displays a list of cameras. Select the camera you want to view from the list. [Search for:] searches for cameras in the list that meet the search criteria, such as the camera name or tag. Viewing Area Place and arrange video windows in this area. Camera Control Controls the settings on the camera. See "Controlling a Camera" on the other side of this guide. Timeline Displays recording information and past events. Playhead Points to the time code being played. Drag the playhead to change the time code of the image in the video window. [Back] Click to return to the previously displayed layout. Click to display the next layout. [Layouts] Selects and switches to a different video window layout. [Grids] Displays a grid in the background of the viewing area. [Zoom] Zooms in and out of the viewing area. [Control] Displays the Camera Control dialog box, used for controlling a camera. [Record Now] Starts recording images. [Capture] Captures a still frame of the displayed image. The still frame can be saved. [Search] Searches for events. Images can be played back from an event in the search results.
-
 1
1 -
 2
2
 |
 |
