Canon S200 S200_QuickStart.pdf - Page 2
Step 5, Step 4 - software
 |
UPC - 013803013511
View all Canon S200 manuals
Add to My Manuals
Save this manual to your list of manuals |
Page 2 highlights
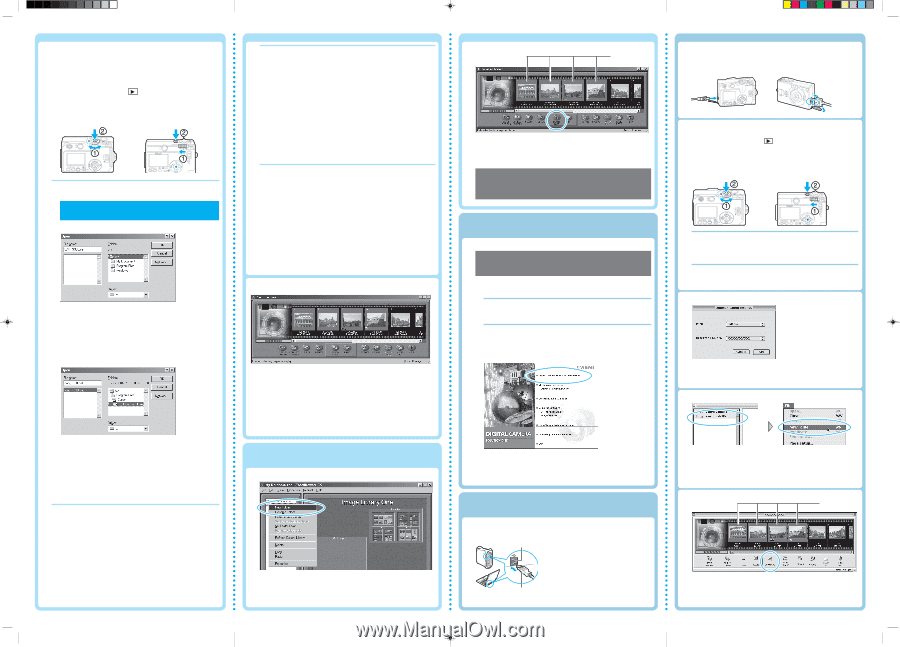
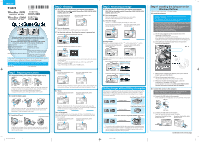
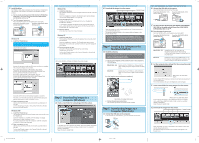
Step 4 Installing the Software on the Windows Platform (continued) C. Install the driver. The TWAIN or WIA driver is required when the camera is connected to the computer. The installation procedures vary between Windows versions. a. Set the mode dial (PowerShot S330 DIGITAL ELPH/DIGITAL IXUS 330) or the mode switch (PowerShot S200 DIGITAL ELPH/DIGITAL IXUS v2) to . b. Turn the camera's power on. Press the ON/OFF button until the green power lamp lights. PowerShot S330 DIGITAL ELPH/ DIGITAL IXUS 330 PowerShot S200 DIGITAL ELPH/ DIGITAL IXUS v2 Windows 98 c. Install the TWAIN driver. The Insert Disk dialog appears. Click [OK] without inserting the Canon Digital Camera Solution Disk. Click the [Browse] button. Double-click the drive (usually the [C:\] drive) on which you installed the software to display all of its folders. PowerShot S330 DIGITAL ELPH/ DIGITAL IXUS S330: Double-click the following folders in the order [Program Files], [Canon], [IXY300A PSS330 IXUS330 TWAIN]. PowerShot S200 DIGITAL ELPH/ DIGITAL IXUS v2: Double-click the following folders in the order [Program Files], [Canon], [IXY200A PSS200 IXUSV2 TWAIN]. Step 4 Installing the Software on the Windows Platform (continued) Windows Me c. Install the WIA driver. The Add New Hardware Wizard will appear and automatically install the WIA driver. Once the installation is complete, the Scanners and Cameras Wizard start-up event dialog appears. Click [Cancel]. d. Start ZoomBrowser EX. Double-click the [Canon ZoomBrowser EX] icon on the desktop. ZoomBrowser EX starts. A confirmation message will appear the first time ZoomBrowser EX starts, asking whether you wish to register the [My Pictures] folder in ZoomBrowser EX. Click [Yes] or [No]. e. Select a camera. In the Tree View Area, click [Canon Camera]. Windows XP c. Install the WIA driver. The Found New Hardware Wizard will appear and automatically install the WIA driver. Once the installation is complete, The ZoomBrowser start-up event dialog and the Scanners and Cameras Wizard start-up event dialog will both display. d. Select a program to start. Click [OK] in the ZoomBrowser EX start-up event dialog. ZoomBrowser EX will start. Confirm that [Display images in the Camera Window] is selected and click the [Finish] button. The Camera Window will open and display the camera images. Step 5 Downloading Images to a Computer (Windows) (continued) B. Download the images from the camera. Selected images Select the images you wish to download from the Camera window and click the [Download] button. The selected images are saved to the computer disk and appear in the Browser Display Area. • The folder you created above normally appears within the [C:\Program Files\Canon\ZoomBrowser EX\Image Library One] folder. The downloaded image files are saved to the folder you created. Step 4 Installing the Software on the Macintosh Platform A. Install the software. • For more information about the system requirements, please refer to the Software Starter Guide. • Close any programs that are running. a. Set the Canon Digital Camera Solution Disk in the computer's CD-ROM drive. Mac OS 8.6 - 9.2: Double-click the CD-ROM icon, followed by the [Mac OS 8/9] and [Canon Digital Camera Installer] icons. Mac OS X: Double-click the CD-ROM icon, followed by the [Mac OS X] and [Canon Digital Camera Installer] icons. b. Click [Digital Camera Software Installation]. Step 5 Downloading Images to a Computer (Macintosh) (continued) B. Connect the USB cable to the camera. Open the terminal cover and connect the cable. PowerShot S330 DIGITAL ELPH/ DIGITAL IXUS 330 PowerShot S200 DIGITAL ELPH/ DIGITAL IXUS v2 C. Set the mode dial (PowerShot S330 DIGITAL ELPH/DIGITAL IXUS 330) or the mode switch (PowerShot S200 DIGITAL ELPH/DIGITAL IXUS v2) to . D. Turn the camera's power on. Press the ON/OFF button until the green power lamp lights. PowerShot S330 DIGITAL ELPH/ DIGITAL IXUS 330 PowerShot S200 DIGITAL ELPH/ DIGITAL IXUS v2 Mac OS 8.6 - 9.2 ImageBrowser will start and open the ImageBrowser Automation Wizard dialog. Confirm that [Display Images] is selected and click the [OK] button. Mac OS X Double-click the [Canon ImageBrowser] icon on the desktop. Once ImageBrowser is started, click [Canon Camera] in the Explorer View section. E. Set the communication settings (first time connection only) Mac OS 8.6 - 9.2 screen shot shown. Confirm that [USB Port] and your camera model name are selected and click the [Set] button. The Camera window will open and display the camera images. F. Create a new folder for saving images from the camera. Click [OK]. When the Insert Disk dialog reappears, click [OK]. The driver will install itself automatically and the Event dialog will display, allowing you to select a program to start. d. Select a program to start. Select [Canon ZoomBrowser EX] and click [OK]. ZoomBrowser EX will start. Confirm that [Display images in the Camera Window] is selected and click the [Finish] button. Windows 2000 c. Install the TWAIN driver. The Add New Hardware Wizard will appear and automatically install the TWAIN driver. Once the installation is complete, the Event dialog will display, allowing you to select a program to start. If you are prompted to restart the computer, restart the computer according to the onscreen messages. d. Select a program to start. Select [Canon ZoomBrowser EX] and click [OK]. ZoomBrowser EX will start. Confirm that [Display images in the Camera Window] is selected and click the [Finish] button. Step 5 Downloading Images to a Computer (Windows) A. Create a new folder for saving images from the camera. In the Tree View Area, right-click the [Image Library One] folder, select [New Folder] from the pop-up menu and input a folder name. (For example, [Travel] or [Wedding]) Select the newly created folder. Mac OS 8.6 - 9.2 screen shot shown. c. Follow the onscreen instructions. The software required for the camera will be installed. Step 5 Downloading Images to a Computer (Macintosh) A. Connect the USB cable to the computer. If the computer has two USB ports, you can use either one of them. USB Port USB Cable *EC118116hkQSGE,vGM 2 3/29/02, 2:16 PM Mac OS 8.6 - 9.2 screen shot shown. In the Explorer View section, select [Macintosh HD]. From the [File] menu, select [New Folder] and input a folder name. (For example, [Travel] or [Wedding]) Select the newly created folder. G. Download the images from the camera. Selected images Select the images you wish to download in the Camera window and click the [Download] button. The selected images are saved to the computer and appear in the Browser area.
-
 1
1 -
 2
2
 |
 |