Canon S330 S330 Quick Start Guide - Page 8
Use the same procedure to install
 |
View all Canon S330 manuals
Add to My Manuals
Save this manual to your list of manuals |
Page 8 highlights
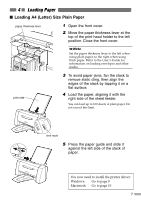
protective cap 2 Hold the ink tank as shown in the diagram and remove the protective cap. ➥Notes • Do not shake or drop ink tanks as this may cause the ink to leak out and stain your clothes and hands. • Do not touch the ink port. • Do not attempt to reattach the protective cap once it has been removed. ink port 3 Insert the black ink tank into the righthand slot. 4 Press the top until it clicks into place. 5 Use the same procedure to install the colour ink tank in the left hand slot. 6 Close the front cover. Wait until the POWER lamp remains fully lit (about 60 seconds). ➥Note You will be notified by the low ink warning when ink is low during printing. For more details about the low ink warning, refer to the User's Guide. 6
-
 1
1 -
2
-
 3
3 -
 4
4 -
 5
5 -
 6
6 -
 7
7 -
 8
8 -
 9
9 -
 10
10 -
 11
11 -
 12
12 -
 13
13 -
14
-
15
-
16
-
17
-
18
-
19
-
20
-
21
-
22
-
23
-
24
-
25
 |
 |

2
Hold the ink tank as shown in the
diagram and remove the protective
cap.
➥
Notes
• Do not shake or drop ink
tanks as this may cause
the ink to leak out and
stain your clothes and
hands.
• Do not touch the ink port.
• Do not attempt to reattach
the protective cap once it
has been removed.
3
Insert the black ink tank into the right-
hand slot.
4
Press the top until it clicks into place.
5
Use the same procedure to install the
colour ink tank in the left hand slot.
6
Close the front cover.
Wait until the POWER lamp remains fully lit
(about 60 seconds).
➥
Note
You will be notified by the low ink warning
when ink is low during printing.
For more details about the low ink warning,
refer to the User’s Guide.
6
ink port
protective cap