Canon VB-R11VE Camera Management Tool User Manual - Page 26
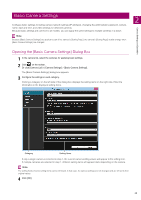
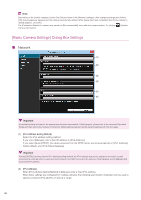
[Basic Camera Settings] Dialog Box Settings, Network
 |
View all Canon VB-R11VE manuals
Add to My Manuals
Save this manual to your list of manuals |
Page 26 highlights
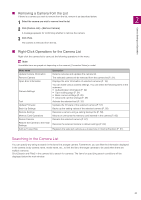
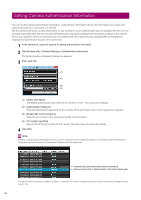
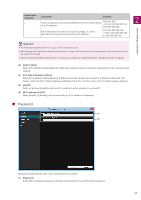
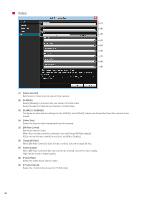
Note Depending on the [Video] category's [Video Size Set] and items in the [Network] category, after changing settings and clicking [OK], the progress bar appears and the camera automatically restarts. When [Setup has been completed. Wait for the camera to restart] appears, click [OK]. The [Connection Status] of a camera may remain as [Not connectable], even after the camera restarts. Try clicking (Update Camera Information). [Basic Camera Settings] Dialog Box Settings Network (1) (2) (3) (4) (5) (6) Important If a network setting is incorrect, the camera may become inaccessible. If that happens, please refer to the camera's Operation Guide and then restore the camera to the factory default setting state and set the network settings with this tool again. (1) [IPv4 Address Setting Method] Select the IPv4 address setting method. If you select [Manual], enter a fixed IP address in [IPv4 Address]. If you select [Auto (DHCP)], the values acquired from the DHCP server are set automatically in [IPv4 Address], [Subnet Mask], and [IPv4 Default Gateway]. Important If [Auto (DHCP)] is selected as the IPv4 address setting method, the IPv4 address may not be assigned correctly in certain environments, such as when a router is present between the DHCP server and the camera. If this happens, select [Manual] and set a fixed IPv4 address. (2) [IPv4 Address] When [IPv4 Address Setting Method] is [Manual], enter a fixed IPv4 address. When basic settings are configured for multiple cameras, the following specification characters can be used to specify a wildcard IPv4 address or specify a range. 26
-
 1
1 -
2
-
3
-
4
-
5
-
6
-
7
-
8
-
9
-
10
-
11
-
12
-
13
-
14
-
15
-
16
-
17
-
18
-
19
-
20
-
 21
21 -
 22
22 -
 23
23 -
 24
24 -
 25
25 -
 26
26 -
 27
27 -
 28
28 -
 29
29 -
 30
30 -
 31
31 -
32
-
33
-
34
-
35
-
36
-
37
-
38
-
39
-
40
-
41
-
42
-
43
-
44
-
45
-
46
-
47
-
48
-
49
-
50
-
51
-
52
-
53
-
54
-
55
-
56
-
57
-
58
-
59
-
60
-
61
-
62
-
63
-
64
-
65
-
66
-
67
-
68
-
69
-
70
-
71
-
72
 |
 |