Canon VIXIA HF G40 User Manual - Page 149
Wireless Remote Control], OLED Color Balance]
 |
View all Canon VIXIA HF G40 manuals
Add to My Manuals
Save this manual to your list of manuals |
Page 149 highlights
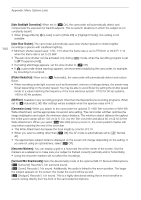
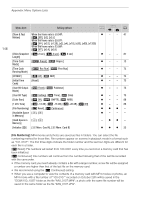
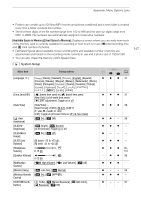
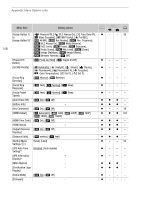
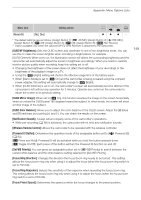
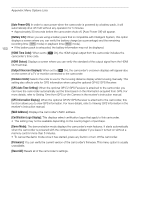
Appendix: Menu Options Lists Menu item [Reset All] [No], [Yes] Setting options A y} zzz - * The default settings are as follows. [Assign Button 1]: [ AF/MF], [Assign Button 2]: [z PRE REC], [Assign Button 3]: [j Off], [Assign Button 4]: [j Off], [Assign Button 5]: [ Rec Review]. ** Option available only when the optional GP-E2 GPS Receiver is attached to the camcorder. [OLED/VF Brightness]: Sets the OLED screen and viewfinder to one of two brightness levels. You can use this to make the screen brighter when recording in bright places, for example. [OLED Dimmer]: When set to on, the illumination sensor will detect the surrounding brightness and the camcorder will automatically adjust the screen's brightness accordingly. When you need to carefully monitor picture quality when recording, keep this setting set to off. • Changing the brightness of the screen does not affect the brightness of your recordings or the brightness of the playback image on a TV. • Using the [ Bright] setting will shorten the effective usage time of the battery pack. • When [Demo Mode] is set to [i On] and the camcorder is being powered using the compact power adapter, this setting will automatically change to [ Bright]. • When [OLED Dimmer] is set to on, the camcorder's screen will automatically become dimmer if the camcorder is left without any operation for 3 minutes. Operate any control on the camcorder to return the screen to its previous setting. [OLED Mirror Image]: When set to [i On], this function reverses the image on the screen horizontally when you rotate the OLED panel 180 degrees toward the subject. In other words, the screen will show a mirror image of the subject. [OLED Color Balance]: Allows you to adjust the color balance of the OLED screen. Adjust the [B] (blue) and [R] (red) bars by touching [+] and [-]. You can check the results on the screen. [Notification Sounds]: A beep will accompany some of the camcorder's operations. • While pre-recording (A 88) is activated, the camcorder will not emit any notification sounds. [Wireless Remote Control]: Allows the camcorder to be operated with the wireless controller. [Powered IS Button]: Determines the operation mode of the assignable button set to [È Powered IS] (A 60). [Î Press and Hold]: Powered IS will be activated while you hold the button pressed down. [Ï Toggle On/Off]: Each press of the button will turn the Powered IS function on and off. [Set WB Priority]: You can press an assignable button set to [Ä WB Priority] to switch between the current white balance and the white balance setting selected for [Set WB Priority]. [Focus Ring Direction]: Changes the direction the focus/zoom ring needs to be turned. This setting affects the focus/zoom ring only when using it to adjust the focus (when the focus/zoom ring switch is set to FOCUS). [Focus Ring Response]: Selects the sensitivity of the response when operating the focus/zoom ring. This setting affects the focus/zoom ring only when using it to adjust the focus (when the focus/zoom ring switch is set to FOCUS). [Focus Preset Speed]: Determines the speed at which the focus changes to the preset position. 149
-
 1
1 -
2
-
3
-
4
-
5
-
6
-
7
-
8
-
9
-
10
-
11
-
12
-
13
-
14
-
15
-
16
-
17
-
18
-
19
-
20
-
21
-
22
-
23
-
24
-
25
-
26
-
27
-
28
-
29
-
30
-
31
-
32
-
33
-
34
-
35
-
36
-
37
-
38
-
39
-
40
-
41
-
42
-
43
-
44
-
45
-
46
-
47
-
48
-
49
-
50
-
51
-
52
-
53
-
54
-
55
-
56
-
57
-
58
-
59
-
60
-
61
-
62
-
63
-
64
-
65
-
66
-
67
-
68
-
69
-
70
-
71
-
72
-
73
-
74
-
75
-
76
-
77
-
78
-
79
-
80
-
81
-
82
-
83
-
84
-
85
-
86
-
87
-
88
-
89
-
90
-
91
-
92
-
93
-
94
-
95
-
96
-
97
-
98
-
99
-
100
-
101
-
102
-
103
-
104
-
105
-
106
-
107
-
108
-
109
-
110
-
111
-
112
-
113
-
114
-
115
-
116
-
117
-
118
-
119
-
120
-
121
-
122
-
123
-
124
-
125
-
126
-
127
-
128
-
129
-
130
-
131
-
132
-
133
-
134
-
135
-
136
-
137
-
138
-
139
-
140
-
141
-
142
-
143
-
 144
144 -
 145
145 -
 146
146 -
 147
147 -
 148
148 -
 149
149 -
 150
150 -
 151
151 -
 152
152 -
 153
153 -
 154
154 -
155
-
156
-
157
-
158
-
159
-
160
-
161
-
162
-
163
-
164
-
165
-
166
-
167
-
168
-
169
-
170
-
171
-
172
-
173
-
174
-
175
-
176
-
177
-
178
-
179
-
180
-
181
-
182
-
183
-
184
-
185
-
186
-
187
 |
 |
