Canon VIXIA HF200 Digital Video Software (Windows) Version32 Instruction Manua - Page 20
Installing the Digital Video Software - transfer video to computer
 |
View all Canon VIXIA HF200 manuals
Add to My Manuals
Save this manual to your list of manuals |
Page 20 highlights
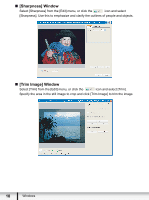
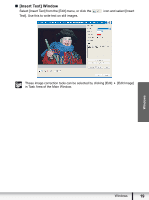
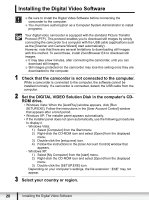
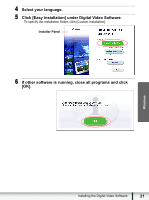
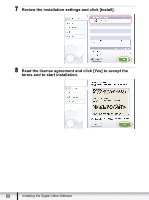
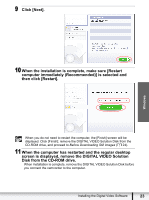
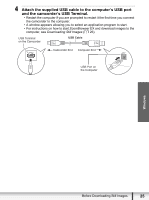
Installing the Digital Video Software Be sure to install the Digital Video Software before connecting the camcorder to the computer. You must have authorization as a Computer System Administrator to install programs. Your digital video camcorder is equipped with the standard Picture Transfer Protocol (PTP). This protocol enables you to download still images by simply connecting the camcorder to a computer with the USB cable (applications such as the [Scanner and Camera Wizard] start automatically). However, note that there are several limitations to downloading still images with this method. To avoid these, install ZoomBrowser EX to download still images. It may take a few minutes, after connecting the camcorder, until you can download still images. Still images protected on the camcorder may lose this setting once they are downloaded to the computer. 1 Check that the camcorder is not connected to the computer. While a camcorder is connected to the computer, the software cannot be installed normally. If a camcorder is connected, detach the USB cable from the computer. 2 Set the DIGITAL VIDEO Solution Disk in the computer's CDROM drive. • Windows Vista: When the [AutoPlay] window appears, click [Run SETUP.EXE]. Follow the instructions in the [User Account Control] window that appears after a brief period. • Windows XP: The installer panel appears automatically. • If the installer panel does not open automatically, use the following procedures to display it. - Windows Vista: 1) Select [Computer] from the Start menu. 2) Right-click the CD-ROM icon and select [Open] from the displayed menu. 3) Double-click the [setup.exe] icon. 4) Follow the instructions in the [User Account Control] window that appears. - Windows XP: 1) Select [My Computer] from the [start] menu. 2) Right-click the CD-ROM icon and select [Open] from the displayed menu. 3) Double-click the [SETUP.EXE] icon. Depending on your computer's settings, the file extension ".EXE" may not appear. 3 Select your country or region. 20 Installing the Digital Video Software
-
 1
1 -
2
-
3
-
4
-
5
-
6
-
7
-
8
-
9
-
10
-
11
-
12
-
13
-
14
-
 15
15 -
 16
16 -
 17
17 -
 18
18 -
 19
19 -
 20
20 -
 21
21 -
 22
22 -
 23
23 -
 24
24 -
 25
25 -
26
-
27
-
28
-
29
-
30
-
31
-
32
-
33
-
34
-
35
-
36
-
37
-
38
-
39
-
40
-
41
-
42
-
43
-
44
-
45
-
46
-
47
-
48
-
49
-
50
-
51
-
52
-
53
-
54
-
55
-
56
-
57
-
58
-
59
-
60
-
61
-
62
-
63
-
64
-
65
-
66
-
67
-
68
-
69
-
70
-
71
-
72
-
73
-
74
-
75
 |
 |