Canon XC15 User Manual - Page 104
Customization, Customizing the FUNC. Menu
 |
View all Canon XC15 manuals
Add to My Manuals
Save this manual to your list of manuals |
Page 104 highlights
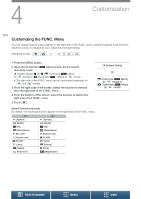
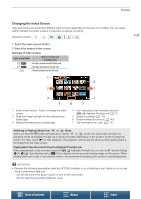
4 Customization 104 Customizing the FUNC. Menu You can change what functions appear on the right side of the FUNC. menu, making frequently used functions easier to access. To replace an icon, follow the procedure below. Operating modes: 1 Press the MENU button. 2 Open the [Customize Menu] screen for the current recording mode. [ System Setup] > [2] > [v Customize Menu] (in mode) or [{ Customize Menu] (in mode) • The right side of the FUNC. menu can be customized separately for and modes. 3 From the right side of the screen, select the function to remove from the right side of the FUNC. menu. 4 From the bottom of the screen, select the function to add to the right side of the FUNC. menu. 5 Touch [X]. [ System Setup] [2] [v Customize Menu] (in mode) or [{ Customize Menu] (in mode) Default functions by mode By default, the following functions appear on the right side of the FUNC. menu. [Aperture] [Shutter] [ISO] [White Balance] [Mic Level] [Exposure Lock] y [AE Shift] [Zebra] [Peaking] [Powered IS] [Aperture] [Shutter] [ISO] [White Balance] [Exposure Lock] y [AE Shift] [Zebra] [Peaking] < [Focus] ^ [Magnification] Table of Contents Menus Index
-
 1
1 -
2
-
3
-
4
-
5
-
6
-
7
-
8
-
9
-
10
-
11
-
12
-
13
-
14
-
15
-
16
-
17
-
18
-
19
-
20
-
21
-
22
-
23
-
24
-
25
-
26
-
27
-
28
-
29
-
30
-
31
-
32
-
33
-
34
-
35
-
36
-
37
-
38
-
39
-
40
-
41
-
42
-
43
-
44
-
45
-
46
-
47
-
48
-
49
-
50
-
51
-
52
-
53
-
54
-
55
-
56
-
57
-
58
-
59
-
60
-
61
-
62
-
63
-
64
-
65
-
66
-
67
-
68
-
69
-
70
-
71
-
72
-
73
-
74
-
75
-
76
-
77
-
78
-
79
-
80
-
81
-
82
-
83
-
84
-
85
-
86
-
87
-
88
-
89
-
90
-
91
-
92
-
93
-
94
-
95
-
96
-
97
-
98
-
 99
99 -
 100
100 -
 101
101 -
 102
102 -
 103
103 -
 104
104 -
 105
105 -
 106
106 -
 107
107 -
 108
108 -
 109
109 -
110
-
111
-
112
-
113
-
114
-
115
-
116
-
117
-
118
-
119
-
120
-
121
-
122
-
123
-
124
-
125
-
126
-
127
-
128
-
129
-
130
-
131
-
132
-
133
-
134
-
135
-
136
-
137
-
138
-
139
-
140
-
141
-
142
-
143
-
144
-
145
-
146
-
147
-
148
-
149
-
150
-
151
-
152
-
153
-
154
-
155
-
156
-
157
-
158
-
159
-
160
-
161
-
162
-
163
-
164
-
165
-
166
-
167
-
168
-
169
-
170
-
171
-
172
 |
 |
