Canon i70 i70 Easy Setup Instructions - Page 2
Install the Printer Driver Windows, Install the Printer Driver Macintosh, Align the Print Head - troubleshooting
 |
View all Canon i70 manuals
Add to My Manuals
Save this manual to your list of manuals |
Page 2 highlights
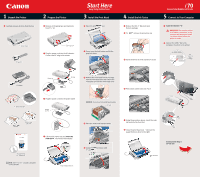
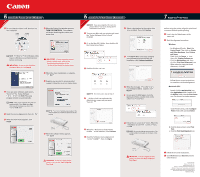
Windows 6 Install the Printer Driver (Windows®) 1 Be sure that the printer is off, then turn on your computer. POWER Button POWER Lamp off 5 When the Printer Port window appears, TURN THE PRINTER ON. The software will begin identifying the printer port being used. 6 Install the Printer Driver (Macintosh®) Macintosh NOTE: If you are using Mac OS 8.6 to 9.x, please refer to your Quick Start guide for installation instructions. 1 Turn on your Mac and your printer and insert the "Setup Software & User's Guide" CD-ROM. 7 Select a destination for the printer driver to be installed. Then click Continue. 2 Open the Mac OS X folder, then double-click the Printer Driver folder. NOTE: For Windows® XP or Windows 2000, before continuing. IMPORTANT: If you see the Add New Hardware Wizard, click Cancel. IMPORTANT: If your computer cannot detect a printer port, refer to the Troubleshooting chapter in the i70 Quick Start Guide for instructions. 6 When the driver installation is complete, click Finish. 7 Register your product to ensure product support. Follow the on-screen instructions. 2 Close any open software applications, then insert the "Setup Software & User's Guide" CD-ROM. The setup NOTE: If the setup program does not run Start, then Run, then type D:/msetup.exe, where D is your CD-ROM drive. 3 Read the License Agreement, then click Yes. 4 When the main menu appears, click Install. NOTE: Be sure to register your product. The printer. Serial # Location 8 When the software menu appears, click Install. 3 Double-click the i70 icon. NOTE: For v10.2 users, skip to Step 5. 4 Cli then click OK. 5 When the "Welcome to the BJ printer installer" screen appears, click Continue. 6 Read the Software License Agreement and click Continue, then click Agree. 8 Click Install. When a message asking for your confirmation to proceed with the installation, click Continue Installation. 9 When the message "The software was " appears, click Restart. 10 Access your CD-ROM again. From the Application folder, double-click on the software to be installed. 11 Follow the on-screen instructions. When the "Installation is Complete" screen appears, click OK. NOTE: Be sure to register your product. The printer. 7 Align the Print Head Before using the printer, align the print head to ensure the best quality printing. 1 Load a stack of blank paper in the paper rest. 2 Start the alignment procedure. Windows: a. For Windows XP select Start, then Control Panel. Then click on Printers and Other Hardware, then Printers and Faxes. b. Right-click the Canon i70 icon, then click . c. Click the Maintenance tab, then click the Print Head Alignment icon. d alignment, click OK. e. Follow the on-screen instructions to complete print head alignment. Macintosh OS X: a. Double-click the Macintosh HD icon, then folder. Double-click the Utilities folder, then the Print Center icon. The Printer List window appears. Under Printers menu, select Configure Printer. Select i70, and click Select. b. Click the down-arrow to select Test Print. c. Click the Print Head Alignment icon. IMPORTANT: To ensure highest quality output, continue with Step 7 Align the Print Head. Serial # Location IMPORTANT: To ensure highest quality output, continue with Step 7 Align the Print Head. 3 Follow the on-screen instructions. 4 Click OK (Windows) or Send (Macintosh) when finished. 40-42380-0902 Part no. QA7-2532-V01 ©2002 Canon U.S.A., Inc. Canon is a registered trademark of Canon Inc. All other products and brand names are registered trademarks or trademarks of their respective owners. Specifications subject to change without notice. PRINTED IN VIETNAM
-
 1
1 -
 2
2
 |
 |