Canon i70 i70 Bubble Jet Direct Reference Sheet - Page 2
Selecting Images and Number of Copies, Selecting Paper and Options, Printing, Disconnecting Your
 |
View all Canon i70 manuals
Add to My Manuals
Save this manual to your list of manuals |
Page 2 highlights
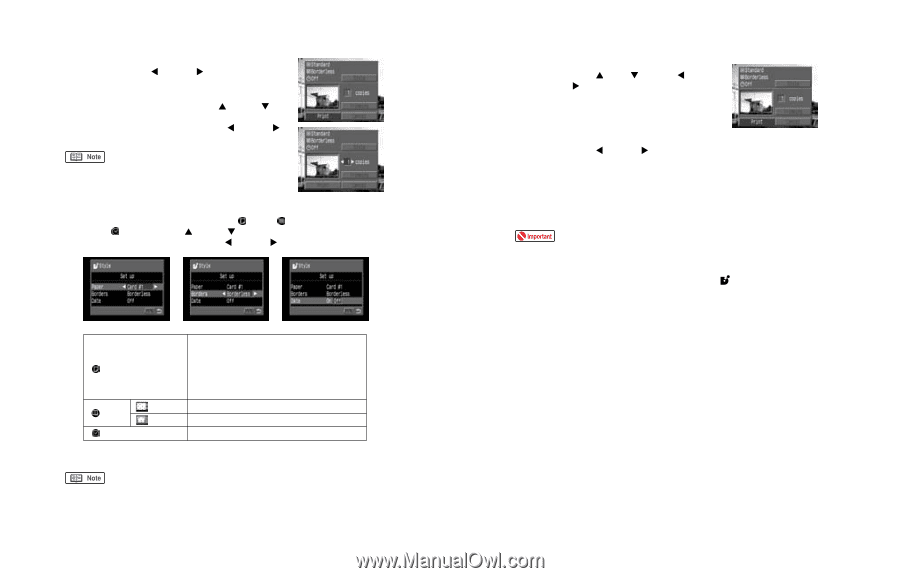
2. Selecting Images and Number of Copies 1. In Replay Mode select the image to print by using the (left) or (right) arrow on the camera. Press SET. 2. From the Print Setting menu, select the [Copies] option using the (up) or (down) arrow on the camera. Select the number of copies using the (left) or (right) arrows. To crop your photos, use the Trimming or Printing area feature displayed in the Replay mode. 3. Selecting Paper and Options 1. From the [Style] menu choose Paper, Borders and Date using the (up) or (down) arrows on the camera. Set the selection using the (left) or (right) arrows. Paper Borders Date Borderless Bordered Select the paper size from the following: • Card # 1 - Photo Paper Pro 4" x 6" • Card # 2 - Photo Paper Plus Glossy 4" x 6" • Card # 3 - Photo Paper Plus Glossy 5" x 7" • LTR - Photo Paper Pro 8.5" x 11" or Photo Paper Plus Glossy 8.5" x 11" • A4 - Photo Paper Pro (European size) or Photo Paper Plus Glossy (European size) Prints right to the edge of the paper Prints with a border Prints the photo's creation date 2. When finished, press the MENU button. With borderless printing, your image will be automatically sized to fit the selected paper size. Slight image cropping may occur. 4. Printing Basic printing 1. Use the (up), (down), (left) or (right) arrows to select [Print]. 2. Press the SET button to start printing. Canceling printing 1. Press the SET button to stop printing. A confirmation message will display. 2. Use the (left) or (right) arrows to select [OK] and press the SET button. 3. The printer will stop printing and eject the paper. 5. Disconnecting Your Camera 1. Disconnect the camera from the printer. When disconnecting the cable from the camera, hold the plug (closest to the camera) and pull. Never pull on the cable. Some digital cameras require that you [Push] a button on the connector to remove the cable. 2. When the camera is disconnected the logo will disappear from the LCD monitor and the camera will revert to the standard replay mode. 3. TURN THE CAMERA OFF. What is Digital Print Order Format (DPOF™)? Digital Print Order Format allows users to mark images on DPOF compatible digital cameras with special instructions. Using DPOF settings, you can: • Print one image per page of all or selected images • Print an index sheet (thumbnail images) of selected images • Add file number and (or) date information to selected images • Print only selected images on a CompactFlash™ card or print all images on a CompactFlash card
-
 1
1 -
 2
2
 |
 |