Canon i860 Series i860 Quick Start Guide - Page 6
Installing the Print Head
 |
View all Canon i860 Series manuals
Add to My Manuals
Save this manual to your list of manuals |
Page 6 highlights
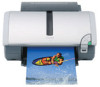
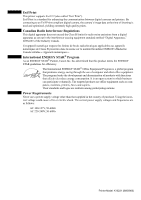
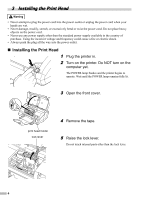
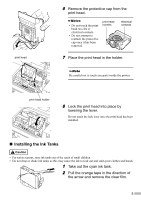
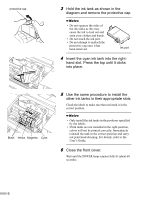
3 Installing the Print Head • Never attempt to plug the power cord into the power outlet or unplug the power cord when your hands are wet. • Never damage, modify, stretch, or excessively bend or twist the power cord. Do not place heavy objects on the power cord. • Never use any power supply other than the standard power supply available in the country of purchase. Using the incorrect voltage and frequency could cause a fire or electric shock. • Always push the plug all the way into the power outlet. „ Installing the Print Head 1 Plug the printer in. 2 Turn on the printer. Do NOT turn on the computer yet. The POWER lamp flashes and the printer begins to operate. Wait until the POWER lamp remains fully lit. 3 Open the front cover. print head holder lock lever 4 Remove the tape. 5 Raise the lock lever. Do not touch internal parts other than the lock lever. 4
-
 1
1 -
 2
2 -
 3
3 -
 4
4 -
 5
5 -
 6
6 -
 7
7 -
 8
8 -
 9
9 -
 10
10 -
 11
11 -
 12
12 -
13
-
14
-
15
-
16
-
17
-
18
-
19
-
20
-
21
-
22
-
23
-
24
-
25
-
26
-
27
-
28
 |
 |