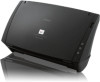
Canon imageFORMULA DR-2010M Workgroup Scanner Reference Guide - Page 3
Setup Guide, Checking the Accessories, Installing the Feed Roller - slide scanner
 |
View all Canon imageFORMULA DR-2010M Workgroup Scanner manuals
Add to My Manuals
Save this manual to your list of manuals |
Page 3 highlights
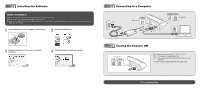
Setup Guide Please read first. Although this manual uses the DR-2510M in the descriptions, DR-2010M operations are identical. If you are using the DR-2010M, please read "DR-2010M" in place of "DR-2510M." Checking the Accessories If any of the items listed below are missing or damaged, contact your local authorized Canon dealer or service representative. • Items included in this manual are subject to change without notice. • You must keep the machine's packaging and packing materials for storing or transporting the machine. DR-2010M/DR-2510M Feed Roller USB Cable Type A/Type B (Length: 1.8 m) AC Adapter/Power Cord (Connected length: 2.6 m) Reference Guide (this document) Registration Card (U.S.A and Canada only) Warranty Card (U.S.A and Canada only) Setup Disc Third-Party Software The following software is included on the supplied Setup disc. ● Presto! BizCard Business card management software from NewSoft Technology Corp. Run the following installer from the Setup disc to install. ➜ BizCard/BCRInstaller ● Presto! PageManager Photo and document management software from NewSoft Technology Corp. Run the following installer from the Setup disc to install. ➜ PageManager/PM8Installer * Presto! BizCard is a registered trademark of NewSoft Technology Corp. Remove the scanner from the box, and remove the orange tape and protective sheets (▼) from the scanner. Installing the Feed Roller 1 Slide the document guides to the left and right, and open the roller cover. Document guides 2 Lift the roller fixing lever a, and slide it to the left b. Roller fixing lever Roller cover 3 Insert the feeding roller and align the notch on the roller with the shaft on the unit. 4 Slide the roller fixing lever to the right and insert it into the hole on the left of the feeding roller a. Lower the roller fixing lever to secure the shaft of the feeding roller b. 5 Close the roller cover. It is properly closed when you hear a click. 6 Gently press on the sides of the front unit to close it. It is properly closed when you hear a click. ☞ Continued on back side
-
 1
1 -
 2
2 -
 3
3 -
 4
4 -
 5
5 -
 6
6 -
 7
7 -
 8
8 -
 9
9 -
10
-
11
-
12
-
13
-
14
-
15
-
16
-
17
-
18
-
19
-
20
-
21
-
22
-
23
-
24
-
25
-
26
-
27
-
28
-
29
-
30
-
31
-
32
-
33
-
34
-
35
-
36
 |
 |
